Table
Symbol ![]()
A Table element or an SQL element is required for a transfer.
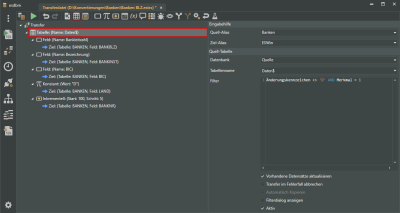
The table here is once again only one main node that contains several functionalities. Generally, several points are collected together in it, the values of which are taken from the source and then transferred to the target with the particular functionality. Several source tables can be addressed as well as the same source table several times.
A Table node is created using the ![]() icon button.
icon button.
'Input help' area
Source alias
This is the database alias for the data source specified in the main node (transfer).
Changes made here will be reflected in the Transfer main node.
Target alias
The database alias in the main node (Transfer) for the target is shown here.
Changes made here will be reflected in the Transfer main node.
'Source table' area
Database
This selection allows you to specify if the source database refers to the Source or the Target.
Depending on this selection, the Table name field will display the tables for the Source alias or the Target alias for selection.
Table name
Select a table as the source table here. The data from this table will be transferred to the target.
The tables available for selection will depend on whether Source or Target was selected in the Database field.
If you type in the table name instead of selecting it from the list, make sure you enter the characters with the correct case (upper or lower case).
Subquery
The source data can be filtered with this attribute. The syntax within the filter is SQL.
Use of ANSI SQL is recommended so that as many database types as possible are supported.
The SQL syntax for the condition starts from WHERE
ClientNo=10001 AND CLStatus=1
Update existing data sets
If this option is activated a check is made to determine if an identical data set already exists when the transfer is executed. If a corresponding data set is found, adjustment to the targeted properties takes place.
Activate this option to cancel further transfer if an error occurs during execution of the transfer.
If the option is not acivated, a transfer will be completed despite the errors. The errors will be recorded in the log.
Copy automatically
When this option is activated the table to be transferred will be copied exacltly (1:1) without all the fields being defined manually.
If filters have been set, they will be applied to the AutoCopy function.
Show filter dialog
When this option is activated, a filter dialog is displayed when you execute the transfer script, where you can define filter options before the actual copying takes place.
Active
This option can be used in conjunction with the Check for active fields before transfer option, which is set directly in the main branch of the transfer description.
In contrast with the other options, the Active option can have three states:
 Marked
The table will be transferred
 Not marked
The table will not be transferred
 Partly marked
Before a transfer, you will be asked if the table is to be transferred.
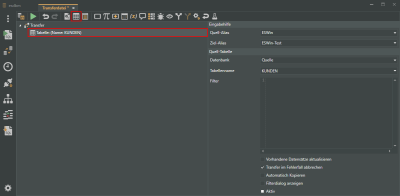
In the following example, a table is inserted into a transfer file.
Click on the Table icon ![]() .
.
A new entry named Table will be visible below the Transfer entry, and the Source table area is displayed on the right.
A search in the tables is started by means of the alias entry fields (Source / Target alias), which marks the nearest matches to make selection quicker and easier. The name is entered when you press the Enter key following a successful search.
You can now select under Database whether a table from the source or the target database is to be selected.
Under Table name, select a table from the database.
You can now make the individual assignments for the data transfer. The transfer file is displayed on the left of the window.


