Schedule
A transfer can be automated with the aid of a schedule.
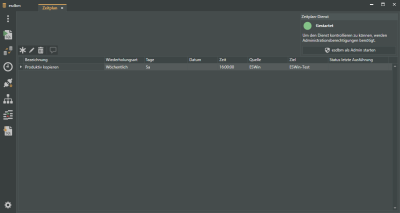
The schedule is opened in the esdbm program window using the ![]() Schedule icon.
Schedule icon.
The associated scheduling service is installed during installation of esdbm.
Scheduling service control
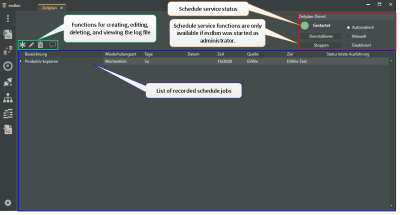
The buttons for controlling the service are at the top right of the tab. Installation of the service as well as starting / stopping and specifying the start type is done here.
The particular status of the service can be seen from the colored icons above the buttons.
The functions for controlling the schedule service are only available if esdbm was started as administrator. A corresponding message is displayed otherwise.
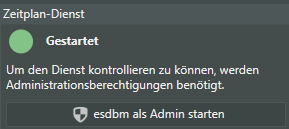
The program is closed and restarted with administrative rights following a message by clicking on the ![]() Start esdbm as admin button.
Start esdbm as admin button.
Alternatively, you can start esdbm as admin by right clicking on the esdbm program shortcut and selecting the Run as administrator command in the context menu.
Status
The status of the scheduling service is indicated by a colored circle icon.
![]() Started
Started
The scheduling service has started successfully. The set transfer jobs will be executed at the specified time.
To end the service, click on the Stop button.
![]() Will end.
Will end.
The service will stop if you click on the Stop button. This status is indicated until the service finally ends.
![]() Stopped
Stopped
The scheduling service has stopped (ended). The set transfer jobs will not be executed at the specified time.
You can restart a stopped scheduling service by clicking the Start button.
![]() Unknown
Unknown
This status is shown if the scheduling service has been uninstalled, for example. The set transfer jobs will not be executed at the specified time.
Uninstall
You can end and uninstall an installed scheduling service by clicking on the Uninstall button.
If the scheduling service has been uninstalled, the set transfer jobs will not be executed at the specified time.
Install
You can reinstall an uninstalled scheduling service by clicking on the Install button.
Following installation, the service status is ![]() Stopped. It must be restarted using the Start button.
Stopped. It must be restarted using the Start button.
Start type
The start type determines how the scheduling service is started.
Automatic
The service is started when the PC / server is started.
Use of the Automatic start type is recommended for running the scheduling service.
This ensures that the service is also run following a restart and that the transfer jobs are started.
Manual
The service does not start when the operating system is started. The service must be started by clicking on the Start button.
Deactivated
The service is unavailable and cannot be started manually with this start type.
Schedule functions
Functions for planning schedule jobs are found above the schedule list.
![]() Create job
Create job
This button creates a new schedule job.
You must start esdbm with administrator authorizations to create new schedule jobs.
You can start esdbm as admin by right clicking on the esdbm program shortcut and selecting the Run as administrator command in the context menu.
![]() Edit job
Edit job
You can edit / alter the job selected in the schedule list here.
Also see Add job
You must start esdbm with administrator authorizations to edit a schedule job.
You can start esdbm as admin by right clicking on the esdbm program shortcut and selecting the Run as administrator command in the context menu.
The scheduling service reacts to any changes made immediately. You do not have to restart the service.
![]() Delete job
Delete job
You can delete the job selected in the schedule list with this function. A security message is displayed before the job is actually deleted.
You must start esdbm with administrator authorizations to delete a schedule job.
You can start esdbm as admin by right clicking on the esdbm program shortcut and selecting the Run as administrator command in the context menu.
![]() Show log
Show log
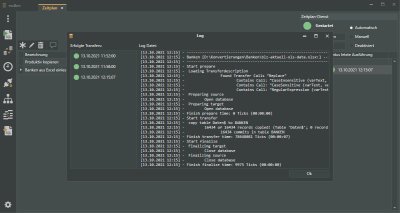
If a job has been run at least once using the scheduling service, you can open the log window for the transfer using the ![]() button.
button.
You can also open the corresponding log file by double clicking on an entry in the transfer list.
The status of the job run is indicated by a colored circle icon.
A green icon in front of the time when the job was run indicates that the job was completed successfully.![]()
If a red icon ![]() is shown in front of the time, an error occurred when the job was run.
is shown in front of the time, an error occurred when the job was run.
If you double click on a run entry in the left column of the log file (Completed transfers) the log file is displayed with the pointer set to the start time of the selected run.
 Add job
You can use the Add button to add a planned transfer to the list.
You must start esdbm with administrator authorizations to create new schedule jobs.
You can start esdbm as admin by right clicking on the esdbm program shortcut and selecting the Run as administrator command in the context menu.
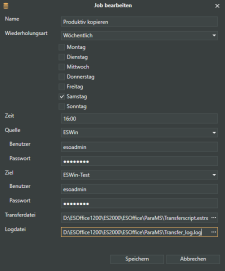
The Edit job window opens for you to define a new schedule.
Variable
Enter a unique name for the schedule / job.
Repeat type
Here you can define the interval between repeated transfers.
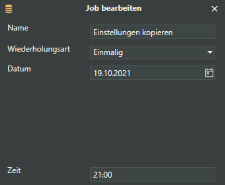
Once
The transfer file is run only once at the time specified in the Date and Time fields.
It will not be repeated.
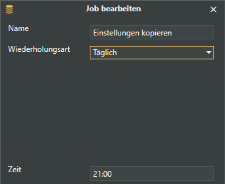
Daily
The transfer file is run every day at the time specified in the Time field.
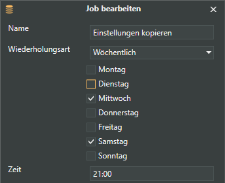
Weekly
For the repeat type Weekly, you can specify the days of the week from Monday to Sunday on which the transfer file is run at the time specified in the Time field.
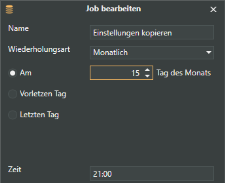
Monthly
For the repeat type Monthly, you can use On to specify the day of the month on which the transfer file is run at the time specified in the Time field. The run will be started on this day every month.
You can also select Penultimate day or Last day to run the transfer file on the penultimate day or the last day of the month, respectively.
Date
You can specify the date for the run for the Repeat type Once.
Time
You can define the time when the transfer is to be run in this field.
Source
Select the database alias for the data source here.
The databases shown are read out from the dbxconnections.ini file in the esoffice para directory.
You can view / edit the database connections under Connection settings.
User / Password
The database user and password are entered from the configuration when the database alias is selected.
If the database data has not been recorded they can be entered manually here.
Some data sources such as Excel tables do not require login data.
Destination
Select the database alias for the target for the data transfer.
The databases shown are read out from the dbxconnections.ini file in the esoffice para directory.
You can view / edit the database connections under Connection settings.
User / Password
The database user and password are entered from the configuration when the database alias is selected.
If the database data has not been recorded they can be entered manually here.
Transfer file
Select the transfer file (*.estrx) using the ![]() Selection field that contains the desired transfer description.
Selection field that contains the desired transfer description.
Transfer files can be created using the Transfer module.
Log file
Specify a path and a file name for a log file using the ![]() Selection field.
Selection field.
Success and error messages will be recorded in the log file during the automatic transfer.
A log file should always be created for automatic transfers, so that information about the possible cause of an error is available if an error occurs.
Save schedule job
The schedule job can be set by clicking on the Save button after all the relevant information has been entered.
The job thus set will then be shown in the list. If this is a new schedule, the Last run status field will be empty because the transfer has not been run yet.
Otherwise, you can see from the colored circle icons in the Last run status field if a transfer run was successful ![]() or unsuccessful
or unsuccessful ![]() .
.
The earlier specified log file is available for closer analysis. This can be opened for each entry in the list using the ![]() View log button if a separate log file has been recorded for each schedule job.
View log button if a separate log file has been recorded for each schedule job.
You can also open the corresponding log file by double clicking on an entry in the transfer list.
