Connection settings
You can display all the recorded database aliases with their database paths and parameter values using the ![]() Connection settings module.
Connection settings module.
Changes to the connection settings may result in esoffice being unable to access the SQL databases.
es2000 does not make any recommendation regarding the suitability of the following information. Errors and exceptions are excluded and no responsibility is accepted for the information provided. The statements are simply descriptions and do not guarantee the consistency of the products. The information may also in part be regarded as an attempt to provide you with assistance for a task even if the product was not actually intended for this special purpose.
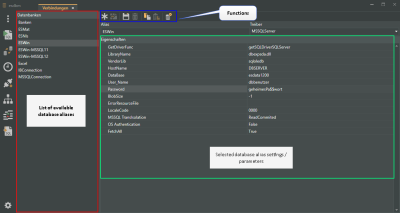
To display the database connections, click on ![]() Connection settings in the esdbm program window. A new tab, Connections, opens showing all the recorded database aliases and their settings.
Connection settings in the esdbm program window. A new tab, Connections, opens showing all the recorded database aliases and their settings.
'Databases' area
The available database connections (aliases) are shown in the Databases area.
The databases shown are read out from the dbxconnections.ini file in the esoffice para directory.
The properties and parameters of a database connection are displayed in the Properties area when you select an alias in the list.
Alias
You can edit the alias name in this field.
Driver
Select a database driver for the database alias. When you select a driver, the corresponding parameters are entered in the Properties area.
The database drivers shown are read out from the dbxdrivers.ini file in the esoffice para directory.
'Properties' area
The settings and parameters available in the Properties area depend on the selected database driver. The parameters are read out from the dbxdrivers.ini file in the esoffice para directory when you select the driver.
You can make changes in this area, for example if the database server (HostName) changes.
Changes to the database settings may result in esoffice being unable to access the SQL database.
For this reason, changes should only be made by an experienced user / database administrator.
Functions
The following functions are available in the connection settings.
 New connection
Creates a database connection.
Creating a database connection / alias
-
Click on the
 New connection button.
 -
Assign a database alias and select a database driver.
-
Complete the missing parameters in the Settings area.
-
Save the changes in the new connection by clicking on the
 button.
 Duplicate connection
Creates a copy of the alias selected in the Databases area. The suffix -Copy is added to the name of the alias copy.
ESWin -> ESWin-Copy
Database connections / aliases with unsaved changes cannot be duplicated. The button will be deactivated (grayed out) if this is the case.
 Save connection
You can save the changes made to a database connection / alias by clicking on this button.
This button is only active if there are unsaved changes present.
 Delete connection
Deletes the database connection alias. A security prompt is displayed before actual deletion.
Database connections / aliases with unsaved changes cannot be deleted. The button will be deactivated (grayed out) if this is the case.
 Copy connection
Copies the alias parameters in the Properties area to the clip board.
The values from the clip board can be used in a different alias by using the ![]() Paste connection button.
Paste connection button.
 Paste connection
Inserts the values placed on the clip board by the ![]() Copy connection function into the Properties area of the active alias.
Copy connection function into the Properties area of the active alias.
 Test connection
If you have made changes to the database connection, you can test the connection to the particular data source / database using the ![]() button or the F9 key.
button or the F9 key.
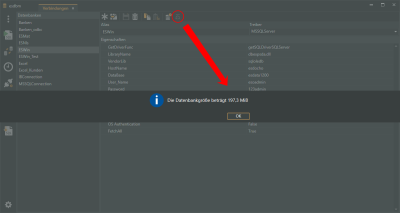
 Determine database size
You can use this button to determine the size of the database for the database alias selected in the list.
The database size is determined using the functions of the particular database and is displayed in the program window.
The ![]() Determine database size function is only available for MSSQL and Firebird databases.
Determine database size function is only available for MSSQL and Firebird databases.
Microsoft SQL Server
The user entered in the connection settings (for example: esoadmin) requires Display database status (View server state permission) authorization for MSSQL databases.
Information for database administrators
This authorization can be assigned to the database user either generally or for individual databases by means of the Microsoft SQL Server Management Studio (SSMS).
user
Security -> Logins -> [Database user] -> Properties -> Securable elements -> Authorization Display server status -> Authorize
Database
Databases -> [Database] -> Properties -> Authorizations -> Authorization Display database status for the database user -> Authorize
Access to an ODBC data source
It is possible to make a data connection to an existing ODBC driver (DSN) with esdbm.
ODBC drivers are available for many database systems, such as Firebird, MSSQL, MySQL, Oracle, MS Access, and Excel.
To ensure correct communication between the 64bit application esdbm and the ODBC driver, this must be set up as a 64bit data source.
The ODBC data source administrator (64bit) can be started by running %windir%\system32\odbcad32.exe.
To set up the ODBC driver itself, please consult the instructions or support provided by the manufacturer.
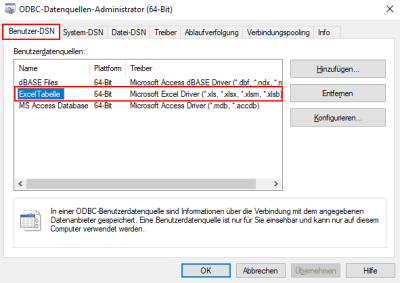
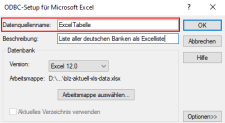
Access by means of esdbm to a User DSN already set up in the Windows ODBC data sources is described below.
Configure access to ODBC connection
-
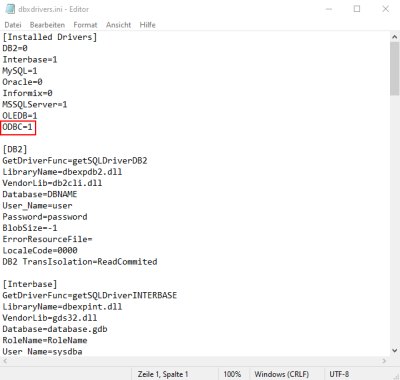
Open the dbxdrivers.ini file in the esoffice Para directory using an editor app (for example: Notepad).
-
Check that the entry ODBC=1 is present in the [Installed drivers] area.
-
If the entry is not present, add it as shown above and save the changes in the file.
-
Open esdbm and open the
 Connection settings module.
 -
Create a new connection using the
 button.
 -
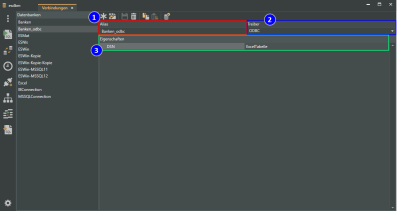
Enter a name for the connection in the Alias field (1).
-
Select the entry ODBC under Drivers (2).
-
In the Properties area, enter the Name for the User DSN defined in the ODBC driver as a Value under DSN (3).
-
Save the connection by clicking on the
 button.
 -
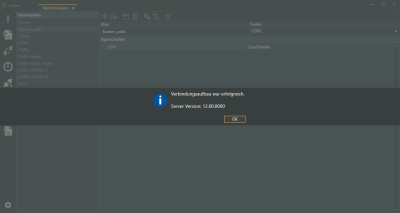
Test the connection to the ODBC data source by clicking on the
 Test connection button.
A corresponding message is displayed when the connection has been made successfully.
The database connection to the ODBC driver is now active and can be used for data access and transfers as well as other operations in connection with esdbm.
Set up OLEDB connection
-
The 64bit version of the Microsoft Access Database Engine is required for the OLEDB connection.
If the Access Database Engine is not yet installed, you can download the installation routine using the link https://www.microsoft.com/de-de/download/details.aspx?id=13255 and then install it.
Please use the 64bit installation routine (AccessDatabaseEngine_X64.exe).
Administration authorizations may be required for the installation.
Parallel installation with the 32bit version of the Access Database Engine is not possible.
-
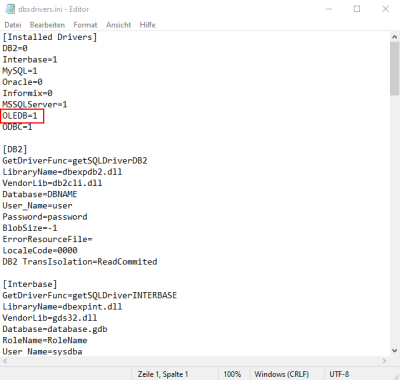
Open the dbxdrivers.ini file in the esoffice Para directory using an editor app (for example: Notepad).
-
Check that the entry ODBC=1 is present in the [Installed drivers] area.
-
If the entry is not present, add it as shown above and save the changes in the file.
-
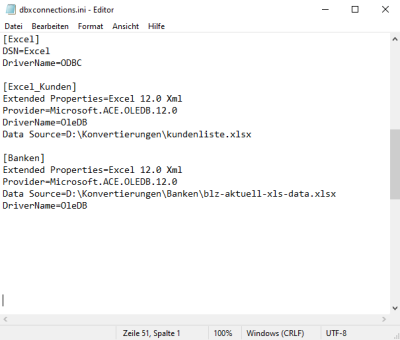
Open the dbxconnections.ini file in the esoffice Para directory using an editor app (for example: Notepad).
Add a new alias by copying the following text into the fileCopyOLEDB alias example
[Excel_Kunden]
Extended Properties=Excel 12.0 Xml
Provider=Microsoft.ACE.OLEDB.12.0
DriverName=OleDB
Data Source=D:\Konvertierungen\kundenliste.xlsx
Enter the path and the file name of the Excel table in the line with the entry Data Source=.
-
Save your changes in the dbxconnections.ini file.
-
Open esdbm and open the
 Connection settings module.
 -
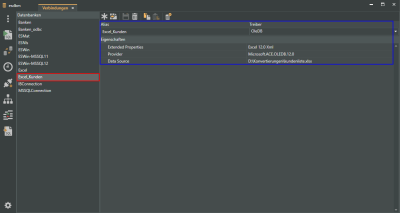
Select the newly created alias in the Databases area.
-
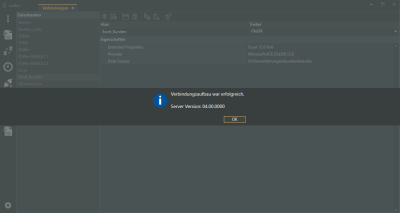
Test the connection to the ODBC data source by clicking on the
 Test connection button.
 -
A corresponding message is displayed when the connection has been made successfully.
The OLEDB database connection is now active and can be used for data access and transfers as well as other operations in connection with esdbm.
You can create a copy of the newly created alias for accessing further Excel tables by means of the
 Duplicate connection function.
