Microsoft SQL Server test environment
es2000 does not make any recommendation regarding the suitability of the following information. Errors and exceptions are excluded and no responsibility is accepted for the information provided. The statements are simply descriptions and do not guarantee the consistency of the products. The information may also in part be regarded as an attempt to provide you with assistance for a task even if the product was not actually intended for this special purpose.
The following describes the creation of an esoffice test environment when using an MSSQL database.
Tools required:
-
Microsoft SQL Server Management Studio.
Copying the esoffice MSSQL database
Copying an MS SQL database with Microsoft SQL Server Management Studio for a test environment, for example. This backs up the database once and restores it under a different name.
Microsoft SQL Server Management Studio is part of an SQL server installation.
Save database (backup)
MS SQL database backup
-
Open Microsoft SQL Server Management Studio.
-
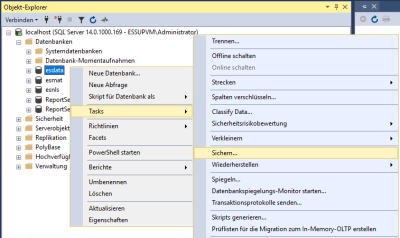
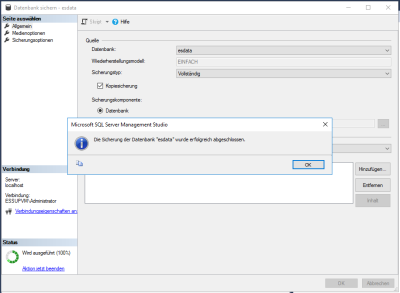
Right click on the database to be backed up and select Tasks > Backup....
-
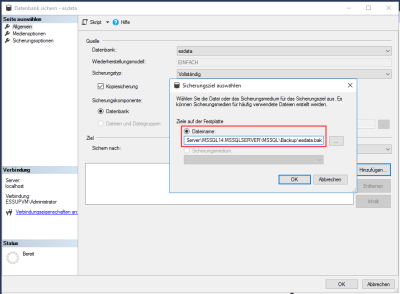
In the Backup database dialog that follows, use the Add button to select a directory and target file where you want to save the backup copy under Target (below), for example C:\temp\esdata.bak.
-
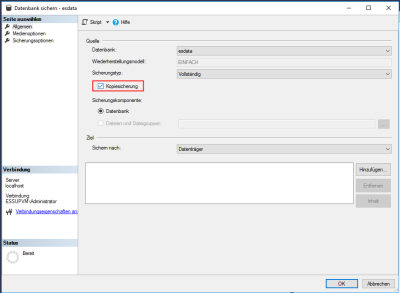
Activate the Backup copy option.
-
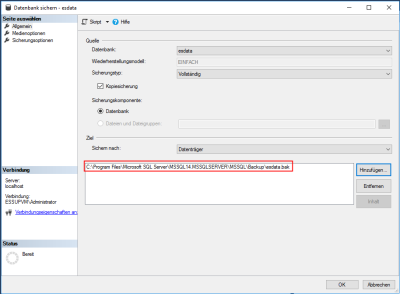
Make sure that only one target file is in the list. There may already be some entries in the Target area. You should delete these entries and replace them with your own (new) entry with the backup.
-
To execute the backup, click on the OK button.
Database restoration (Restore)
Restore MS SQL database
-
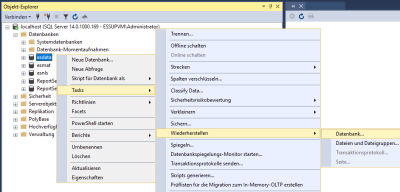
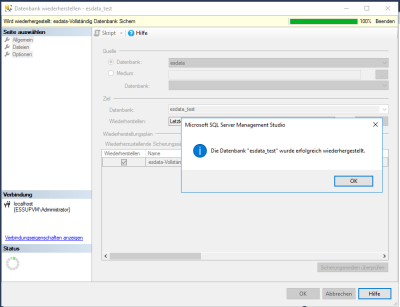
After the backup has completed successfully, right click again on the database and select Tasks > Restore > Database...
-
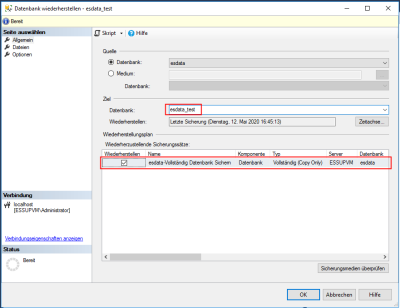
In the dialog that follows, the last backup is already entered in the Source area.
-
Enter the new database name in the Database field in the Target for restore area, for example: esdata_test.
-
Don't forget to set the Restore option in the list of backup sets (below).
-
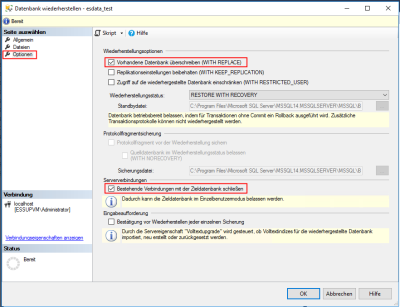
Switch to the Options page. You need to activate the Overwrite existing database option (WITH REPLACE) in the Restore options area here. You must also activate the Close existing connections with target database option in the Server connections area.
-
The new database is created when you click OK to confirm.
Create alias for database copy
To enable access to the copied database, you must create a database alias.
Create database alias (duplicate)
-
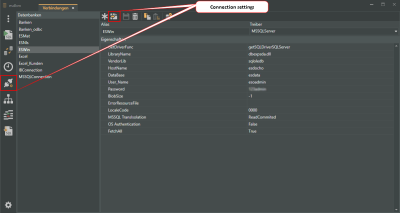
Open the esdbm menu and select the
 Connection settings command.
 -
In the Databases list, mark the alias for the esoffice productive database (usually ESWin). Then click on the
 Duplicate link icon in the toolbar.
 -
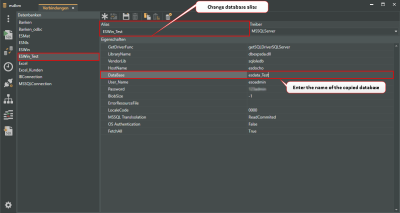
A copy of the database alias will be created. Change the Alias name to ESWin_Test, for example.
-
Now enter the name of the copied database under DataBase and then click on the
 Save button in the toolbar.
 -
You can test that the link to the database works by clicking the
 Test link button or by pressing the F9 key.
SQL script execution
The next step requires execution of an SQL script on the database copy to remove the links to the productive system.
-
Download the file and unpack the file.Testumgebung.zip The ZIP file contains the SQL script Testumgebung_Demo_esoffice_datenbank_werte_löschen.sql. You can also copy the script below onto the clipboard, paste it into an editor (Notepad, for example) and save it as an SQL file.
You can adjust the script to your requirements if you have the necessary knowledge of SQL.
CopySQL script Testumgebung_Demo_esoffice_datenbank_werte_löschen.sql/* ########## Dokumentenpfade ########## */Wurzelpfad entfernen (Vermeidung von Zugriff auf produktives DMS)
UPDATE EinGlob SET EinGlobValue=“ WHERE EinGlobID=10;
Diverse Pfade entfernen (Vermeidung von Zugriff auf produktives DMS)
UPDATE DokuPfad SET Pfad=“;
/* ########## Einstellungen allgemein ########## */
Clientadministration deaktivieren (Suche nach Serverdiensten verhindern)
UPDATE EinAllg SET EinAllgValue='0' WHERE EinAllgID=10706;
EMail über Server deaktivieren (Suche nach Serverdiensten verhindern)
UPDATE EinAllg SET EinAllgValue='0' WHERE EinAllgID=363;
EMail Import für die Mailgruppen deaktivieren
DELETE FROM MailGrp;
/* ########## Exchange Einstellungen ########## */
Exchange Abgleich deaktivieren
UPDATE SetServer SET SetValue='0' WHERE SetID=10607;
Exchange URL entfernen
UPDATE SetServer SET SetValue=“ WHERE SetID=10609;
Autodiscvover deaktivieren
UPDATE SetServer SET SetValue=“ WHERE SetID=10610;
/* ########## esServer Einstellungen allgemein ########## */
Verbindung zu den Serverdiensten entfernen
UPDATE SetServer SET SetValue=“ WHERE SetID IN (31,32);
/* ########## Diamant ##########*/
nur notwendig, wenn die Schnittstelle zur Diamant-Fibu vorhanden ist
UPDATE EinAllg SET EinAllgValue = 0 WHERE EinAllgID = 422;
UPDATE EinAllg SET EinAllgValue = 0 WHERE EinAllgID = 423;
UPDATE EinAllg SET EinAllgValue = 0 WHERE EinAllgID = 424;
UPDATE EinAllg SET EinAllgValue = 0 WHERE EinAllgID = 438;
UPDATE EinAllg SET EinAllgValue = 0 WHERE EinAllgID = 444;
UPDATE EinAllg SET EinAllgValue = 0 WHERE EinAllgID = 445;
UPDATE EinAllg SET EinAllgValue = 0 WHERE EinAllgID = 446;
UPDATE EinAllg SET EinAllgValue = „ WHERE EinAllgID = 447;
UPDATE EinAllg SET EinAllgValue = 0 WHERE EinAllgID = 448;
UPDATE EinAllg SET EinAllgValue = „ WHERE EinAllgID = 457;
UPDATE EinAllg SET EinAllgValue = 0 WHERE EinAllgID = 458;
UPDATE EinAllg SET EinAllgValue = 0 WHERE EinAllgID = 459;
UPDATE EinAllg SET EinAllgValue = 0 WHERE EinAllgID = 460;
UPDATE EinAllg SET EinAllgValue = 0 WHERE EinAllgID = 461;
UPDATE EinAllg SET EinAllgValue = 0 WHERE EinAllgID = 598;
UPDATE EinAllg SET EinAllgValue = '01-01-0001 00:00:00' WHERE EinAllgID = 620;
UPDATE EinAllg SET EinAllgValue = 0 WHERE EinAllgID = 9508;
UPDATE EinAllg SET EinAllgValue = 0 WHERE EinAllgID = 9509;
UPDATE EinAllg SET EinAllgValue = 0 WHERE EinAllgID = 9510;
UPDATE EinAllg SET EinAllgValue = 0 WHERE EinAllgID = 9511;
UPDATE EinAllg SET EinAllgValue = 0 WHERE EinAllgID = 9512;
UPDATE EinAllg SET EinAllgValue = 0 WHERE EinAllgID = 9513;
UPDATE EinAllg SET EinAllgValue = „ WHERE EinAllgID = 9519;
UPDATE EinAllg SET EinAllgValue = „ WHERE EinAllgID = 9520;
UPDATE EinAllg SET EinAllgValue = „ WHERE EinAllgID = 9521;
UPDATE EinAllg SET EinAllgValue = 0 WHERE EinAllgID = 9807;
UPDATE EinAllg SET EinAllgValue = 0 WHERE EinAllgID = 9808;
UPDATE EinAllg SET EinAllgValue = 0 WHERE EinAllgID = 9809;
UPDATE EinAllg SET EinAllgValue = 0 WHERE EinAllgID = 10516; -
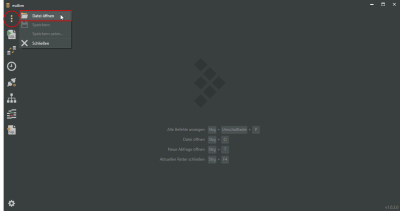
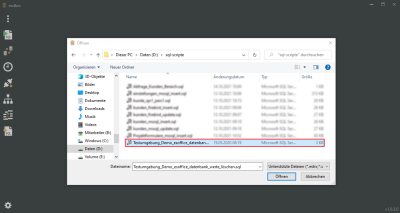
Open esdbm and select
 Open file in the
  Filemenu.
 -
Now select the SQL script file in the file selection window and click on the Open button.
-
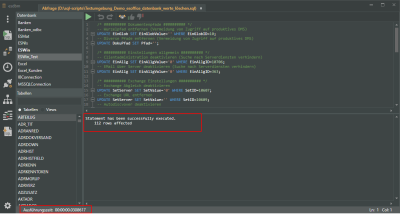
The SQL query module opens in a separate tab and the SQL script loads.
Log in data
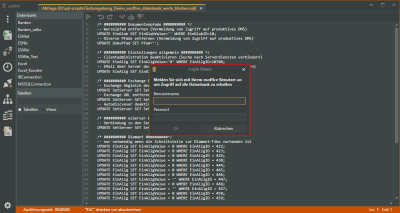
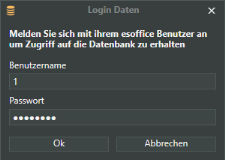
An esoffice user login is required when a module is opened or a function that acesses an esoffice database is executed.
The user requires 110 - Basic settings authorization.
If you have successfully logged in to an esoffice database (alias) in esdbm, your log in data will not be requested again when you access the database alias again.
-
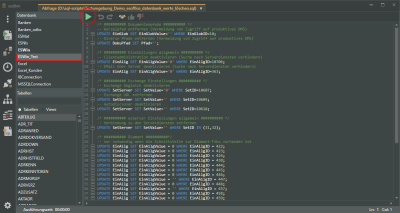
Select the newly created Database alias in the Databases list.
You can make adjustments to the script before it is run. Detailed knowledge of esoffice databases and SQL is required for this.
-
Start execution of the SQL script by clicking the
 Execute query button.
 -
A message and the execution time are displayed when the SQL script has run.
-
You can now close esdbm
Create program shortcut to test environment
esoffice can be started using various parameters, which can be used in a shortcut.
Also see Start parameters
Thus it is also possible to start esoffice with a different database alias using the parameter -a:.
-
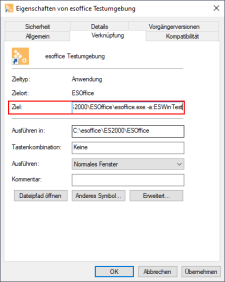
Create a new shortcut to esoffice.exe, for example by copying an existing shortcut.
-
Under Target, add the parameter -a:[name of newly created database alias] to the esoffice callup, for example: -a:ESWinTest.
-
To ensure that the program window for the test environment can be distinguished from the productive esoffice environment, you can use the start parameter -m: to display your own text in the title bar of the program window.
Also see Window line label
Test licence
A test licence file test_licence.cfg can be used alongside the licence file licence.cfg (full licence for productive use) for use in a test environment.
Due to certain restrictions, a test licence is not suitable for use in a productive environment. If the licence files for a full licence and a test licence are present in one para directory, the test licence will have precedence.
You can obtain a test licence from es2000 Sales.
