esExchange
The optional esExchange module integrates into the esBusiness server service and is used to synchronize appointments and tasks between eserp and Microsoft Exchange. Synchronization settings can be made for each user to be synchronized.
Synchronization with several Exchange servers can be set up with the esExchange license.
Please make sure that you take note of the system requirements. You can then work through the following points one by one.
Synchronizing appointments and tasks between Exchange and eserp
Conference appointments
No conference appointments will be changed or deleted in eserp when they are changed or deleted in Exchange.
Requirements
The esExchange module is part of the es Business Server and is used to synchronize appointments and tasks between eserp and Microsoft Exchange. Synchronization settings can be made for each user (employee) to be synchronized. Several Microsoft eExchange servers can be connected if an additional license is purchased.
A configured esBusiness server service is required before the Exchange interface can be put into operation.
Microsoft
- Microsoft Exchange 2016 or later
- EWS (Exchange Web Services) pre installed and executable
We strongly recommend the use of Autodiscover for communication. To see if this is possible without problems, perform a connectivity test for Microsoft web services under https://testconnectivity.microsoft.com/. [Connectivity tests for Microsoft Exchange web services -> Synchronization, Notification, Availability and Automated responses]
-
SSL
 User friendliness connection
A certificate that is not self signed is required.
A certificate issued and checked by a trustworthy certification agency (CA - Certificate Authorities) is required for this purpose.
Also see Business server - 'Client settings' area.
-
If load balancing is used, it is essential that the entire system converges under one URL (not one URL per user / mailbox!)
-
If this is not desirable, an additional module (esMulti-Exchange) can be purchased, which allows connection to several Exchange servers.
-
Consideration of other EWS parameters:
-
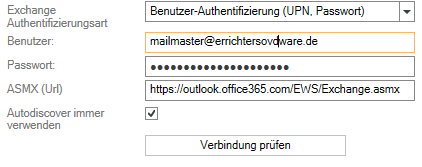
The Exchange user account must be a complete user with mailbox and must be authorized to 'impersonate' the personnel to be synchronized. This role is called Application impersonation.
This should be carefully discussed with your provider, particularly if a cloud based Exchange solution is involved.
eserp
- eserp Version 1.0 or above (additional database script required!)
- esBusiness Server for eserp Version 1.0 or above
- The users that are to be synchronized must have authorizations to create appointments.
No conference appointments will be changed or deleted in eserp when they are changed or deleted in Exchange. Please remember that your MS Exchange server will need to be installed and configured by suitable IT professionals.
We also recommend that one of our technicians is present for the installation and start up of the es Business Server and esExchange modules as soon as the above requirements for the Microsoft Exchange server have been met.
Additional Exchange parameters
To operate the esExchange interface additional settings of the Microsoft Exchange server may be necessary. These can be viewed on the Microsoft Help pages.
To make it easier to find the commands needed, we have summarized them here. These should be configured by your IT specialists by means of the Exchange Management Shell.
The information shown here can be adapted to suit your needs.
exchangeadmin or ESExchangeEWS are possible names.
The parameters given below apply to all supported versions of Microsoft Exchange unless otherwise stated.
Impersonation
The Exchange server active directory user Impersonating allows:
New-ManagementRoleAssignment –Name:EsExchangeEWS –Role:ApplicationImpersonation –User:esexchangeadminAdditional
Query Exchange version:
es2000 does not make any recommendation regarding the suitability of the above information. Errors and exceptions are excluded and no responsibility is accepted for the information provided. The statements are simply descriptions and do not guarantee the consistency of the products. The information may also in part be an attempt to assist you with a task even if the product itself is not specifically designed for this purpose.
eserp
- eserp Version 1.0 or above (additional database script for the eserp database required)
- es Business Server for eserp Version 1.0 or above (for eserp-Server-Installation)
- The users that are to be synchronized must have authorizations to create appointments.
Conference appointments
No conference appointments will be changed or deleted in eserp when they are changed or deleted in Exchange.
Please remember that your MS Exchange server will need to be installed and configured by suitable IT professionals.
We also recommend that one of our technicians is present for the installation and start up of the esBusiness Server and esExchange modules as soon as the above requirements for the Microsoft Exchange server have been met.
Configuration
7.2 Hints
Make sure that there are no other esExchange interfaces in operation within the network (for example, in a test environment).
The corresponding settings are found in the esBusiness server configuration tool (esServerConfig). The es Business server service must therefore be installed and set up for the esExchange server functions.
esExchange configuration is accessed from the Exchange tab. The esExchange interface allows you to synchronize appointments and tasks from Microsoft Exchange and eserp.

'Exchange connections' area
The ![]() button above the list is used to set up a new connection to your Microsoft Exchange server by EWS
button above the list is used to set up a new connection to your Microsoft Exchange server by EWS![]() Exchange Web Services
Exchange Web Services are an important interface for applications for accessing Exchange contents..
Exchange Web Services
Exchange Web Services are an important interface for applications for accessing Exchange contents..
Appointment sync.
Activate this option if synchronization of appointments is also to take place via the Exchange connection.
Exchange EWS information
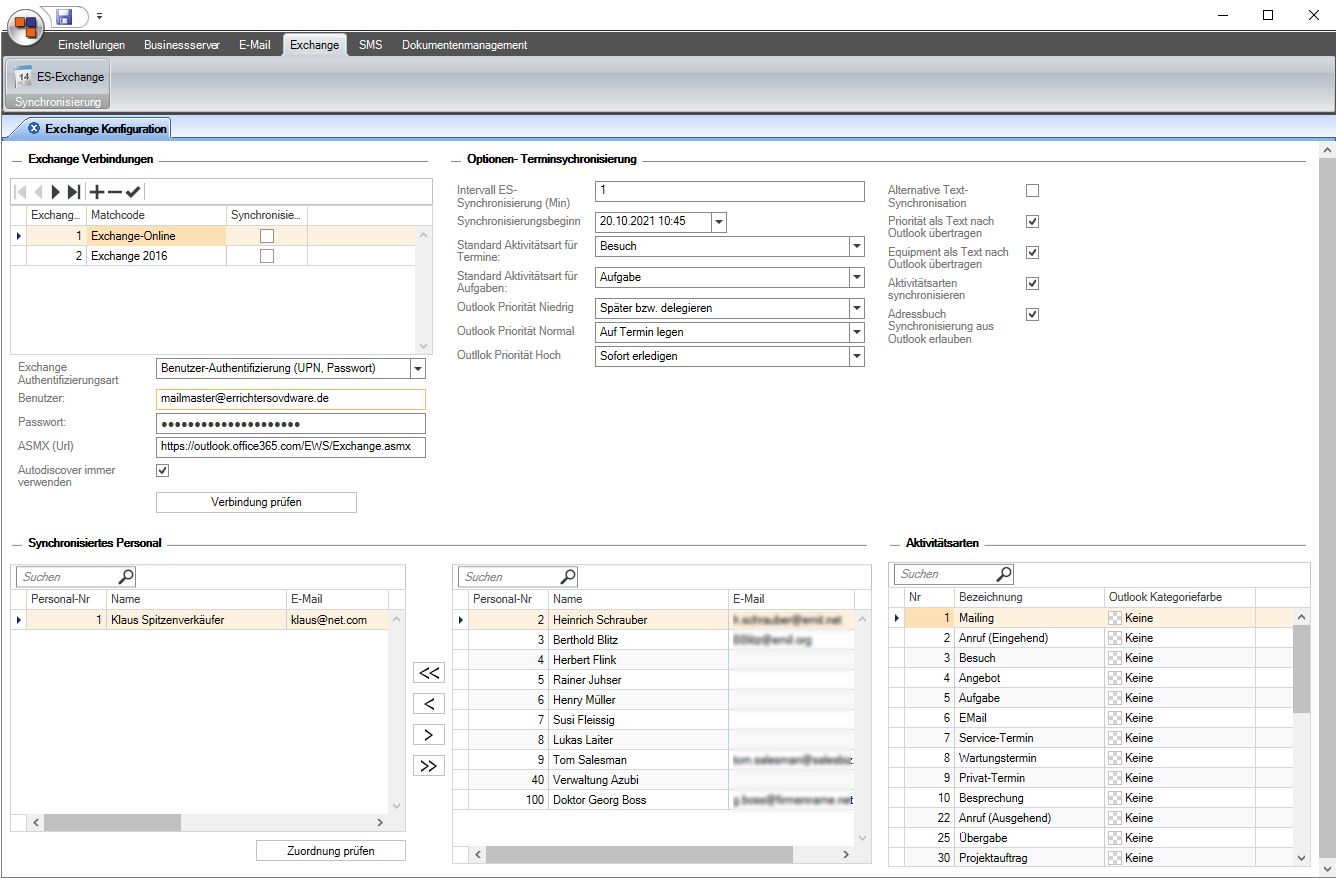
Exchange authentication type
THis selection specifies how esExchange is authenticated to the Exchange server.
Different entries are required depending on the type of authentication chosen.
User authentication (UPN, password)
With this method, a user name and password are used by the Exchange server for authentication.
User (UPN)
Enter the account name (User Principal Name) of your Exchange server here.
Pleas note that this is NOT in the same syntax as a domain user, like Domain\Exchangeadmin but has the same syntax as Exchangeadmin@domain.local
The exact syntax depends on the Exchange version. Contact your Exchange administrator if you have any questions about this.
The specified Exchange user account must be a complete Exchange user with mailbox. Authorization to impersonate the employee to be synchronized is also required.
This is the role called Application impersonation in Exchange.
Password
The password for the specified Exchange account.
Autodiscover
If you use autodiscover, the entry under ASMX (Url) is ignored and determined automatically for each new connection.
If the message The Autodiscover Service couldn´t be located appears,there is a problem with the server / network configuration.
First of all, check whether a connection by URL (see next point) is possible. Microsoft provides the Support and Recovery Assistant at https://testconnectivity.microsoft.com/ to help solve problems with automatic connection (autodiscover).
ASMX (Url)
The URL (ASMX) is ideally determined and entered here using autodiscover after entering the user name and password and clicking on the Check assignment button.
If you are unable to use autodiscover, you can enter the complete URL to your .asmx configuration here instead.
General example URL
https://outlook.office365.com/ews/exchange.asmx
Example URL for a real certificate
https://exchange.meinserver.com/ews/exchange.asmx
(Please take note of the exchange. syntax in the URL)
The URL can be determined using the following PowerShell command to the Exchange server:
Get-WebServicesVirtualDirectory |fl identity,internalurl,externalurl
Check connection
You can use this to test the connection to your Exchange server.
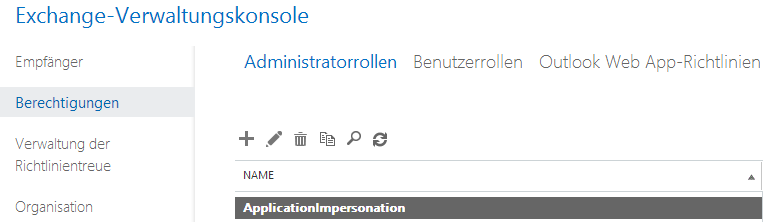
Application authentication with OAuth 2.0 (IDs, secret)
Contact your Exchange administrator for the necessary information.
You can find a description of howw to register the esBusiness server as an app for Exchange Online under Register app for Exchnage online.
ASMX (Url)
If you are unable to use autodiscover, you can enter the complete URL to your .asmx configuration here instead.
General example URL
https://outlook.office365.com/ews/exchange.asmx
Example URL for a real certificate
https://exchange.meinserver.com/ews/exchange.asmx
(Please take note of the exchange. syntax in the URL)
The URL can be determined using the following PowerShell command to the Exchange server:
Get-WebServicesVirtualDirectory |fl identity,internalurl,externalurl
Client ID
Enter the Client ID for the connection to the Exchange server here.
Tenant ID
The Tenant ID for the connection is entered in this field.
Client key
An additional client key is required for the connection to the Exchange server.
Request auth. token
You can request an authentication token from the Exchange server using the Request auth. token button after you have entered the necessary access data.
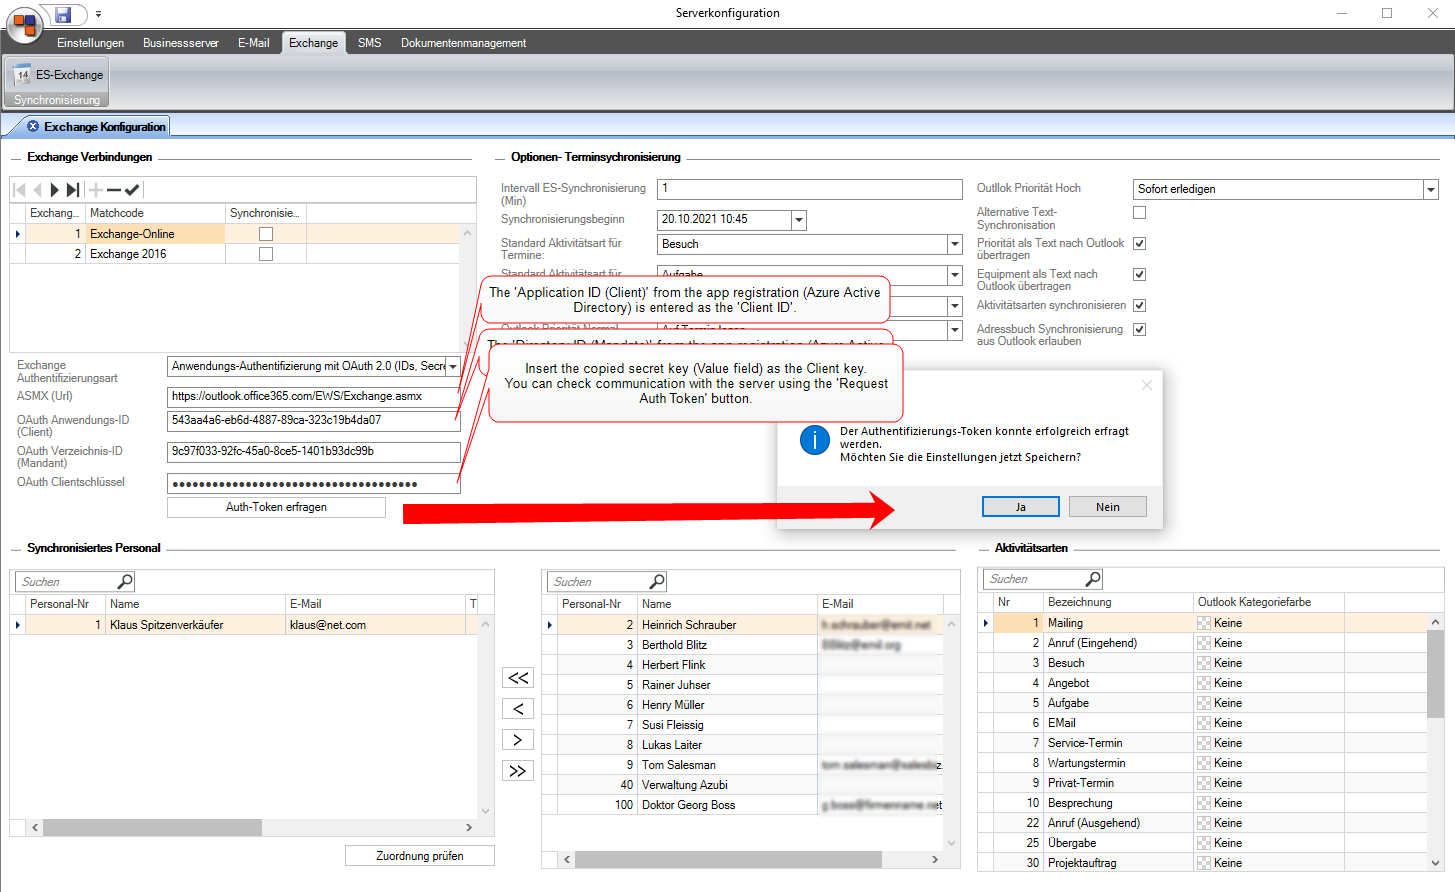
Options - Appointment synchronization area
The additional settings for the Exchange connection selected in the list are made in this area.
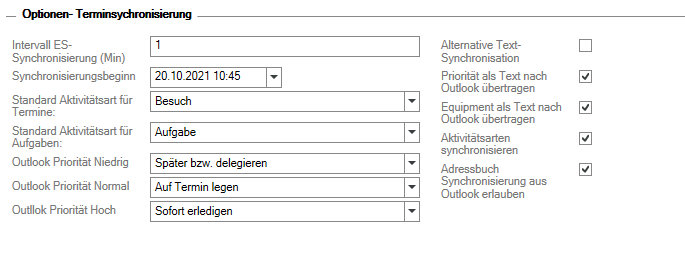
ES synchronization interval
Enter the interval in minutes between each search of your eserp database for changes to appointments and tasks to be synchronized with Exchange.
Start synchronization
Select the time here from which changes in eserp or Exchange are to be observed. This serves as the start value for the interface and is extended to the last synchronization automatically. If your selection is in the future or is more than 30 days in the past, the time will be set automatically to 30 days in the past.
Default activity type for appointments
Select the desired activity type to be applied when your Exchange appointments are imported into eserp (if not otherwise defined in the Activity types section).
Activity types are recorded in the corresponding reference table (Settings | Office | General | References | Activity types).
Default activity type for tasks
Select the desired activity type to be applied when your Exchange tasks are imported into eserp (if not otherwise defined in the Activity types section).
Activity types are recorded in the corresponding reference table (Settings | Office | General | References | Activity types).
Outlook priority Normal, Low, High
An eserp priority is linked to the corresponding Outlook priority here.
Alternative text synchronization
This option should only be activated in special cases after consultation with es2000 Support.
Synchronize activity type
This option activates synchronization of the activity types and Outlook categories.
If this option is activated, the Exchange appointments and tasks will be transferred with the activity types described in the Activity types area.
Transfer priority as text to Outlook
This causes the priority to also be shown in the appointment text. This option is particularly useful for devices or software clients that do not support priorities in their display of appointments.
Transfer equipment as text to Outlook
If equipment is assigned to an appointment in eserp, each equipment line item separated by a comma can be transferred with the appointment text if this option is activated.
Allow address bok synchronization from Outlook
If this option is activated, contact persons can also be transferred using the optional esOutlook add in.
Synchronized personnel area
Individual employees from the master data can be selected from the Non-synchronized personnel area fro Exchange synchronization.
Using the single arrow button, you can transfer individual employees from the Non-synchronized personnel list into the Synchronized personnel list. You can also use the corresponding arrow button to transfer in the opposite direction.
The double arrow buttons transfer the entire list.
Make sure that the main email address (Email field) in the employee's master data corresponds to the particulae email address for the Exchange server.
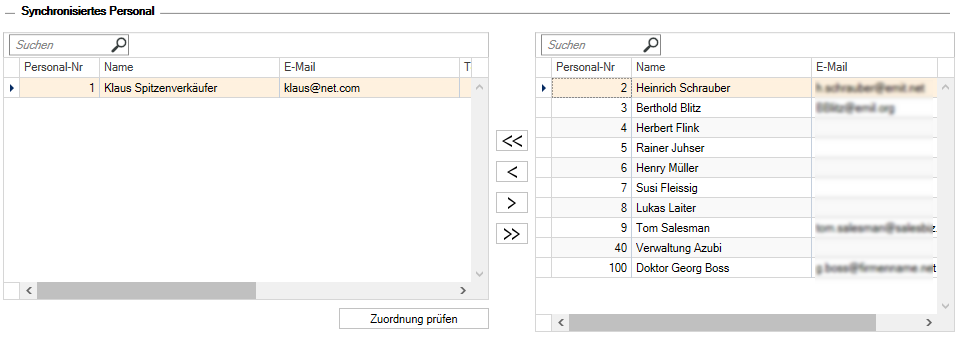
You can make synchronization settings for each employee here.
When you add employees, all the options will be initially activated.
Appointment synchronization active
If this option is activated, appointments for this employee are synchronized between eserp and MS Exchange.
Delete appointments in Exchange
Delete in Exchange appointments deleted in eserp
Delete appointments in eserp
Delete in eserp appointments deleted in Exchange
No private appointments
Appointments flagged as Private will not be synchronized.
Synchronize tasks
Synchronize tasks between eserp and Exchange
Delete tasks in Exchange
Delete in Exchange tasks deleted in eserp
Delete tasks in eserp
Delete in eserp tasks deleted in Exchange
No private tasks
Tasks flagged as Private will not be synchronized.
Transfer contact persons to Outlook
This option specifies if the particular employee is allowed to transfer addresses to Outlook. Synchronization of contact persons is done using the optional esOutlook add in module.
Also see Export contact person and Import contact person.
Employment status
The current employment status of the selected employee is shown here.
Transfer contact persons to Outlook
This option specifies if the particular employee is allowed to transfer addresses from eserp to Outlook.
the esOutlook add in is required for contact person synchronization.
Check assingment
The Check assignment button is used to test the various entries in synchronized personnel. If it is not possible to set up a connection to one or more of the specified mailboxes, a corresponding message will be displayed.
Activity types area
You can transfer your eserp activity types as Outlook categories and vice versa. Your activity types will be included in Exchange with the following description: ES_No_Description.
The Task activity type would be shown as the Outlook category ES_5_Task in light green.
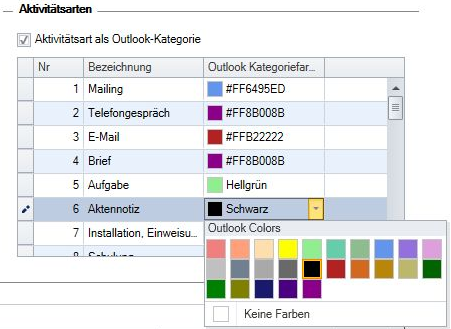
Outlook category color
You can optionally assign an Outlook category color to your activity types here. This is used for display in your Exchange.
If the esExchange interface was newly set up, it will be necessary to close and restart the eserp clients following activation of synchronization.