Business server
The settings for the esBusiness server service are made here. You can also start / stop the business server service and view the module statuses here.

'Service' area
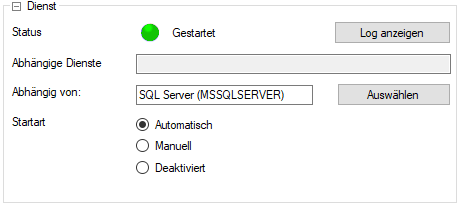
Status
Displays the current status of the service.
Dependent services
Indicates the services that are dependent on this service.
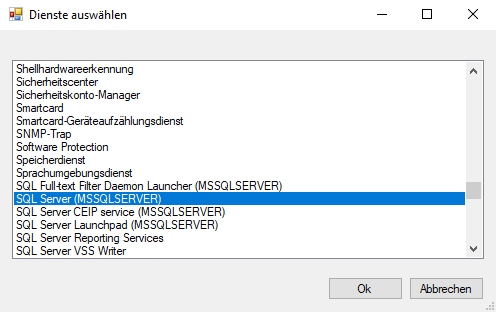
Dependent on
Indicates the services on which the starting of the business server service depends.
The recommended dependent services here are the Print queue service and the Network connections service.
If the SQL database is installed on the same server, the Database service (Firebird or SQL server) can also be specified here.
Multiple selection / marking of data sets
Several entries in the list can be selected by holding down the Ctrl key and left clicking on the entries.
Repeat the process to clear the selection / marking.
Start type
This should always be set to Automatic so that the service is started at the same time as the operating system.
'Client settings' area
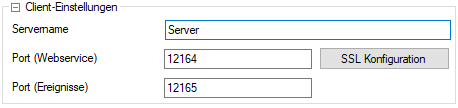
Server name
The server name under which the esBusiness server is reached in the network is specified here.
Specifying localhost will mean that the service cannot be accessed by other clients in the network.
The fully qualified domain name must be specified when specifying the server name for the esBusiness server (Example: server.domain.local).
Port
The port through which the business server communicates is specified here.
Default ports:
Web service: 12164
Events: 12165
Please note that a vallid SSL certificate connection is required for proper communications between esweb and the Business server.
A SSL certificate is required for communication with the web service of the esBusiness server service. An existing certificate can be selected or a self-signed certificate created using the SSL configuration button.
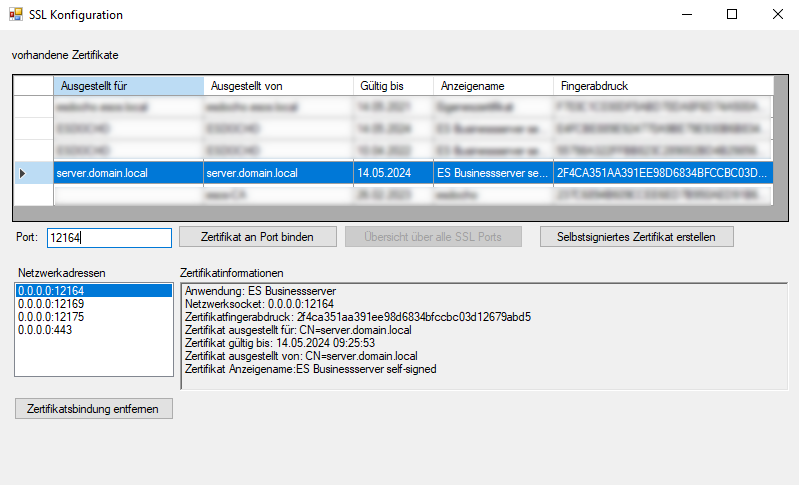
Create self-signed certificate
If another certificate is not available, a self-signed certificate can be created using this button.
If the optional esExchange module is used, a self-signed certificate cannot be used. A certificate issued and checked by a trustworthy certification agency (CA - Certificate Authorities) is required for this purpose.
Bind certificate to port
The selected certificate is bound to the port for communication with the web service using the Bind certificate to port button. This ensures secure communications.
Overview of all SSL ports
To remove the binding to a port, click on the Overview of all SSL ports button. Select the port in the Network addresses area and then click on the Remove certificate binding button.
The business server must be restarted after any changes in the SSL configuration.
'Error notifications' area
Error notifications can be sent by email. Enter the corresponding email address and an eserp personnel number (for the sender) for this.
You should only activate error notification after consultation with es2000 support, as certain error constellations can result in a large number of email notifications.
'Modules' area
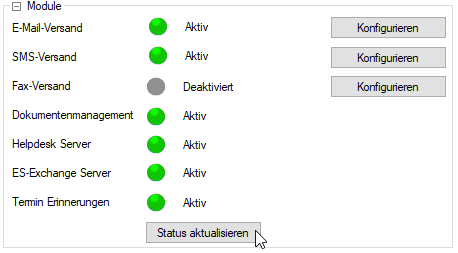
In this area you can see the status of the individual modules that were configured for the esBusiness server service.
You can open the particular settings for the Email transmission, SMS transmission, and Fax transmission modules using the Configure button.
Module status display
Depending on the module, it may take some time for the status to change to Active after a change in the configuration and subsequent restartig of the esBusiness server service. You can query the status again using the Update status button.
'Business server log file' area

Enabled
This option specifies whether the event log for the service is active (activated = log file will be created).
Events that occur during operation of the business server will be recorded and saved in a log file if this option is activated. This log file can be used for troubleshooting if an error occurs.
Also see Evaluate log files
Path
The log files are created in the folder specified here.
Debug
If this option is activated, further detailed information is recorded and saved in the log file.
Please only activate the Debug option for a specific error analysis or if instructed to do so by Support.
DMS features
A file hash must be generated once for all the documents in the document management system (DMS) when updating to eserp Version 1.50. This file hash gives every file in the DMS a unique ID which enables the business server to distinguish between the files.
This process can take a long time depending on the number of files in the DMS, and this should be considered when updating to this version. If the DMS files are located on a different server, it is recommended that the file hashes are generated in advance using a Powershell script.
Without file hash generation it will no longer be possible to access the files in the DMS after an update to eserp Version 1.50. eserp / DMS must not be used during file hash generation.
Start
File hash generation is started using the Start button. As the process can take some time, separate confirmation is required.
In the next step, you can specify whether you have a file (text file in CSV format) available. Click on the Yes button to open selection of the corresponding CSV file.
Click on No to start file hash generation without a file.
The hash values can be generated as a CSV file in advance using a script. This is particularly useful if the directory with the DMS files is on a different server. You can enter a CSV file containing the hash values.
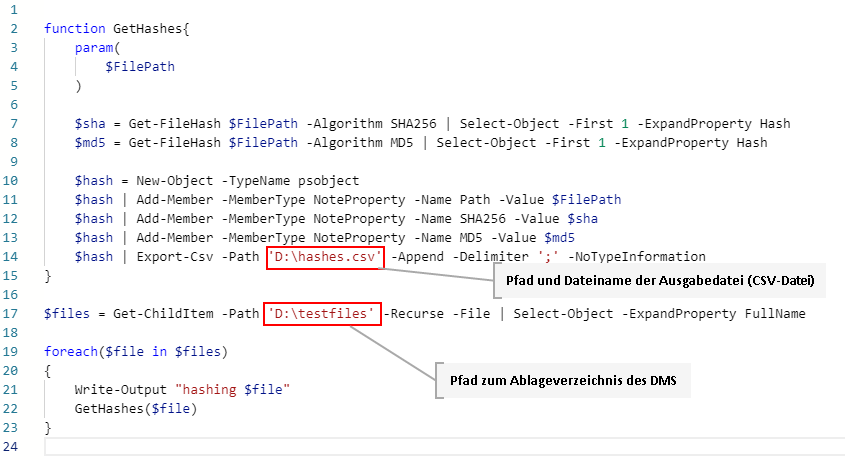
File hash generation using a script
File hash generation can be performed using a script on the server where the files for the DMS are stored. The result of running the script is saved in a CSV file that can be read into the business server.
The script is available in Windows (Powershell script) and Linux (Bash).
Individual adjustment of the particular script is required before it is run.
Windows script (Powershell)
File hash generation (Powershell)
function GetHashes{
    param(
        $FilePath
    )

    $sha = Get-FileHash $FilePath -Algorithm SHA256 | Select-Object -First 1 -ExpandProperty Hash
    $md5 = Get-FileHash $FilePath -Algorithm MD5 | Select-Object -First 1 -ExpandProperty Hash

    $hash = New-Object -TypeName psobject
    $hash | Add-Member -MemberType NoteProperty -Name Path -Value $FilePath
    $hash | Add-Member -MemberType NoteProperty -Name SHA256 -Value $sha
    $hash | Add-Member -MemberType NoteProperty -Name MD5 -Value $md5
    $hash | Export-Csv -Path 'D:\hashes.csv' -Append -Delimiter ';' -NoTypeInformation
}

$files = Get-ChildItem -Path 'D:\testfiles' -Recurse -File | Select-Object -ExpandProperty FullName

foreach($file in $files)
{
    Write-Output "hashing $file"
    GetHashes($file)
}
Adjustment required
Adjust the Powershell script to your DMS environment at the marked positions.
Linux script (Bash)
Linux file hash generation (Bash)
#/bin/sh

searchPath=$1
resultFile="hashes.csv"

echo -n > $resultFile

find "${searchPath}" -type f -print0 | while read -d $'\0' file
do
    echo "hashing ${file}"
    absolutePath=`realpath "${file}"`
    sha=($(sha256sum "${file}"))
    md5=($(md5sum "${file}"))
    echo "${absolutePath};${sha};${md5}" >> $resultFile
done
Adjustment required
searchPath = DMS path (directorry containing the DMS files)
resultFile = CSV file (output file name)
es2000 does not make any recommendation regarding the suitability of the above information. Errors and exceptions are excluded and no responsibility is accepted for the information provided. The statements are simply descriptions and do not guarantee the consistency of the products. The information may also in part be an attempt to assist you with a task even if the product itself is not specifically designed for this purpose.
Business server service - Control / Installation
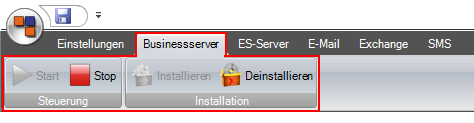
Install
The service can be started, stopped, installed or uninstalled depending on its status. When a service is installed, a message is displayed asking if the service should be installed under a different account to the local system account.
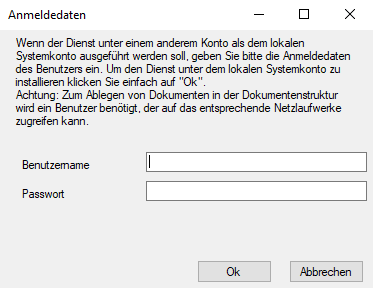
The local system account can only very rarely be used for operation, as the business server necessarily requires access to documents in the network, external services, and so on. Depending on the scope of application, a user that is specially created for the eserp services should be used here, to which the corresponding rights can be specifically granted.
Also see esBusiness server requirements (Service user)
If this is not the case you can continue by clicking on OK.
Otherwise, complete the two entry fields and then click on OK.
The user name entered here must be a user that has access rights to the document management in eserp. Also see esBusiness server requirements (Service user)
The document management path is specified under Document Management. The authorizations for this path are assigned using the Windows operating system.
If settings are changed and saved, the business server must be restarted. The changes will not come into effect until after the restart.
Uninstall
It may be necessary to uninstall the service and re-install it with new settings in order to change the business server service (log in data, etc.).
Click on the Uninstall button to immediately stop the service and uninstall it. The service must only be uninstalled when no users are using eserp, esweb, or esmobile.