User management
Access to esweb for clients and personnel (employees, technicians) is managed under the Settings | User management menu command.
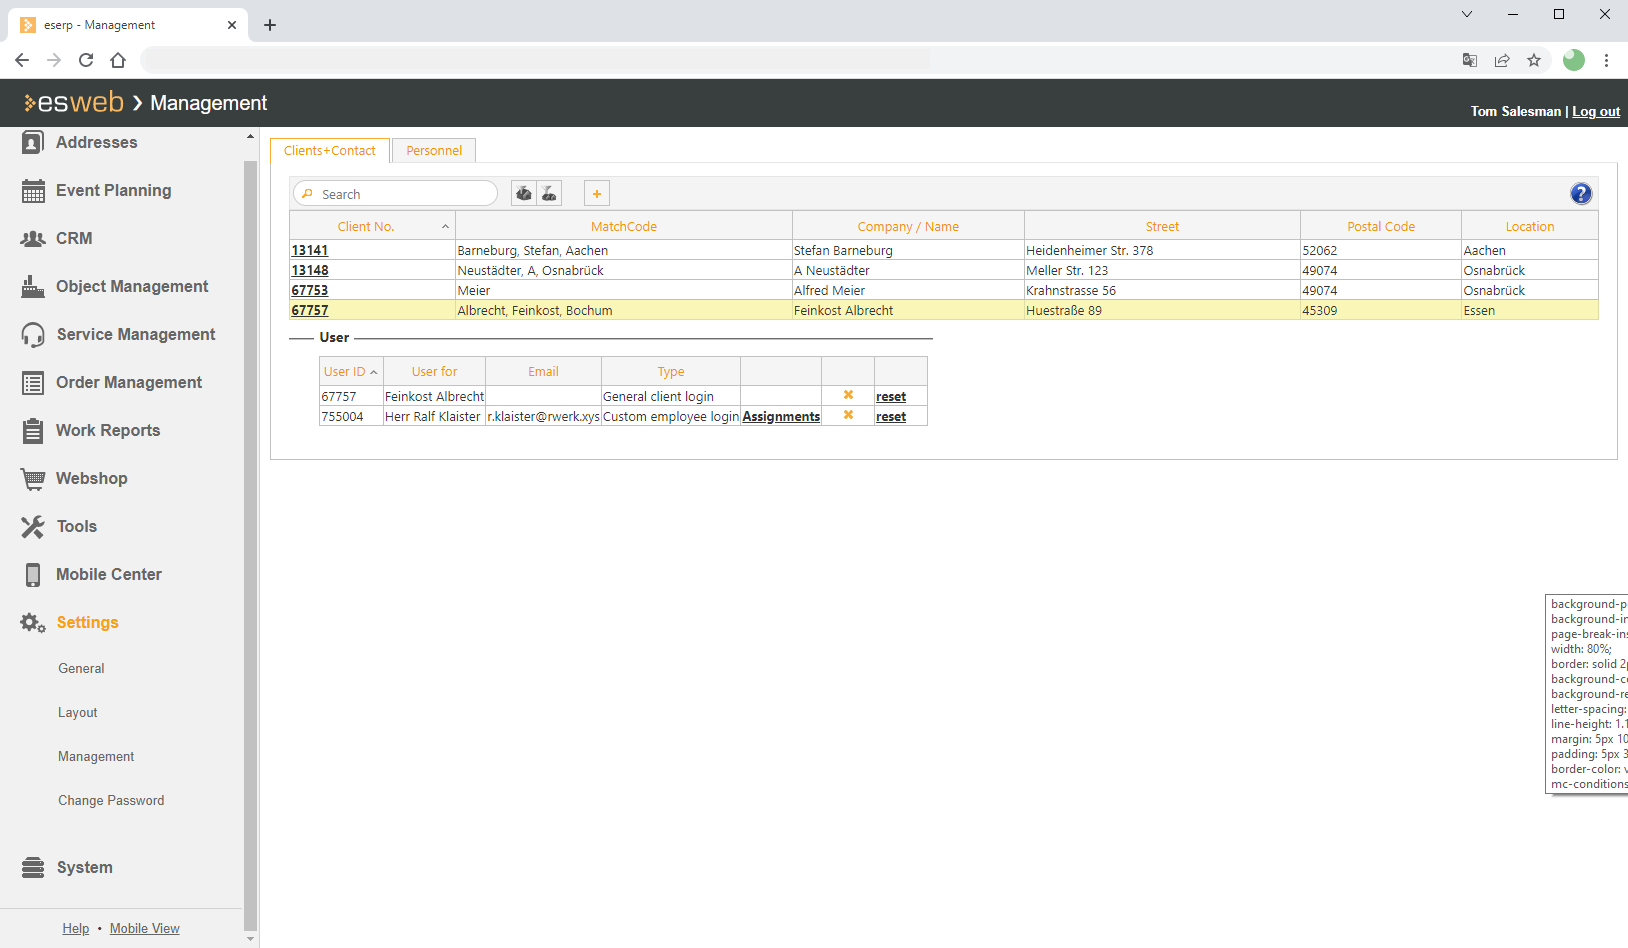
Client + contact person tab
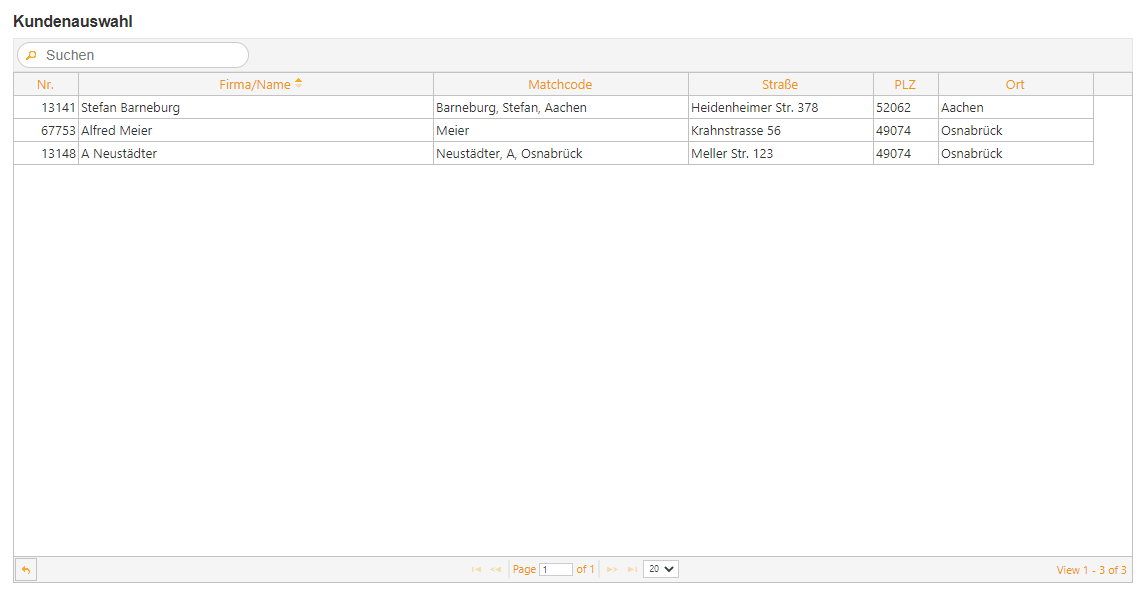
The Clients + contact persons tab initially displays all the clients that already have access set up.
Search / Filter
 Search function
Full text search in all displayed fields. The search starts as soon as the first character is entered.
 Office branch filter: Current office branch
The office branch filter is shown if you have a license for the optional Office branches module.
Also see Office branches
General | Office branches | Office branches authorization is required for display of the office branch filter.
General | Office branches | View all office branches authorization is required to view all office branches.
If this filter is activated, only those data sets that are assigned to the current office branch will be displayed.
The basic function of the office branch filter is described under Office branch filter.
 Office branch filter: Own office branches
The office branch filter is shown if you have a license for the optional Office branches module.
Also see Office branches
General | Office branches | Office branches authorization is required for display of the office branch filter.
General | Office branches | View all office branches authorization is required to view all office branches.
If this filter is activated, only those data sets for all the office branches assigned in the personnel master data to the logged in user will be displayed.
Also see
-
Assign main office branch
eserp - Office | Personnel | Details I - 'Office branches' area
-
Assign further office branches
eserp - Office | Personnel | Details I - 'Other office branches' table
The basic function of the office branch filter is described under Office branch filter.
Client / contact person access
To view the accesses recorded for a client, click on the particular Client no. The accesses for the selected address are shown in the Users area.
A distinction is made between General client login and Specific employee login.
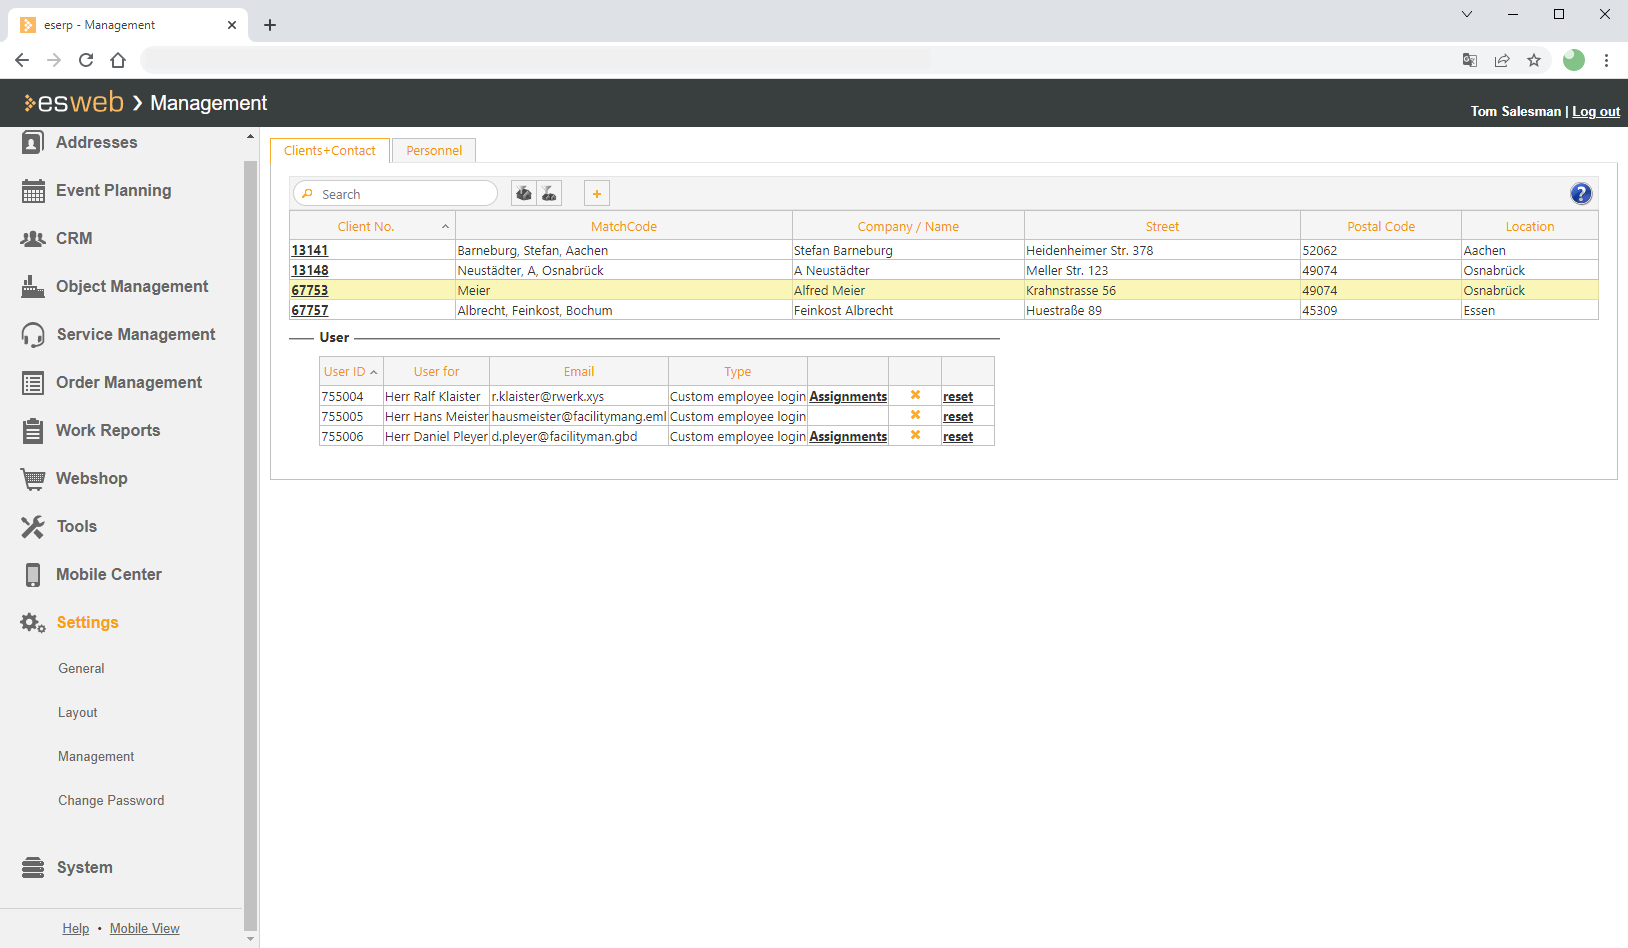
Assignments
If you click on Assignments for a Specific login, a list of the clients to whom the contact persons were assigned is displayed.

![]() Delete access / login
Delete access / login
Click on the ![]() button to permanently erase an access / a login A message is displayed (Are you sure you want to delete this user?) before the data set is erased.
button to permanently erase an access / a login A message is displayed (Are you sure you want to delete this user?) before the data set is erased.
The data set is not deleted until you confirm this message by clicking the OK button.
Reset
This function is used to reset the password of the user. A message is displayed (Are you sure you want to reset this password?) before a new password is assigned.
The new password is not generated and sent by email to the user until you confirm this message by clicking the OK button.
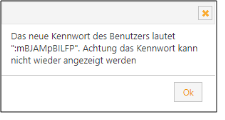
Password cannot be sent by email
If the email cannot be sent due to a missing connection to the esBusiness server service or a mising email function, a dialog showing the access data will be displayed.
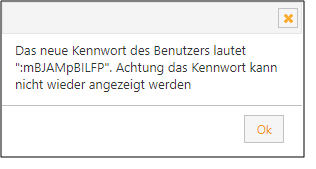
Please make a note of this password, as it cannot be displayed again. If you lose the password, you can generate a new one by resetting the password.
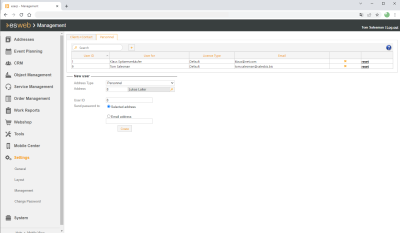
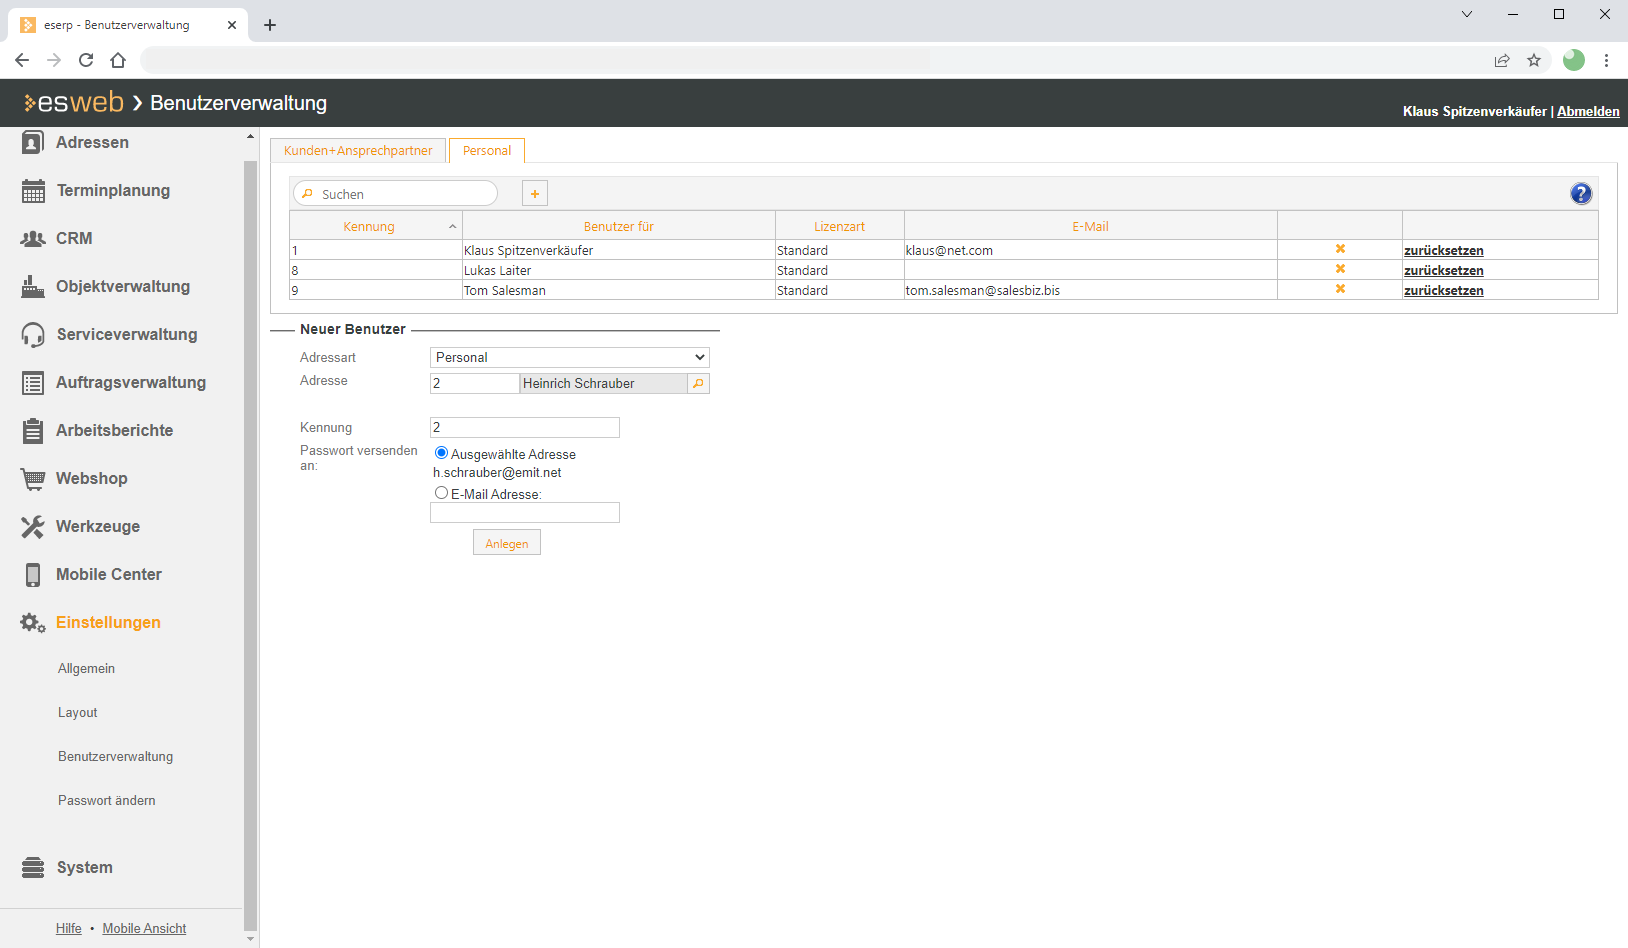
Create client login / employee login
The  button allows you to create a new user for the selected client or to specify a client that does not have a login yet.
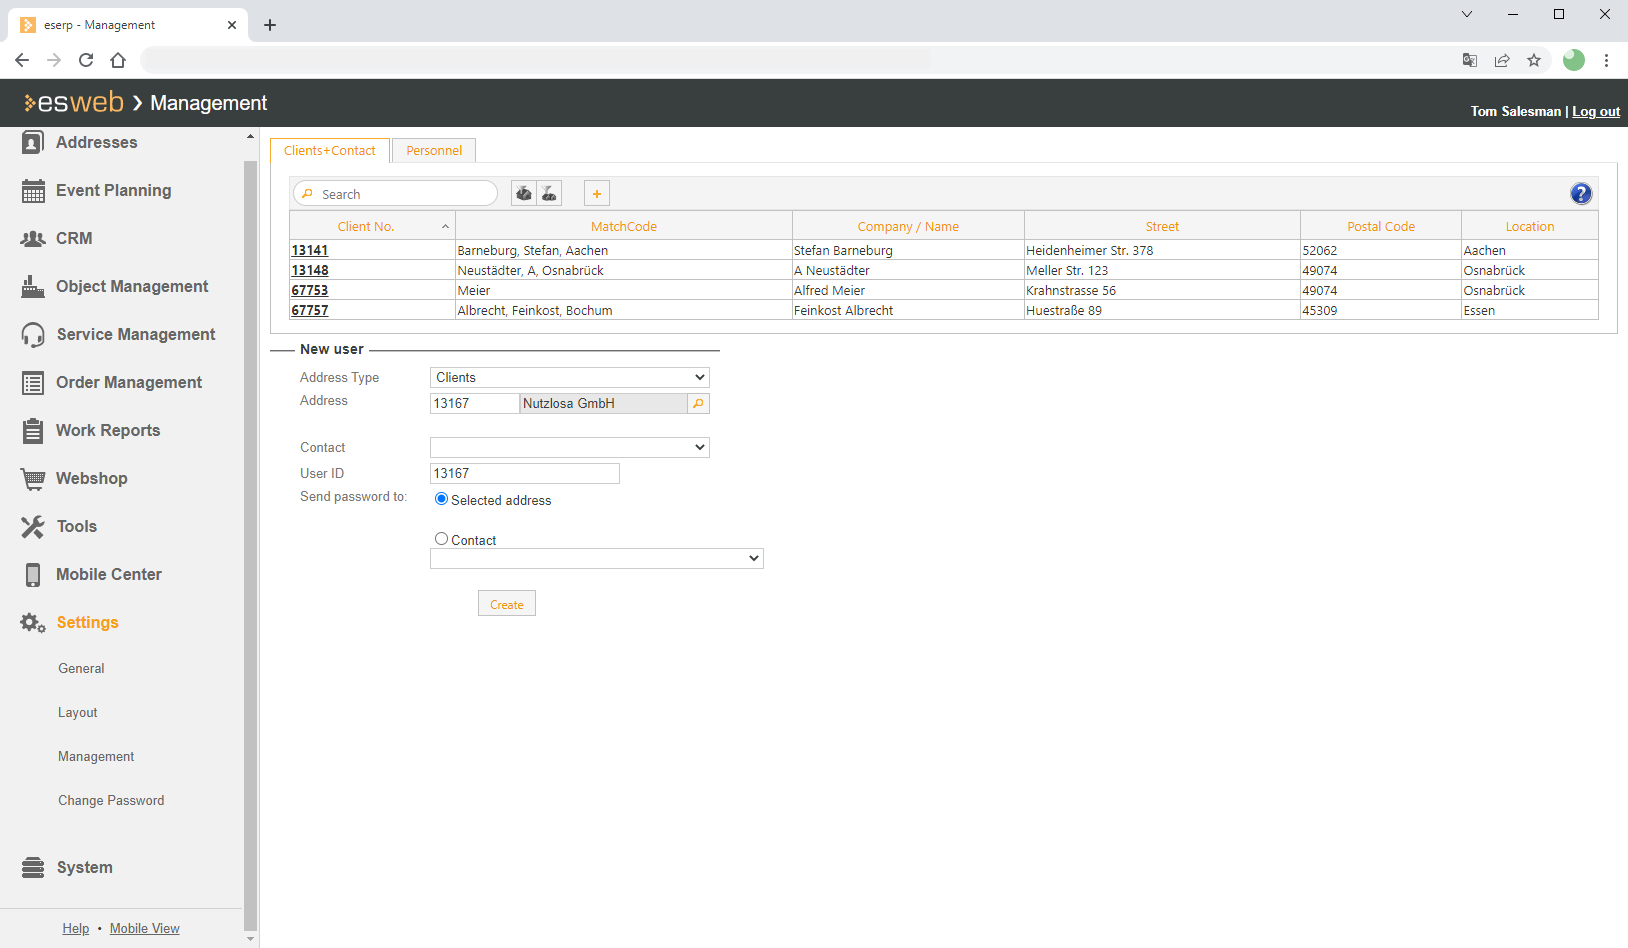
If you now select the client, a General client login is generated. If you select a contact person, an Employee login is generated.
The User ID numbers are initially preset as follows:
-
When the first general client login is entered, the User ID is the same as the client number.
-
If a further general client login is created, the User ID is initially blank and a number must be entered manually.
-
When a new access for a contact person is specified, the User ID is the same as the contact person number.
-
If a further access for the same contact person is specified, the User ID will again be the contact person number, but this must be changed as duplicate User IDs are not allowed.
User ID already assigned
![]() is displayed next to the User ID field if the User ID has already been assigned elsewhere. Assign your own unique User ID in this case.
is displayed next to the User ID field if the User ID has already been assigned elsewhere. Assign your own unique User ID in this case.
Assigning a contact person to several clients
One contact person can be assigned to several clients, for example an IT technician who looks after several companies. An assignment can also be made for this in esweb User management.
The user can log in for all the marked clients shown under Further clients. A query to this effect will be displayed on the web inteface at log in.
Selection from the viewpoint of the client user logging in
The client selection for contact persons can be adjusted under Settings | Layout - 'Edit page layout' area.
When all the relevant fields have been completed, an email containing the access data is sent automatically to the selected address when the data is saved.
Password cannot be sent by email
If the email cannot be sent due to a missing connection to the esBusiness server service or a mising email function, a dialog showing the access data will be displayed.
Please make a note of this password, as it cannot be displayed again. If you lose the password, you can generate a new one by resetting the password.
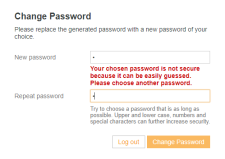
The start password that is assigned here must be replaced by the user with a secure password of their choice when logging in for the first time.

Specify your own secure password using upper and lower case letters, numbers, and special characters. Password rules (password length, password sequence, etc.) can be set under Settings | General | Parameters - 'User management' area.
If a password that can be easily guessed is assigned, a warning is displayed.
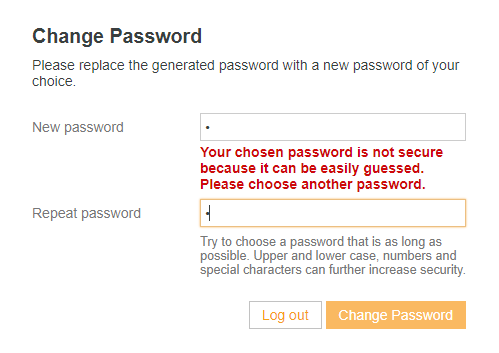
Every user can change their own password at any time using the Login dialog (Settings | Change password).
The subject line text and email text used for sending the esweb access data by email can be specified by selecting a default text under Settings | General | Parameters - 'User management' area.
Create general client login
-
Open the Settings | User management menu in esweb.
-
Click on the
button on the Clients + Contact persons tab. The New users area is displayed below the client list. -
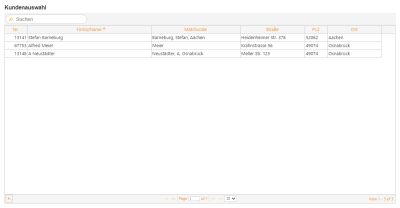
Select Client as the Address type. You can open a list for selecting a client using the
 magnifying glass icon.
You can search for a client within the list or restrict the list by means of the office branch filter.

-
Select a client from the list by clicking on the Client no.

-
You do not need to select a contact person for a general client access. The client number is suggested as the User ID for the esweb login.
-
The start password is sent to the client by email, to the email address from the client data set or alternatively to the email address of a contact person.
If the Also send password email to any email address option is activated under Settings | General | Parameters - 'User management' area, you can enter an email address to which the password is to be sent.
-
Click on the Create button. esweb access is created and the access data are sent by email to the selected address automatically.
Password cannot be sent by email
If the email cannot be sent due to a missing connection to the esBusiness server service or a mising email function, a dialog showing the access data will be displayed.
Please make a note of this password, as it cannot be displayed again. If you lose the password, you can generate a new one by resetting the password.
The start password that is assigned here must be replaced by the user with a secure password of their choice when logging in for the first time.
Specify your own secure password using upper and lower case letters, numbers, and special characters. Password rules (password length, password sequence, etc.) can be set under Settings | General | Parameters - 'User management' area.
If a password that can be easily guessed is assigned, a warning is displayed.
Every user can change their own password at any time using the Login dialog (Settings | Change password).
Create specific employee login
-
Open the Settings | User management menu in esweb.
-
Select a client on the Clients + Contact persons tab by clicking on the Client no. The User area is displayed.
-
Click on the
button. The New users area is displayed below the client list. The Client Address type and the selected Client are already entered in the Address field. -
Select a Contact person. The contact person number is suggested as the User ID for the esweb login
User ID already assigned
 is displayed next to the User ID field if the User ID has already been assigned elsewhere. Assign your own unique User ID in this case.
Assigning a contact person to several clients
One contact person can be assigned to several clients, for example an IT technician who looks after several companies. An assignment can also be made for this in esweb User management.

The user can log in for all the marked clients shown under Further clients. A query to this effect will be displayed on the web inteface at log in.
Selection from the viewpoint of the client user logging in
The client selection for contact persons can be adjusted under Settings | Layout - 'Edit page layout' area.
-
You do not need to select a contact person for a general client access. The client number is suggested as the User ID for the esweb login.
-
The start password is sent to the contact person by email, to the email address recorded for the contact person or alternatively to the email address of another contact person.
If the Also send password email to any email address option is activated under Settings | General | Parameters - 'User management' area, you can enter an email address to which the password is to be sent.
-
Click on the Create button. esweb access is created and the access data are sent by email to the selected address automatically.
Password cannot be sent by email
If the email cannot be sent due to a missing connection to the esBusiness server service or a mising email function, a dialog showing the access data will be displayed.
Please make a note of this password, as it cannot be displayed again. If you lose the password, you can generate a new one by resetting the password.
The start password that is assigned here must be replaced by the user with a secure password of their choice when logging in for the first time.
Specify your own secure password using upper and lower case letters, numbers, and special characters. Password rules (password length, password sequence, etc.) can be set under Settings | General | Parameters - 'User management' area.
If a password that can be easily guessed is assigned, a warning is displayed.
Every user can change their own password at any time using the Login dialog (Settings | Change password).
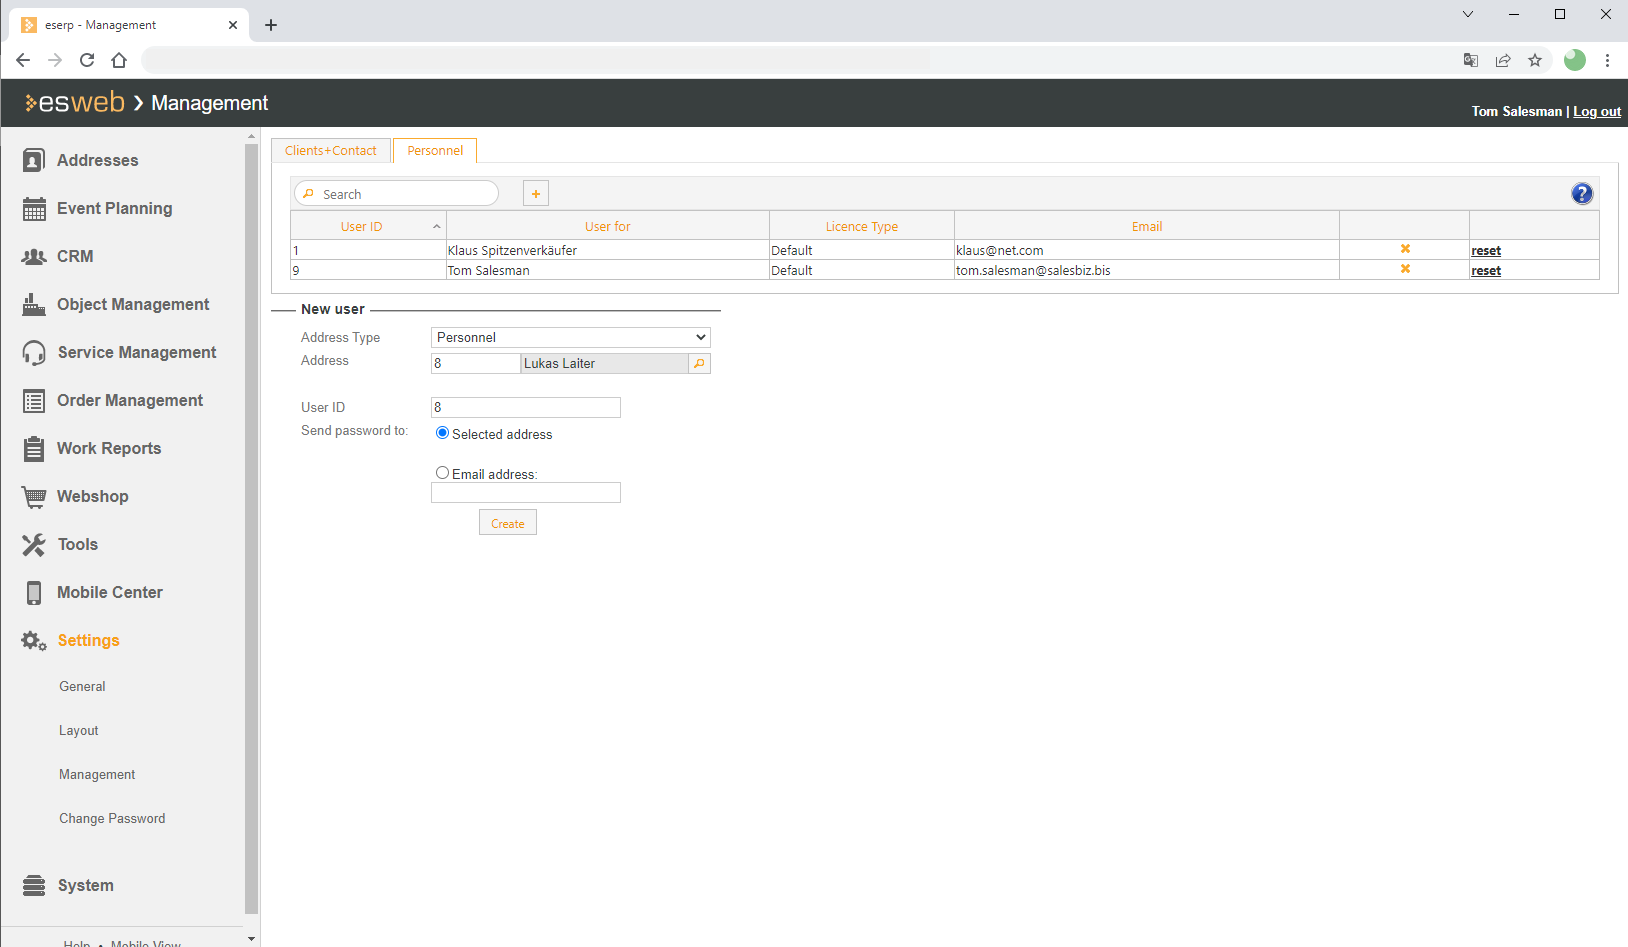
'Personnel' tab
The Personnel tab initially displays all the employees that already have access set up.
Search function
Full text search in all displayed fields. The search starts as soon as the first character is entered.
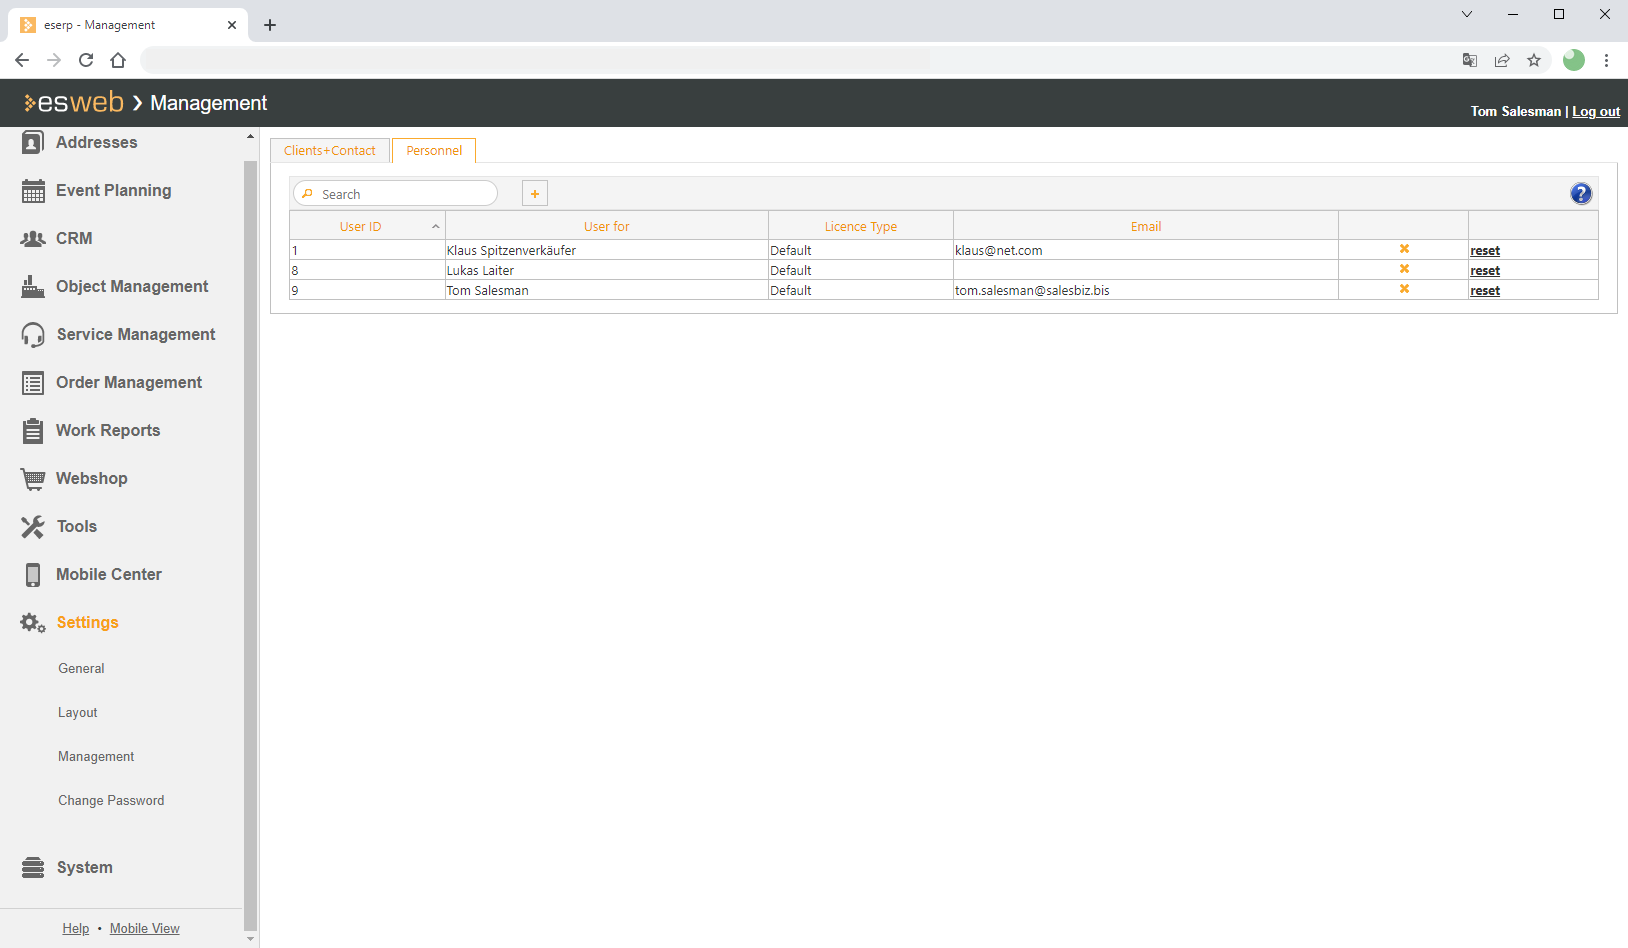
User ID
The User ID and Password are required to login to esweb. As a rule, the personnel number is used as the User ID for employees.
User for
Employee name. This is taken from the esoffice personnel master data when creating the esweb access data.
License type
The license type is additionally displayed here so that you can see if the recorded employees can use all the module functions for the esweb access (default) or if a restricted licese has bee assigned.
The following license types are available:
Default
Item number 999100 User License (Network)
License for eserp using a local or network installation (for example for back office, sales, company management, etc.). All eserp modules and program functions can be used with a standard license (authorizations can be used to restrict access).
Terminal
Item number 999150 User License (Terminal)
User license to use eserp in a terminal server environment.
Technician
Item number 999050 User License (Technician)
License with restricted range of functions. This is used for field work technicians who do not need access to all the eserp functions.
Access to the following modules is included:
-
In Calendar and Resource elements, the Static text element is used to display the title.
-
Personnel assignment planning (PAP)
-
Personnel team ability
-
Dispatching
-
Email
-
TAPI
-
Systems
-
Maintenance
-
Service
-
Help desk
-
Fault notification
Technician base (time recording license)
Item number 999070 User License (Time Recording)
License with restricted range of functions. This is used for field work technicians who do not need access to the desktop functions (eserp, esCash, etc.).
This license enables recording of times on own orders and leave requests in esweb and esmobile.
Employees can also acknowledge their work times with their signature.
Display of service and inspection orders ONLY with corresponding appointment.
Site manager
Item number 999060 User License (Site manager)
License with restricted range of functions. This is used for field site managers who do not need access to all the eserp functions.
The scope is the same as the Technician license with access to the Goods received module added.
Access to the following modules is included:
-
In Calendar and Resource elements, the Static text element is used to display the title.
-
Personnel assignment planning (PAP)
-
Personnel team ability
-
Dispatching
-
Email
-
TAPI
-
Systems
-
Maintenance
-
Service
-
Help desk
-
Fault notification
-
Stock entry
-
Email history
Employee's email address. This is taken from the esoffice personnel master data when creating the esweb access data.
![]() Delete access / login
Delete access / login
Click on the ![]() button to permanently erase an access / a login A message is displayed (Are you sure you want to delete this user?) before the data set is erased.
button to permanently erase an access / a login A message is displayed (Are you sure you want to delete this user?) before the data set is erased.
The data set is not deleted until you confirm this message by clicking the OK button.
Reset
This function is used to reset the password of the user. A message is displayed (Are you sure you want to reset this password?) before a new password is assigned.
The new password is not generated and sent by email to the user until you confirm this message by clicking the OK button.
Create esweb employee login (personnel)
Create personnel / employee login
-
Open the Settings | User management menu in esweb.
Click on the
button on the Personel tab. The New users area is displayed below the personnel list. -
Select Personnel as the Address type. You can open a list for selecting an employee using the
magnifying glass icon.
You can search for a client within the list or restrict the list by means of the office branch filter.
If the desired employee is not displayed, check the Employment period (Start / End) under Office | Personnel | Details I in esoffice. No access to esweb can be set up outside the employment period.
-
Select an employee. The personnel number is suggested as the User ID for the esweb login.

User ID already assigned
is displayed next to the User ID field if the User ID has already been assigned elsewhere. Assign your own unique User ID in this case. -
The start password is sent to the employee by email, to the employee's recorded email address.
If the Also send password email to any email address option is activated under Settings | General | Parameters - 'User management' area, you can enter an email address to which the password is to be sent.
-
Click on the Create button. The access is created and the access data are sent by email to the selected address automatically.
Password cannot be sent by email
If the email cannot be sent due to a missing connection to the esBusiness server service or a mising email function, a dialog showing the access data will be displayed.
Please make a note of this password, as it cannot be displayed again. If you lose the password, you can generate a new one by resetting the password.
The start password that is assigned here must be replaced by the user with a secure password of their choice when logging in for the first time.
Specify your own secure password using upper and lower case letters, numbers, and special characters. Password rules (password length, password sequence, etc.) can be set under Settings | General | Parameters - 'User management' area.
If a password that can be easily guessed is assigned, a warning is displayed.
Every user can change their own password at any time using the Login dialog (Settings | Change password).
Specifics for esmobile users
When a new user login is created for esmobile in esweb, the first login to esweb must be done using the start password. You cannot log in to esmobile using the temporary start password.
When you first log in to esweb, a personal secure password must also be allocated.
Also see Create esweb employee login (personnel)
After a user for esmobile has been created in esweb, the temporary stored settings must be reset in esweb (Reset.aspx) when the vehicle store is entered or edited. Open the page https://[YourDomain]/esweb/system/reset and click on the Restart session button.

The subject line text and email text used for sending the esweb access data by email can be specified by selecting a default text under Settings | General | Parameters - 'User management' area.
If a user is created here that does not yet exist in eserp, this user will also be created there automatically.