Delivery slips
Items | Delivery slips
You can create delivery slips for shipments of items using the Items | Delivery slips menu command.
Items | Delivery slip | Delivery slips authorization is required for this menu command.
A delivery slip can be used by the client for example to check that the quantity and type of goods delivered matches the quantity, quality and type of goods that were actually ordered. A delivery slip also makes it possible to supply the recipient with additional information about the goods, such as technical specifications or special features.
The procedure for creating delivery slips depends on the selected method of warehouse management.
If shortfall management is used, the quantity of an item to be supplied which exceeds the warehouse stock level will be reduced according to the available quantity when the delivery slip is printed.
The user can use the Access minimum stock settings to specify whether the stated minimum stock level can be utilized to fulfill the requested delivery quantity.
This type of delivery slip creation also allows the creation of part delivery slips. When delivery shortfall management is used, only the residual line items will be suggested when the delivery slip is reopened.
Return slips
Return slips can be printed and booked in a similar way. These can be used to document a return delivery of items from a client, for example.
When you print out a return slip, the term Delivery slip is replaced by Return slip.
The print format for both processes, delivery slip and return slip, is controlled through a report, which means tht the layout can be customized.
The delivery slip numbers are assigned automatically from the number ranges.
A separate file is always used to record the history as well as bookkeeping evaluations for each warehouse booking and also for return slips.
A delivery slip cannot be booked to a completed order, service order, inspection order or maintenance order.
All information regarding the copper surcharge is drawn from the vendor table provided for this, and not from the table of items.
When the change date is entered for a delivery slip, the personnel number of the logged in user is also recorded at the same time.
It is also possible to print out a delivery slip without setting the booking option during an annual inventory.
Delivery slips list
All the existing delivery slips and return slips are shown in the list.
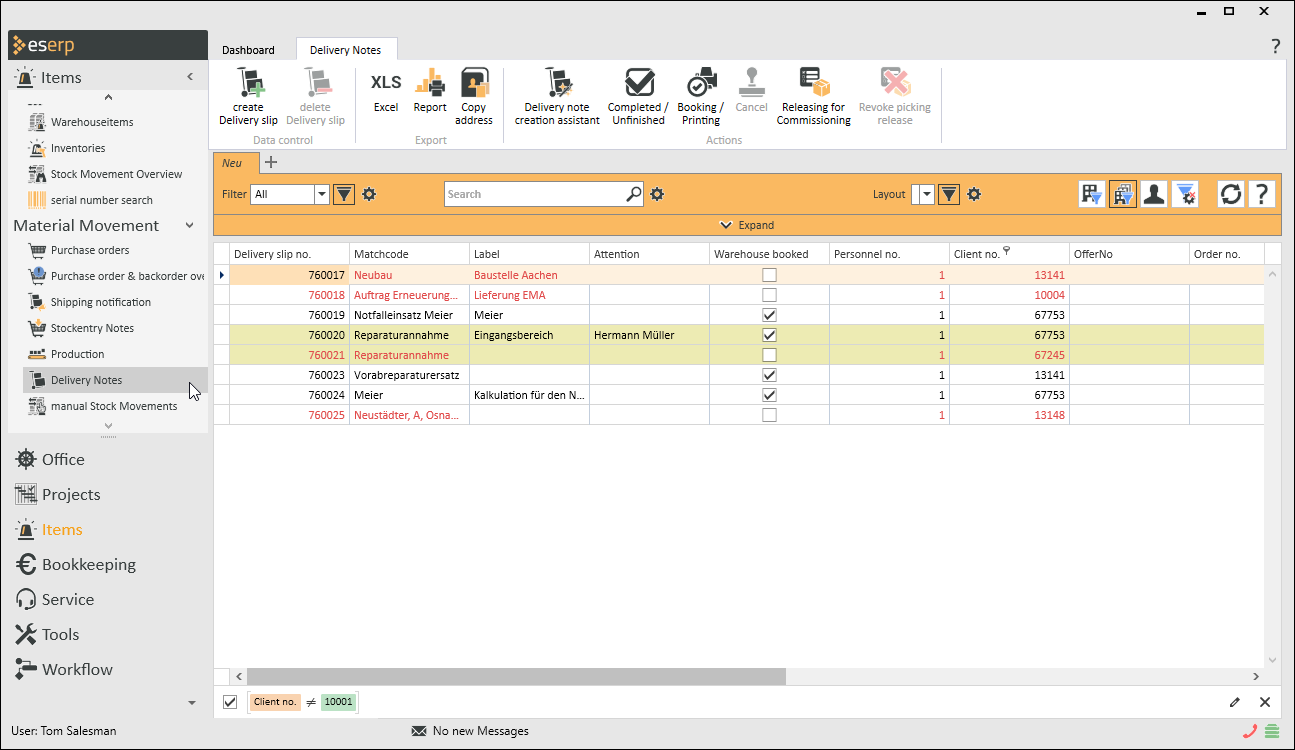
Double click on the data set in the list to open a delivery slip or return slip for editing.
Color meanings
Delivery slips that are still 'uncompleted'
-
Font color
Black
-
Background color
-
White
Delivery slip not yet booked
-
Font color
Red
-
Background color
White
Delivery slips marked as 'completed'
-
Font color
Gray
-
Background color
White
Return slips that are not yet completed
-
Font color
Black
-
Background color
Yellow
Return slips marked as 'completed'
-
Font color
Gray
-
Background color
Yellow
Internal delivery slips (created through a calculation)
-
Font color
Blue
-
Background color
Blue
Column selection / Column editor
The columns to be displayed in a Data Grid can be set using the Column Selection dialog. To open Column Selection, right click on the table column header and choose Show Column Editor from the context menu.

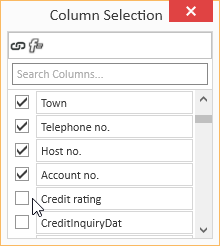
In the Column selection window, you can show the desired columns by activating the option in front of the column name.
Deactivate the check box in front of the column name to remove the column from the list view.
To save the list view layout, right click on the column header and select Save layout from the context menu.
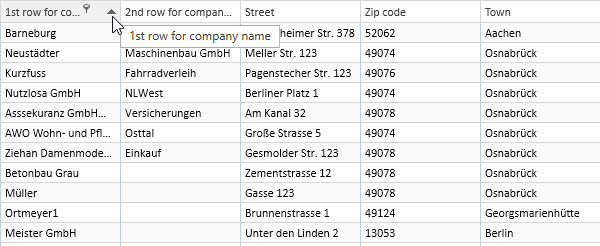
Move columns / Change column order
Each user can set the column order individually. To move a column, click on the column and hold down the left mouse button, drag it to the desired position between two columns and release the mouse button (drag and drop).
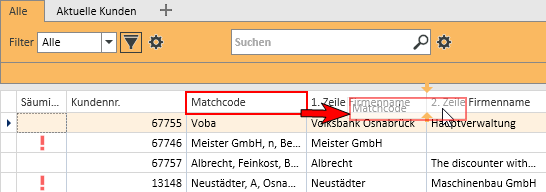
Suitable locations for inserting a column are marked with two colored arrows.
Optimum width
Adjusts the column width to automatically match the contents. Right click on the column header and select Optimum width from the context menu.
Use the Save layout function to permanently store the changed column width.
If you do not save the Layout after changing the column width, the column width will be reset when you restart the module.
Optimum width (all columns)
Adjusts the column width to automatically match the contents for all columns. Right click on the column header and select Optimum width (all columns) from the context menu.
Use the Save layout function to permanently store the changed column width.
If you do not save the Layout after changing the column width, the column width will be reset when you restart the module.
Column filters
You can use column filters to display only certain data sets from extensive lists.
You can use the column filters for example to display all the client data sets for a particular ZIP code. Only the ZIP codes that are already recorded for the client data sets will be displayed.
To filter the data sets, click on the desired column (for example ZIP code) and on the filter icon ![]() there.
there.
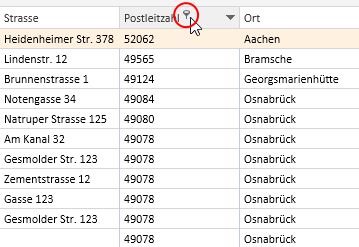
You will now see a list of all the recorded ZIP codes.
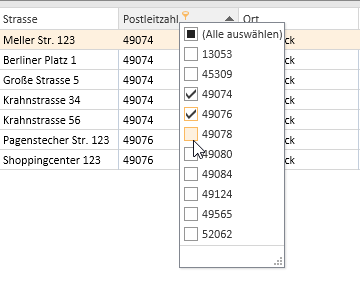
You can now select one or more values for the filter. There are also additional filters available (all, user defined, empty, not emptry).
If a filter is active for a column, this is indicated by the colored filter icon ![]() in the column header. Click on the icon to edit the filter.
in the column header. Click on the icon to edit the filter.
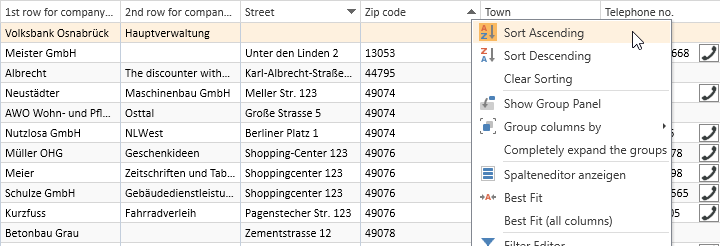
Sort order
The values in a column can be sorted in ascending or descending order by clicking on the table column header.
You can sort rows without changing existing sort conditions as follows:
-
Press and hold down the Shift key and click on the column header until an up or down arrow appears
-
Right click on the column header and select Ascending order or Descending order from the context menu.
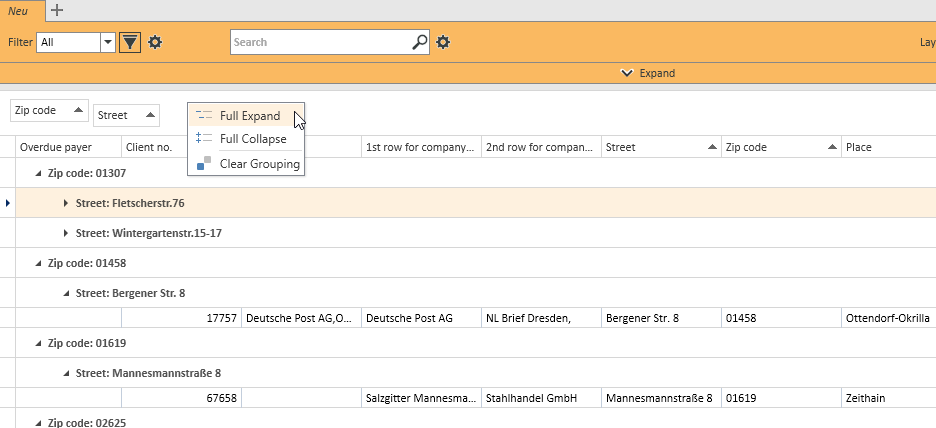
In the above example, the list is sorted by Zip code (ascending order) and additionally by Street (descending order). Thus, if there are several entries with the same Zip code, these entries will be sorted according to the Street field.
To remove a column from the sort criteria, press and hold down the Ctrl key and click on the column.
Column summaries
A column summary can be displayed below each column in the list.

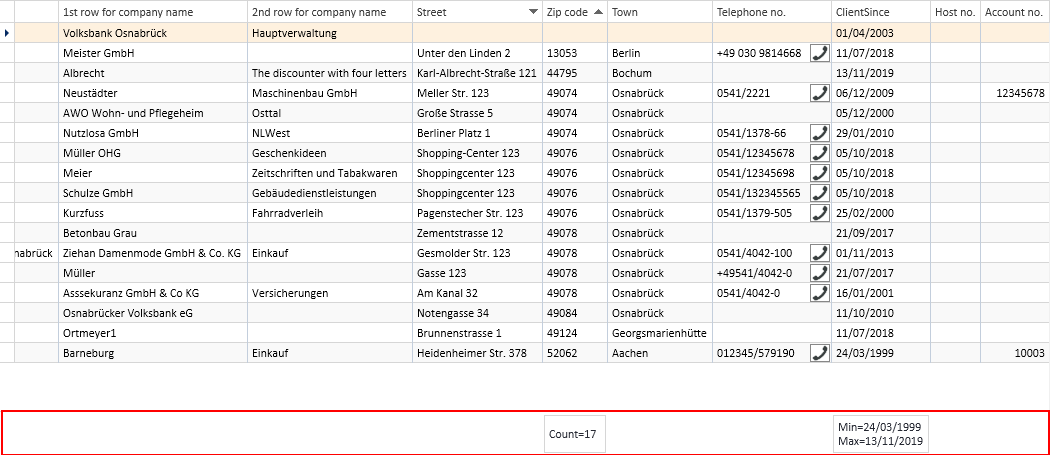
To configure this column summary, right click on the column header and select Show Sums from the context menu.
A Totals field is now shown below the list. Right click in this field to select the value to be displayed for this column.
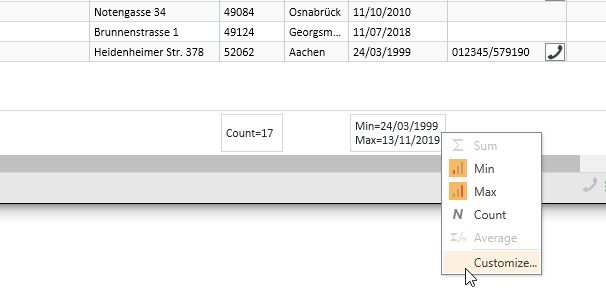
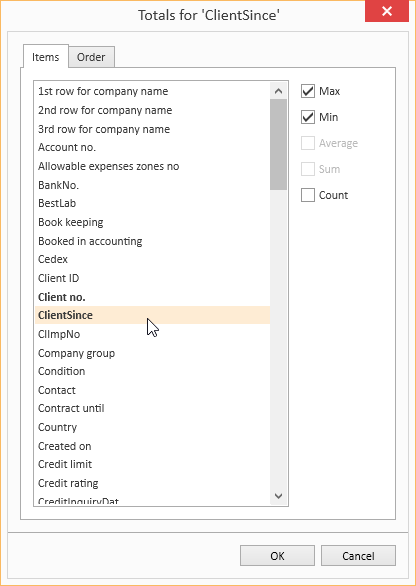
You can use the Customize... context menu command to make more detailed settings for the column summaries, including setting the Sort order and labeling when there are several sums.
Groupings
To group according to one or more columns, proceed as follows:
Method 1
- Right click on the column header and select Show grouping field from the context menu.
- Drag a column header into the Grouping field.
- You can drag additional columns into the grouping field to further subdivide a grouping.
- To remove the grouping, drag the column header from the group selection field and drop it back in the list or select the Remove grouping command in the context menu.
Method 2
Right click on the column header and select Group columns by from the context menu. You can now select whether to use the Standard grouping or grouping according to Initial letters.
To remove the grouping, right click on the column header or the particular column in the Group Selection field and select Remove Grouping from the context menu.
Grouping summaries
Summaries can be displayed for individual groupings.
To do this, right click in the column header in the Group Selection field and select Group Sum Editor from the context menu.
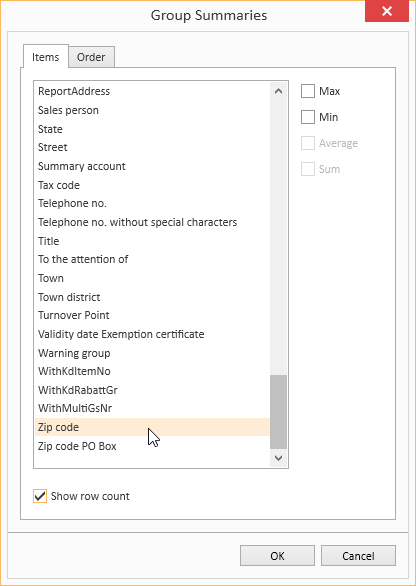
You can now define criteria for a Group Summary in the Group Selection dialog. You can use the Show number of rows option to display the number of data sets in a group.
Sort according to Grouping summaries
When a data grid has been grouped and a Grouping summary has been defined, the grouped data grid can also be sorted according to the values in the Grouping summary. Right click on the column header that is used for the grouping and select Sort by Group sorting from the context menu.
Calculated Fields
You can create Calculated fields in the Column editor. To do this, open the Column editor and click on the Add calculated field button.
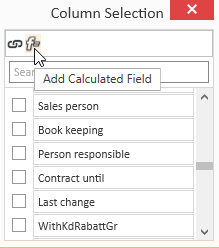
First, you will be asked for a field name. Enter the header for the Calculated Field in the box. When you click OK to confirm the dialog, the Expression editor opens.
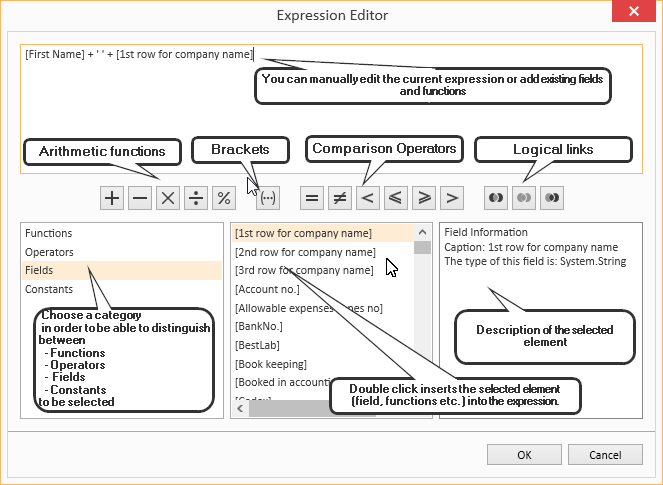
You can find a list of the functions and operators under Functions in Calculated fields.
To later edit the Expression, right click on the table column header of a Calculated Field and select Edit Expression from the context menu.
Iif(IsNullOrEmpty([Vorname]), [1. Zeile Firmenname], [Vorname] + + [1. Zeile Firmenname])In this example, the First name and Company 1 fields are combined into one field with a space between them, but only if the First name field is filled out. Otherwise, only the Company 1 field is output.
Field Background color
Data fields that meet certain conditions can be highlighted with a Background color.
To set Background colors for individual fields, right click on a column and select Background color from the menu.
You can now define a new rule. All the fields that match this rule will then be highlighted in the selected color.
The pencil icon opens the Expression editor. You can create more complex expressions with this editor. Also see Calculated Fields.
When you have successfully created a rule, close the window by clicking the OK button. The rule will be applied when you refresh the View.
Rule: [NoEmployees] < 30
Color: #FF009DFF
This rule colors all fields in the Client no. column blue if the number of employees entered in the corresponding data set is less than 30.
Using and Managing layouts
Right click on a column to open a context menu where you can access the Layout settings.
Load Layout
The Load layout command displays all the layouts that you have already created.
You can easily switch to another Layout here.
Save Layout / Save Layout As
When you Save Layout, the current View will be saved in the currently open Layout. All Expressions, Calculated Fields and Sort Groups will be included in this Layout and can be applied as required.
You can use the Save Layout As command to save the current View as a new separate Layout.
Specify the Layout properties for this.
Edit Layout
If you want to change the properties of the current Layout, select Edit Layout Properties from the menu. The Layout properties window opens. You can make the changes that you want here.
Reset Layout / Delete Layout
If the edited Layout is not what you want, you can undo the changes you made and revert to the original Layout by selecting Reset Layout from the menu. You can also use the Delete Layout command in the menu to delete a Layout entirely if you no longer want it.
Functions / Toolbars
Various functions are provided in the toolbars (ribbons / ribbon bars) above the tabs.
The toolbar structure depends on the current module / tab.
Some toolbars are only shown when you edit certain fields, such as the Text toolbar when you edit rich text fields.
'Delivery slips' toolbar
'Data control' area
![]() Create delivery slip
Create delivery slip
You can use this button to create delivery slips and return slips with various references.
Create delivery / return slip
-
Open the Items | Delivery slips menu command.
-
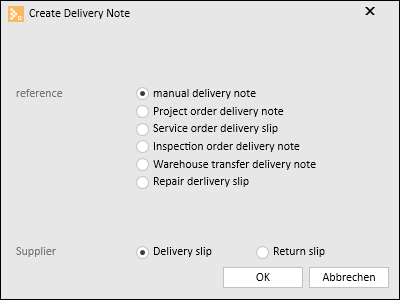
Click on the
 Create delivery slip button in the Delivery slip toolbar. The Create delivery slip window opens.
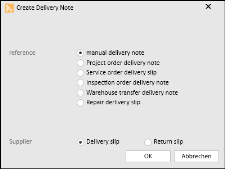
-
Select a Reference and a Delivery type.
You cannot create a return slip for every delivery slip type (reference).
-
Click on the OK button.
Depending on the chosen reference, either an empty delivery slip (manual delivery slip) or the order selection will be displayed. The order selection will also be displayed for return slips that reference an order.
-
The selection of delivery or return slip line items can be made either using a corresponding selection (for orders) or on the Items | Delivery slips | Line items tab.
-
The delivery slip / return slip can be booked and printed using the Book / Print button in the Navigation toolbar.
![]() Delete delivery slip
Delete delivery slip
This function can be used to delete delivery / return slips that have not been booked and set to completed yet.
Before actual deletion, a security prompt is displayed (Delete data set? Yes / No) The delivery slip will not be deleted until you confirm this message by clicking on the Yes button.
Use the Cancel function if you need to edit a delivery slip / return slip that has already been booked.
Data sets cannot be deleted in delivery slip management unless you have Items | Delivery slips | Delete delivery slips authorization.
'Export' area
![]() Excel
Excel
You can save the displayed data as a list in MS Excel format (*.xlsx or *.xls) using this button. The current column, filter, and search settings are considered when the data is exported.
![]() Report
Report
Reports can be used to print out or send the displayed information for an address or process. The reports that are registered for the current program point are displayed when you click on the Report button.
Also see Registration
![]() Copy address
Copy address
Copies the current address to the clip board. The address that you copied can then be inserted as text from the clip board into any application, or you can use the Insert address function to insert the address into an eserp address form.
'Actions' area
![]() Delivery slip creation assistant
Delivery slip creation assistant
This function starts the delivery slip creation assistant with comprehensive functions for creating delivery slips for order deliveries, warehouse transfers, branch requirements, and returns.
You can find a detailed description under Delivery slip creation assistant.
![]() Completed / Uncompleted
Completed / Uncompleted
When a delivery slip has been completed, it can be marked as Completed. The Completed status can be used to filter the delivery slips to show only the uncompleted goods received in a list, for example.
The status of the Completed option is shown in the list view and in the Items | Delivery slips | Details tab - Details area.
You can activate or deactivate the Completed status using the ![]() Completed / Uncompleted button.
Completed / Uncompleted button.
![]() Book / Print
Book / Print
Once you have finished preparing a delivery slip / return slip, this function is used to book it and print it out. The corresponding warehouse booking is performed depending on the options selected in the Book and print delivery slip booking dialog.
If the Only book when delivery slip is completely deliverable option under Settings | Items | Stock movement | Settings | Delivery slip is activated, a delivery slip can only be booked if all the line items in the delivery slip are available in the warehouse.
Exception
The Book negative stock in warehouse option is activated and the Warehouse minimum stock level must be maintained option is not activated.
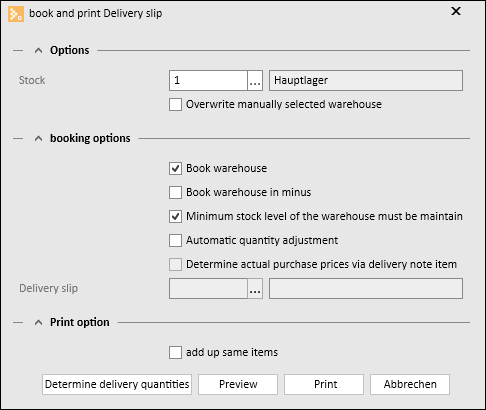
'Options' area
Warehouse
Select the warehouse here from which items are to be supplied from stock with the delivery slip.
The warehouse defined as the Main warehouse is entered here by default.
Main warehouse
The Main warehouse is specified under Settings | Items | Warehouse management | Settings - 'General' area.
The settings logic (basic settings for each office branch / Settings sets) determines that the preset main warehouse for the currently active office branch is always used for the booking.
Overwrite manually selected warehouse
If the Overwrite manually selected warehouse option is activated, any delivery warehouse instructions that may have been made for certain line items will be overwritten by the warehouse instruction for this booking option.
'Booking options' area
Book warehouse
Here you can specify whether the delivery slip is booked from the specified warehouse.
If thiis option is not selected, no alteration to the stock level in the warehouse will be made when the delivery slip is printed.
This option also adds a returned item back into the warehouse for a return slip.
Book negative stock in warehouse
THis option makes it possible to always book the requested delivery quantity from the warehouse. This will be done whether there is sufficient stock in the warehouse or not. This leads to negative warehouse values.
The Book negative stock in warehouse option is only visible if the Allow negative numbers when booking warehouse option is activated under Settings | Items | Warehouse management | Settings - 'General' area.
Warehouse minimum stock level must be maintained
Allows items to be booked from a warehouse only until the minimum stock level is reached. If a larger quantity of the item is required, only the quantity down to the minimum stock level will be booked.
The Minimum stock level for a warehouse item is specified on the Items | Warehouse items | Details - 'Warehouse items' area tab.
Automatic quantity adjustment
If this option is activated, the requested quantity will be adjusted automatically if there is insufficient stock available or the minimum stock level is to be considered.
Create delivery slip items as system components
This option is available if the With system components option is activated under Settings | Items | Stock movement | Delivery slip and an order with an assigned system is linked.
If this booking option is activated, the dialog for transferring delivered order line items opens after booking and printing. The order line items are filtered according to the booked delivery slip.
If line items are transferred, in the Transfer options you can select a room / area of the system to which the line items are to be booked. You can also create a new room / area and specify the fitting date and the technician responsible.
Determine actual PPs from delivery slip line items / Delivery slip
This option is only available for return slips and if actual purchase prices are being used. A delivery slip can be selected using the ![]() Selection field to determine the purchase price of a returned item. The system attempts to determine the purchase price from the delivery slip line item.
Selection field to determine the purchase price of a returned item. The system attempts to determine the purchase price from the delivery slip line item.
Actual purchase prices
The With actual purchase prices option under Settings | Items | Item management | Settings - 'General' area is used to set whether actual purchase prices are used.
'Print options' area
Total same items
This option specifies whether or not the total number of identical items is output before the delivery slip is printed out.
This option is displayed here when a delivery slip is booked / printed depending on the setting of the Total items when printing option that is selected under Settings | General | Reports | Settings | Purchase order / Delivery slip - 'Delivery slip default settings' area.
You can specify that the items are not added together (No), or that they are always added together (Yes), or that this option can be set (Optional) when a delivery slip is generated.
Determine delivery quantities
A test booking is performed when you click on the Determine delivery quantities button. The delivery quantities / quantity units that can actually be booked are determined when the booking and printing options are considered.
However, a possible order booking is not made immediately when the delivery quantities are determined. This means that the order number is not deleted if items that are not delivery items are included on the delivery slip, that is, they have the item type Cannot be supplied (see Settings | Items | Item management | References | Item types).
The entire delivery slip is processed during the determination. A corresponding message is displayed if any differences occur.
Preview
A preview of the printout that does not allow you to actually print it opens when you click on the Preview button. This is simply a preview of the current state of the delivery slip. For this reason, no delivery quantities are shown in the preview before the delivery slip is first booked and printed out.
You can open reports that you created yourself for delivery note management using this button.
This allows you to print out user defined reports for shipping documents or package labels, for example.
Bookings cannot be made to completed orders.
Completed status can be set automatically when the delivery slip / return slip is booked.
To do this activate the Book including completed option under Settings | Items | Stock movement | Settings | Delivery slip.
![]() Cancel
Cancel
A booked and not yet completed delivery slip or return slip can be canceled by clicking this button to allow the slip to be edited and then printed and booked again.
Delivery slip
An attempt is made to book the items on a delivery slip back into the warehouse if the items are warehouse items. If the delivery slip includes items that were booked when received with the option Bypass warehouse or miscellaneous items, the delivery slip cannot be canceled.
Reservations that have been made cannot be reversed by the cancellation.
Return slip
Only the return slip booking is reversed (Warehouse booked option is reset) when a return slip is canceled, so that the return slip data can be edited again.
![]() Release for commissioning
Release for commissioning
All the items on a delivery slip are reserved in the corresponding warehouse using this button. If items with activated serial number management are on the delivery slip, the serial numbers will be reserved on a FIFO![]() First In First Out basis and entered on the delivery slip.
First In First Out basis and entered on the delivery slip.
![]() Withdraw release for commissioning
Withdraw release for commissioning
The reservations for all reserved items and serial numbers can be cleared by using the ![]() Withdraw release for commissioning button.
Withdraw release for commissioning button.