Line items
Service | Contracts | Line items
Contract fee line items make it possible to organize a Contract invoice more transparently. The Client gets an overview of the items that make up a Contract invoice (for example the proportions for maintenance and rental).
Contract final costing is simplified because the line items allow a detailed breakdown of services in a contract.
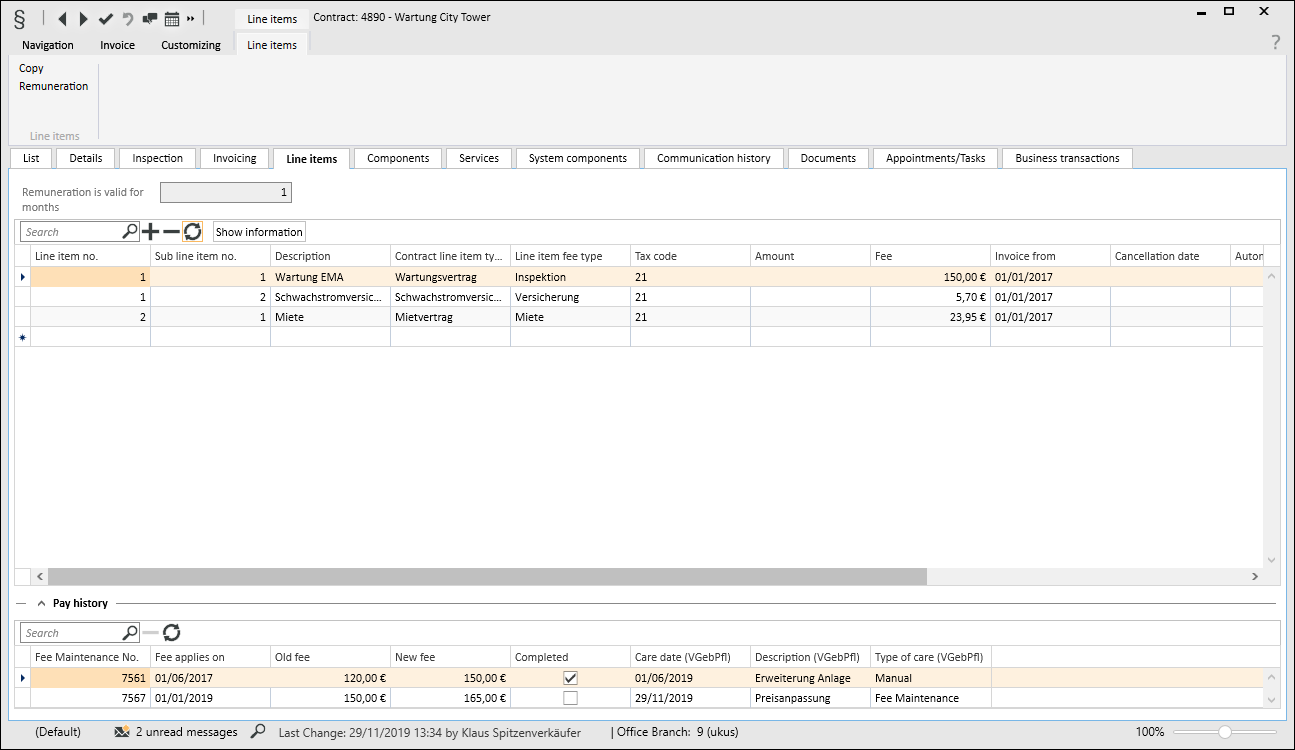
The individual Contract line items are recorded in the upper table. If you highlight a Contract line item in the table, the list below shows the fee history for this line item.
Insert Contract line item
Click on the ![]() button in the Navigator below the table view of the Contract line items.
button in the Navigator below the table view of the Contract line items.
Line item / Sub item
A new Contract line item data set is displayed. The following fields are pre filled: Line item (with the next available Line item number) and Sub item (always 1). The next line item number is automatically assigned. If necessary, enter your own line item number. The line items will be printed on the Contract invoice in order of line item number.
Enter a sub item number in the Sub item field. Only the first (lowest number) sub item is shown on the Contract invoice. The amounts for the other sub items will be included in the first (lowest number) sub item.
The other sub items allow for a further breakdown of items for your own Contract final costing. The sub items will additionally be booked to the corresponding revenue accounts in the Invoice allocation.
Description
You can enter an individual description for the particular line item in the Description field. This Description is shown on the Contracts | Services tab for the selection of Contract line items.
Contract line item type
A Contract line item type must be selected for each fee that is to be booked to a different revenue account. Assignment to the revenue account (contra account), cost center, and cost unit is done using the Contract line item type.
The Contract line item types are created underSettings | Contract management | References | Contract line item types. A product type can be assigned to a line item type. Some examples of this are described below.
|
Product type |
Description |
|---|---|
|
Fixed price |
Contract line items with the product type Fixed price are permanently charged at the fee recorded for the Line item and are shown as a Quantity of 1 on the Invoice. |
|
Maintenance |
When invoicing a Contract invoice, line items with the product type Maintenance will only be included if this invoice is inclusive of Maintenance. Charging of an Inspection must be specified first because Maintenance can only be charged as an additional fee to the Inspection.
The Maintenance product type is, however, only shown if the Elevator tools product is not being used, as this does not make a distinction between Inspection and Maintenance. |
|
Service |
The amount to be invoiced for Line items with the product type Service is determined from the Labor reports. The individual shifts are each assigned one Contract line item in the Contract on the Service | Contracts | Services tab for this purpose. On invoicing, all the working times for all shifts that have been assigned this Contract line item and which are within the period to be invoiced and for which the Invoicing option has been set will be added together and shown as a Quantity in the Contract invoice. |
|
Quantities |
Line items with the product type Quantities are charged in conjunction with the Contractual services rendered. The corresponding information must be entered for the services and shift data on the Service | Contracts | Services tab for this. The line item fee is multiplied by the quantity of shifts agreed and completed and the number of employees for billing. |
Tax codes
You can specify a separate Tax code (VAT code) or select one from the corresponding list field for each line item or sub item. This may be required for insurance, for example.
Quantity
The Quantity field can only be edited for line items that are assigned the Fixed price product type (see Contract line item type). When Contract invoices are booked, the Quantity according to Contract is entered in the invoice line item for line items with product type Fixed price and the fee is multiplied by the line item quantity.
Fee
You can specify the fee for each line item in this field.
Invoice from
You can specify for an individual line item the date from which the line item will be charged, for example if a free maintenance period has been agreed for a line item. Enter the corresponding date in the Invoice from field. In this situation, this date is independent of the date specified on the Service | Contracts | Invoicing tab.
Terminated on
You can also specify the date after which individual line items are no longer charged. Enter the corresponding date in the Terminated on field. Individual line items can be terminated here, for example if items no longer exist or are replaced by others. When replacing a line item, the old line item must be terminated before the new line item is created.
Automatic price maintenance off
Line items that have the Automatic price maintenance off option set will be excluded from an automatic fee update.
They will also not be shown under Fee maintenance / List of contract line items and will therefore not be maintained either.
Start date automatic fee maintenance
You can also enter a Start date for fee maintenance here.
The Start date for automatic fee maintenance and the Automatic price maintenance off option are mutually exclusive, so if you activate the option, the start date is deleted, and if you enter a start date, the option is deactivated.
If a start date has been recorded for the Contract line item, this line item will be considered in the fee maintenance from this date onwards.
If you are not using automatic fee maintenance, line items with a start date greater than the current date will not be visible in the fee maintenance. If you are using automatic fee maintenance, the line item with a start date greater than the date from which the new fee is valid will not be updated.
System no.
You can use the System number field to assign a System to the Contract other than the main System from the contract. This is done using the selection field.
If you select a system here, the System match code is also entered automatically. This allows you to assign more than one system to a contract.
This field can only be edited, however, if the With several systems option is activated under Settings | Service | Contract management | Settings - 'General' area.
Contract line item ID no.
The next available number in the Contract line items number range will be entered automatically in the Contract line item ID no. field when you create a new contract line item. The ID no. is used on the Contracts | Services tab to generate the Shift data.
'Show information' button
The Show information button opens an Info memo field where you can record further information about each Contract line item in a separate entry window.
Net invoices
Contract invoices can also be printed out as net invoices without detailing the sales tax / VAT. For this, a tax code for which the % rate field is empty (nothing entered, not even 0) must be recorded in Settings | Book keeping | General | References | Tax code.
If a Contract invoice only contains line items without sales tax / VAT, the text associated with the tax code description for the selected tax code will be entered automatically in the sales tax line where the sales tax rate and sales tax amount are usually shown.
Please note that a contract invoice can only be written either with or without sales tax / VAT.
If a Contract contains fee line items both with and without sales tax, the booking will be canceled and a corresponding message displayed. (This also applies to all Contracts within an invoicing group.)
If all the fee line items in an Invoice are booked without sales tax, any Materials that have not yet been accounted will be automatically charged without sales tax.
'Fee history' table
Development of the fees for the highlighted Contract line item is displayed in this table. Fee maintenance can be performed line item by line item using the Line items - Fee maintenance toolbar or for specific contracts using the Service | Contracts | Fee maintenance menu command.
The fee history table contains the Completed option, which indicates whether the fee increase has already been applied to the associated Contract line item and therefore also included in the charges. This option is initially not activated directly after a fee maintenance operation unless you are using automatic fee changes with a start date.
In this case, the increase will not be set to Completed until it is entered automatically when invoicing the Contract invoice.
If a Contract invoice with automatic fee changes is canceled or deleted, the fee changes will be undone, i.e. the old fee will be entered for the Contract line item.
Functions / Toolbars
Various functions are provided in the toolbars (ribbons / ribbon bars) above the tabs.
The toolbar structure depends on the current module / tab.
Some toolbars are only shown when you edit certain fields, such as the Text toolbar when you edit rich text fields.
'Line items' toolbar
The Fee maintenance button can be used to perform fee maintenance for the current line item.
'Edit data set' area
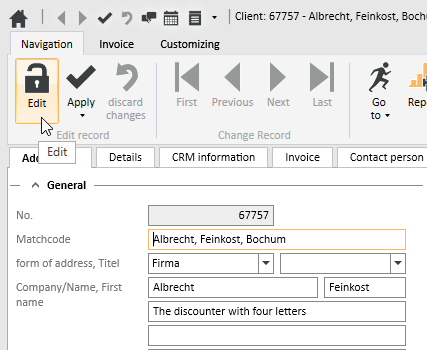
![]() Edit
Edit
Click on the ![]() Edit button to switch the Form to Edit mode.
Edit button to switch the Form to Edit mode.
The usual Input elements are available in Edit mode.
If data has been changed and you close the form or change to another data set, a message will be displayed asking you if you want to save the changes or not.
Changes can be undone by clicking the ![]() Reject changes button as long as input has not been actively saved or the form has not been closed or the data set changed.
Reject changes button as long as input has not been actively saved or the form has not been closed or the data set changed.
Detail data sets can also be opened directly in Edit mode. To do this, deactivate the Do not automatically edit detail data option under Settings | General | General | Settings | System settings - 'Program behavior' area.
Also see Edit Data Set
![]() Apply
Apply
You can always actively save changes in the data by clicking the ![]() Apply button.
Apply button.
![]() Apply and close
Apply and close
You can save the changed data and close the entry form / module in one go with the ![]() Apply and close function.
Apply and close function.
![]() Reject changes
Reject changes
Changes can be undone by clicking the ![]() Reject changes button as long as input has not been actively saved or the form has not been closed or the data set changed.
Reject changes button as long as input has not been actively saved or the form has not been closed or the data set changed.
'Change data set' area
Each detail view contains a copy of the current list view for the module. This can be viewed on the List tab in the Detail view. This enables you to also navigate through the original list in the Detail View using the navigation buttons.
If a filter or search is active when you open the detail view, this will also be applied to the display on the List tab.
![]() First
First
Jumps to the first data set in the list. The sort order on the List tab is used.
![]() Previous
Previous
Pages back to the previous data set in the list. The sort order on the List tab is used.
![]() Next
Next
Pages forward to the next data set in the list. The sort order on the List tab is used.
![]() Last
Last
Jumps to the last data set in the list. The sort order on the List tab is used.
![]() Go to
Go to
There is a general Go to function in eserp that allows you to jump to the associated modules.
You can use the Go to function to jump to other modules that are connected to the current process.
You can jump directly from a Client data set to the Systems or Contracts for the Client.
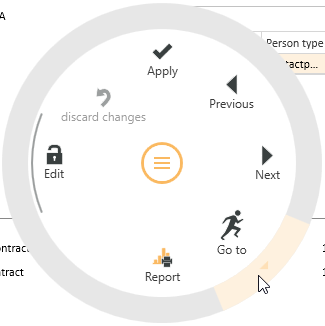
The ![]() Go to button in the Navigation toolbar is used to execute the Go to function.
Go to button in the Navigation toolbar is used to execute the Go to function.
Click on the ![]() icon in the button to display the available Go to targets.
icon in the button to display the available Go to targets.
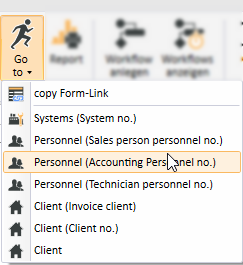
When you click on an item in the list, the corresponding module opens with the linked data set.
Go to in the Context menu
The Go to function is also available at many points in the program in the Context menu that is opened with a right mouse click.
![]() View change history
View change history
Program areas for which a detailed change history is to be recorded can be activated from Tools | Database logging. A report stating when data sets were deleted can be produced for each area. When the detail log function is activated, the report also states what kind of data sets were deleted.
This report is recorded in the report entry point Data set change history (Groups).
A report can be displayed from the Data set change history report entry point using the ![]() Show change history button. This function is also available in lists / tables via the context menu so that you can display the changes in the detail data sets.
Show change history button. This function is also available in lists / tables via the context menu so that you can display the changes in the detail data sets.
The Data set change history and Data set change history (Groups) report entry points are only shown when the license for esLog is present and the table RevGrup exists.
![]() Report
Report
Reports can be used to print out or send the displayed information for an address or process. The reports that are registered for the current program point are displayed when you click on the Report button.
Also see Registration
'Workflow' area
![]() Create workflow
Create workflow
Previously defined workflow processes can be selected and started using this button. Only the workflow processes that are assigned to the current process type or to no process type will be displayed.
![]() Show workflow
Show workflow
This button displays the workflows that have already been started.
![]() Copy address
Copy address
Copies the current address to the clip board. The address that you copied can then be inserted as text from the clip board into any application, or you can use the Insert address function to insert the address into an eserp address form.
![]() Insert address
Insert address
Inserts a previously copied address (Copy address function) into the current address form from the clipboard.
![]() Close
Close
Closes the current form / module.
A message will indicate if there are any unsaved changes.
You can then decide whether to save the changes (Yes), reject the changes (No) or cancel the Close command (Cancel).
'Invoice' area
Notice complying with §14 para. 4 line 1 No. 9 UStG for invoices
"The recipient of the service shall keep the invoice for a period of two years in accordance with §14b para.1 lines 2 & 3 UStG. This period shall begin at the end of the calendar year in which the invoice was issued."
The notice complying with §14 para. 4 line 1 No. 9 UStG can be inserted automatically when booking / printing invoices for private persons if the following conditions are met:
-
The Private option is activated for the client on the Office | Clients | Address tab.
-
The Office branch for the associated calculation folder is in Germany. Also see Settings | General | Office branches | Address - 'Address' area.
-
The contract invoice report has already been prepared for printing out the notice complying with §14 para. 4 line 1 No. 9 UStG.
The corresponding basic reports are available in eserp version 2.0 and above. If you are using Client specific reports for invoices, you can add the notice complying with §14 para. 4 line 1 No. 9 UStG.
Single (separate invoicing)
You can print out and book individual contract invoices by means of the Single button in the Invoice toolbar.
If the contract belongs to an invoice group, all the associated invoices will be printed.
Click on the Single button.
In the contract invoices input dialog, you can specify the invoices to be printed out by means of a Target date. A search for due contract invoices is now made, working back from this target date to the next starting point of the invoice interval (using the fee type).
You can additionally use the Invoice after inspection completed option to specify if only the invoices for which the agreed inspection / maintenance has been done are to be printed (the corresponding inspection order must be flagged as Completed). If the contract stipulates that it is reckoned only after the inspection has been done, the inspection interval will be taken as the invoice interval, regardless of what has been recorded through the fee type in the Contract. The interval in the fee type should therefore be the same as the inspection interval for inspection contracts.
The inspection order number will be entered in the OrderNo field of the invoice if a contract is invoiced after inspection is completed.
You can select a sort criterion using a selection field for serial or individual invoicing of a contract that belongs to an invoice group. All the due invoices are sorted according to this selected sort criterion, and invoiced and printed out in this order.
Possible sort criteria are according to System location (this is the default setting), System number, Contract number, and Matchcode.
The additional sort criterion Invoice approved is shown in the list if the Invoice after inspection completed option is set. This sort criterion refers to the Invoice approved on field on the Details tab of the corresponding order. This date field will be completed there when the order is set manually to completed, or implicitly when set by Technically completed and when created (maintenance) with the Invoice option.
When you have completed your entries here, click on the Book button.
As you have selected single (individual) invoicing, the selected contract will now be displayed (only if it is actually due). If the selected contract belongs to an invoice group, then all the contracts due on the entered target date that belong to the group will be displayed.
The rule for invoice groups is: Either all due in the group are reckoned, or none.
If only some of the contracts or no contracts are shown, you can enter a different target date in the Target date field. Then click on the ![]() (update) button to update the display to reflect the new target date.
(update) button to update the display to reflect the new target date.
If the desired contracts are displayed, click on the Book contract invoices button to book and optionally print out the contract invoices.
You can enter the invoice date using the corresponding date field. If the contract invoice is to be printed out right after it has been created, check the Print / Send option. (You can book the contract invoices first, and then print them out later. This saves time when large numbers of invoices are to be printed out. It also only blocks the program for a short time.)
Exact day billing
It is also possible to book the billing to the exact day as a variant of normal booking. To do this, activate the Exact day billing option. If you now click the Book button, the fee items will be reckoned to the exact day according to the invoicing period information (either contract invoicing period or Line item period). To calculate the daily fee, a monthly average of 30 days is used. Contract invoices that have been reckoned to the exact day are shown in blue type. The line items then show the number of days reckoned and not the number of months. The list heading changes accordingly.
Enter an invoice date and activate the check box if the invoice is also to be printed. Then click on the Book contract invoices button.
Then confirm that the displayed and therefore due invoices really are to be booked by clicking the Yes button.
You can select another report variant for the invoice printout if you have created one. Then click on the OK button to start the printout (the print dialog for your printer will open).
If you attempt to book contract invoices to the Client without an account number, (serial invoices or individual invoices), an error message is displayed or an account number is automatically drawn from the KTO number range (depending on the basic setting).
When you click on the OK button a further message is displayed to indicate that the contract data is being edited or is incomplete. The booking process will be canceled and you will be returned to the List page. The booking process can be repeated when the error has been corrected.
Recalculation
The Recalculation button enables a recalculation of a selected contract or all the serial contracts for the selected time period to be started. All the invoices already created for this period will be deducted.
If the contract details (line item fees) are unchanged, a recalculation of zero would be the result. This is checked by the program first, and a corresponding message is displayed and no booking takes place.
The recalculated line items appear first on the recalculations that are created, followed by all the invoice line items that have already been booked. These are shown as deducted line items. The end total is the sum of all the line items. This means that it is possible for the end result to be a negative amount, that is, a credit. In such cases, a credit is created (for a positive amount) automatically. Of course, the correct credit amount appears in the outgoing invoice book, i.e. the book keeping entry is negative.
Manual
Manual contract invoice / credit
You can create contract invoices and credits manually using the Manual button.
When you click on this button, you can enter one or more lines for reckoning. As with the contract line items, you can specify the line item and sub line item, the fee, as well as the line item type, so that the fee is booked to the correct account; and a text that is to be shown in the description line of the invoice / credit.
When all fields are completed, the invoice / credit is booked by using the Book button in the Navigation toolbar.
Display
You can select a Contract invoice report using this button. There are various presentation options available for the printout depending on the report.
'Prices' area
Contract prices
Process specific prices can be specified for each contract:
- List prices (for certain order types, materials and wages discounts)
- Hourly rates (for certain wage codes, hourly rates for sales)
- Item prices (for certain items, sales price, materials and wage discounts)
The process specific prices can be time limited (Valid from / Valid until).
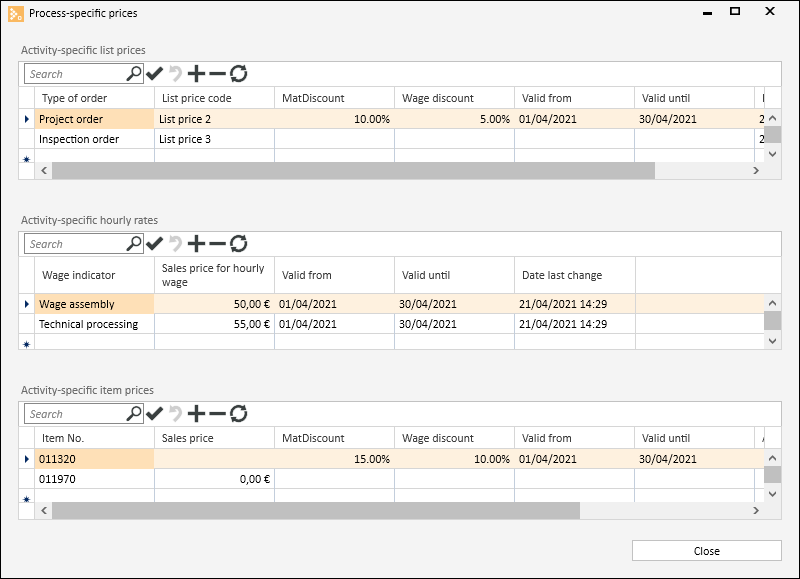
Process specific list price
You can specify the list prices for individual Order types (project order, partial order, service order, and inspection order) in this table.
You can enter four different prices per item (Items | Items / Services | Prices - Prices). You can select the default List price code to be used for this contract here. An existing value must be entered in this field. In addition to the four prices, the Gross entry can also be selected. If this is entered, the gross price of the item from the main supplier in the local currency will be selected as the item sales price when pricing is done.
If list price 2 or above is selected here, and there is no list price 2 available for the item, list price 1 will be used for this item.
Discount
A discount for materials and / or wages, which will determine the sales price (SP price) pricing, can be assigned to the contract.
Valid from / Valid until
The prices can be time limited.
Process specific hourly rates
A sales hourly rate for the contract can be recorded here for each wage code. If contract specific hourly rates have been defined, these will be used as defaults when a calculation is created.
Valid from / Valid until
The prices can be time limited.
Process specific item prices
You can specify fixed sales prices or materials and wage discounts for certain items for the contract.
Valid from / Valid until
The prices can be time limited.
The Customize (0110250) license is required for customizing.
The optional esCustomize allows the following control element properties to be adjusted:
- The order and visibility of input and control elements
- The labeling of control elements
- The layout of control elements (color, text width)
- The brief hint text for control elements
- The data linking of control elements
It is also possible to create new fields and add them to the Form.
![]() Start customizing
Start customizing
Click on the ![]() Start customizing button to switch the current form to Customizing mode.
Start customizing button to switch the current form to Customizing mode.
The Form is always customized in the context of the current role that is being used (see Role assignment).
To find out how to change the role, please see: Role assignment.
General | Administration | General references - Customize forms authorization is required to customize forms.
Also see Customizing forms
Apply customizing from role
Click on the Apply customizing from role button to apply the customizing settings already defined for another role to the current form. A selection of the customizing properties defined in other roles is shown.
![]() Edit fields
Edit fields
You can edit certain properties (required field, font color, background color, default values) of the input fields in a form / module using the Edit fields function. Also see Required fields and Default values.
You can also create your own fields and user defined data packs, also see Create individual fields.
![]() Role management
Role management
This button opens management of customizing roles.
Customizing roles can be created and managed under Settings | General | Customizing | References | Customizing - Roles.
Functions when the Customizing process is running
Three additional buttons are shown after you start Customizing:
![]() Apply
Apply
This function saves the temporary customization and closes Customizing mode.
You must close and restart the program for the changes to be visible to the user.
![]() Cancel
Cancel
Use this button to Cancel the Customizing process. Customizing mode closes without saving the changes you made to the forms.
![]() Reset
Reset
This function resets Customizing and loads the default settings for the form. The reset is performed only after you have confirmed the query dialog that is displayed.
The current Customizing settings are deleted by the reset and cannot be retrieved.
General | Administration | Reset form customizing authorization is required to reset Customizing.