Warehouse items
Items | Warehouse items
For various reasons, management of the warhouse data is kept separate from actual management of projects, offers, and items. eserp allows restricted warehouse management in which not every item is managed in a warehouse. The number of data sets would be unnecessarily high if all the items that are available for project planning were also managed in the warehouse.
Items from the item master data can be recorded as warehouse items in each warehouse. These items are then available for warehouse management.
Items | Warehouse management | Warehouse items authorization is required for this menu command.

Warehouse item views
You can influence the warehouse item list view by means of filters and / or groupings.
You can use a filter to display all the warehouse items in a warehouse (Warehouse filter) or in which warehouse an item is recorded as a warehouse item (Item filter).

Edit warehouse itemsEdit warehouse items
You can open a warehouse item in the list by double clicking on it. The Items | Warehouse items | Details tab is displayed.
Creating warehouse items
Warehouse items can be created in different ways:
-
Manually create individual warehouse items ( Create warehouse items function)
-
Copy warehouse item function in the item master data
-
Import to warehouse Import item list by warehouse items function in the item master data
-
Create warehouse items when booking stock entries
-
First inventory of a warehouse
Column selection / Column editor
The columns to be displayed in a Data Grid can be set using the Column Selection dialog. To open Column Selection, right click on the table column header and choose Show Column Editor from the context menu.

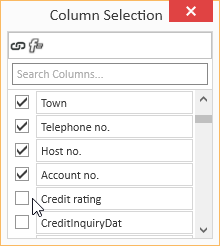
In the Column selection window, you can show the desired columns by activating the option in front of the column name.
Deactivate the check box in front of the column name to remove the column from the list view.
To save the list view layout, right click on the column header and select Save layout from the context menu.
Move columns / Change column order
Each user can set the column order individually. To move a column, click on the column and hold down the left mouse button, drag it to the desired position between two columns and release the mouse button (drag and drop).
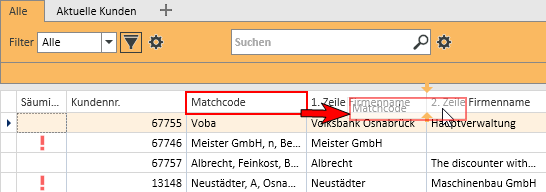
Suitable locations for inserting a column are marked with two colored arrows.
Optimum width
Adjusts the column width to automatically match the contents. Right click on the column header and select Optimum width from the context menu.
Use the Save layout function to permanently store the changed column width.
If you do not save the Layout after changing the column width, the column width will be reset when you restart the module.
Optimum width (all columns)
Adjusts the column width to automatically match the contents for all columns. Right click on the column header and select Optimum width (all columns) from the context menu.
Use the Save layout function to permanently store the changed column width.
If you do not save the Layout after changing the column width, the column width will be reset when you restart the module.
Column filters
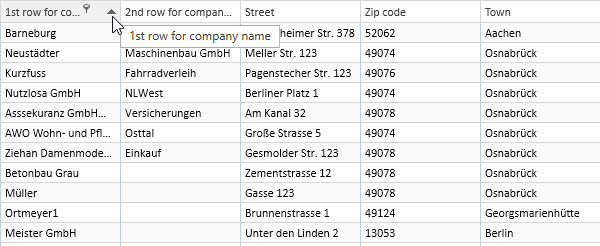
You can use column filters to display only certain data sets from extensive lists.
You can use the column filters for example to display all the client data sets for a particular ZIP code. Only the ZIP codes that are already recorded for the client data sets will be displayed.
To filter the data sets, click on the desired column (for example ZIP code) and on the filter icon ![]() there.
there.
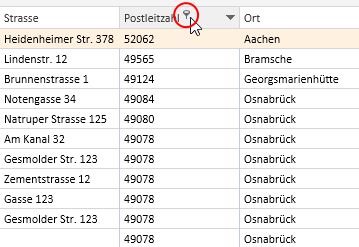
You will now see a list of all the recorded ZIP codes.
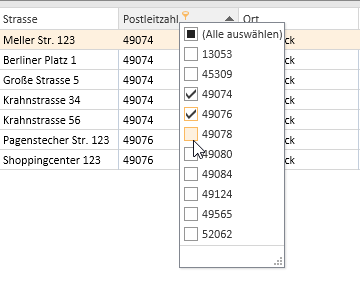
You can now select one or more values for the filter. There are also additional filters available (all, user defined, empty, not emptry).
If a filter is active for a column, this is indicated by the colored filter icon ![]() in the column header. Click on the icon to edit the filter.
in the column header. Click on the icon to edit the filter.
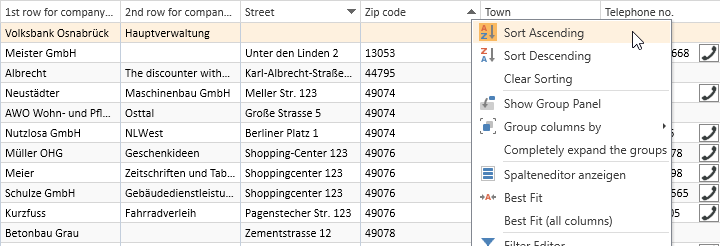
Sort order
The values in a column can be sorted in ascending or descending order by clicking on the table column header.
You can sort rows without changing existing sort conditions as follows:
-
Press and hold down the Shift key and click on the column header until an up or down arrow appears
-
Right click on the column header and select Ascending order or Descending order from the context menu.
In the above example, the list is sorted by Zip code (ascending order) and additionally by Street (descending order). Thus, if there are several entries with the same Zip code, these entries will be sorted according to the Street field.
To remove a column from the sort criteria, press and hold down the Ctrl key and click on the column.
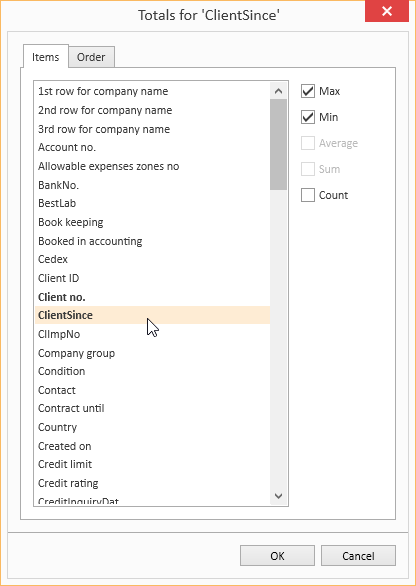
Column summaries
A column summary can be displayed below each column in the list.

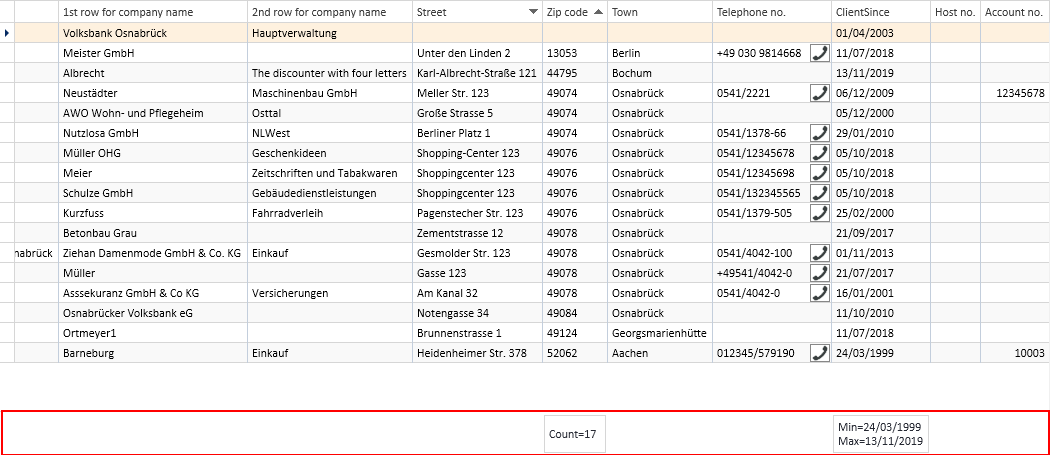
To configure this column summary, right click on the column header and select Show Sums from the context menu.
A Totals field is now shown below the list. Right click in this field to select the value to be displayed for this column.
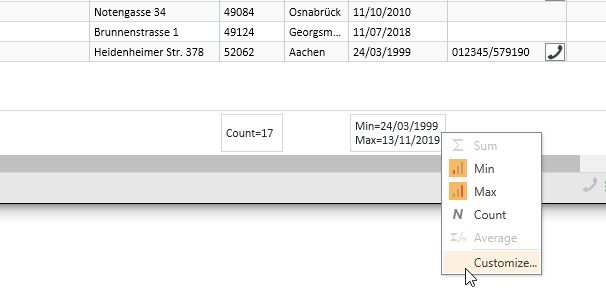
You can use the Customize... context menu command to make more detailed settings for the column summaries, including setting the Sort order and labeling when there are several sums.
Groupings
To group according to one or more columns, proceed as follows:
Method 1
- Right click on the column header and select Show grouping field from the context menu.
- Drag a column header into the Grouping field.
- You can drag additional columns into the grouping field to further subdivide a grouping.
- To remove the grouping, drag the column header from the group selection field and drop it back in the list or select the Remove grouping command in the context menu.
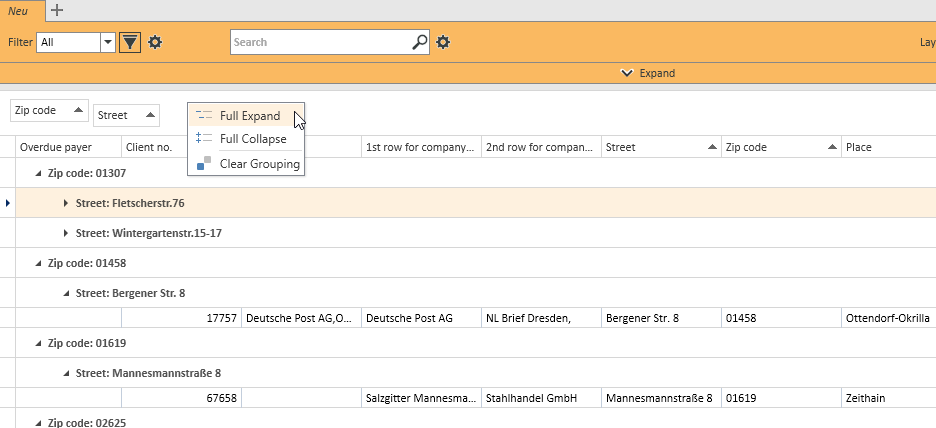
Method 2
Right click on the column header and select Group columns by from the context menu. You can now select whether to use the Standard grouping or grouping according to Initial letters.
To remove the grouping, right click on the column header or the particular column in the Group Selection field and select Remove Grouping from the context menu.
Grouping summaries
Summaries can be displayed for individual groupings.
To do this, right click in the column header in the Group Selection field and select Group Sum Editor from the context menu.
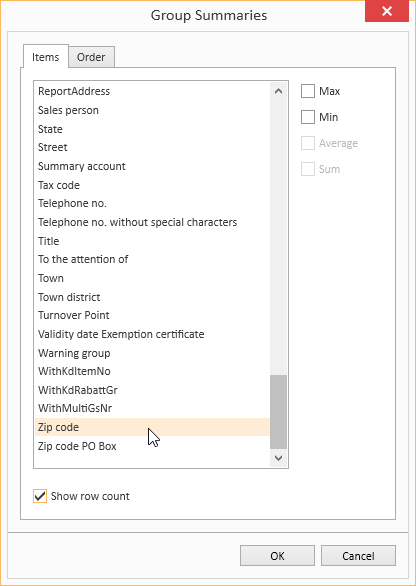
You can now define criteria for a Group Summary in the Group Selection dialog. You can use the Show number of rows option to display the number of data sets in a group.
Sort according to Grouping summaries
When a data grid has been grouped and a Grouping summary has been defined, the grouped data grid can also be sorted according to the values in the Grouping summary. Right click on the column header that is used for the grouping and select Sort by Group sorting from the context menu.
Calculated Fields
You can create Calculated fields in the Column editor. To do this, open the Column editor and click on the Add calculated field button.
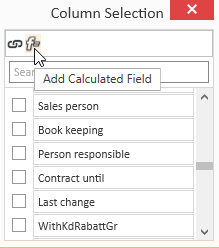
First, you will be asked for a field name. Enter the header for the Calculated Field in the box. When you click OK to confirm the dialog, the Expression editor opens.
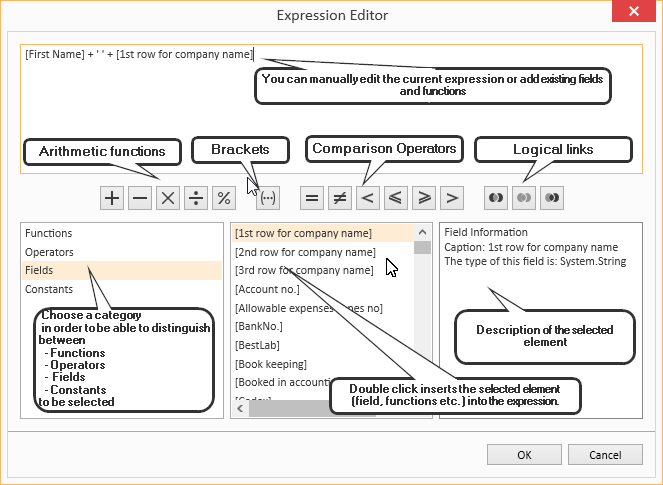
You can find a list of the functions and operators under Functions in Calculated fields.
To later edit the Expression, right click on the table column header of a Calculated Field and select Edit Expression from the context menu.
Iif(IsNullOrEmpty([Vorname]), [1. Zeile Firmenname], [Vorname] + + [1. Zeile Firmenname])In this example, the First name and Company 1 fields are combined into one field with a space between them, but only if the First name field is filled out. Otherwise, only the Company 1 field is output.
Field Background color
Data fields that meet certain conditions can be highlighted with a Background color.
To set Background colors for individual fields, right click on a column and select Background color from the menu.
You can now define a new rule. All the fields that match this rule will then be highlighted in the selected color.
The pencil icon opens the Expression editor. You can create more complex expressions with this editor. Also see Calculated Fields.
When you have successfully created a rule, close the window by clicking the OK button. The rule will be applied when you refresh the View.
Rule: [NoEmployees] < 30
Color: #FF009DFF
This rule colors all fields in the Client no. column blue if the number of employees entered in the corresponding data set is less than 30.
Using and Managing layouts
Right click on a column to open a context menu where you can access the Layout settings.
Load Layout
The Load layout command displays all the layouts that you have already created.
You can easily switch to another Layout here.
Save Layout / Save Layout As
When you Save Layout, the current View will be saved in the currently open Layout. All Expressions, Calculated Fields and Sort Groups will be included in this Layout and can be applied as required.
You can use the Save Layout As command to save the current View as a new separate Layout.
Specify the Layout properties for this.
Edit Layout
If you want to change the properties of the current Layout, select Edit Layout Properties from the menu. The Layout properties window opens. You can make the changes that you want here.
Reset Layout / Delete Layout
If the edited Layout is not what you want, you can undo the changes you made and revert to the original Layout by selecting Reset Layout from the menu. You can also use the Delete Layout command in the menu to delete a Layout entirely if you no longer want it.
Functions / Toolbars
Various functions are provided in the toolbars (ribbons / ribbon bars) above the tabs.
The toolbar structure depends on the current module / tab.
Some toolbars are only shown when you edit certain fields, such as the Text toolbar when you edit rich text fields.
'Warehouse items' toolbar
'Data control' area
Individual items are recorded as warehouse items in a warehouse using this function. This step only creates the warehouse item. The stocks are booked in further steps such as a stock entry or manual stock movement.
Create warehouse items (manually)
-
Open the Items | Warehouse items menu command.
-
Click on the
 Create warehouse item button in the Warehouse toolbar in the Data control area.
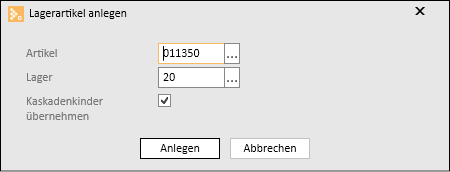
The Create warehouse items window opens.

-
Select an item from the item master data using the
 Selection field. The item search assistant opens for this.
Include cascade children
The other items associated with a cascaded item can be created as warehouse items at the same time as the cascaded item by activating the Include cascade children option.
If the option is not activated, only the parent item for a cascaded item will be included.
-
Use the
Selection field to select the warehouse in which the items are to be recorded as warehouse items. -
Click on the Create button.
-
The selected item is recorded as a warehouse item in the corresponding warehouse and the Items | Warehouse items | Details tab opens. You can complete the information for the warehouse item here: select a Warehouse location, enter values for the Minimum, Reorder, and Maximum stock level as well as the Overdelivery or Underdelivery tolerance, and specify if the item is to be included in the Inventory or not.
-
Save the entries by clicking on the
 Apply button.
Items from the list are recorded as warehouse items in the warehouse with this function. To add stock levels to these items, use the Inventory or Manual stock movements functions.
Warehouse items without any stock can be deleted with this function. If stocks of a warehouse item exist, these stocks must be booked to another warehouse first, for example by using the Manual stock movements function.
Delete warehouse items
-
Open the Items | Warehouse items menu command.
-
Click on the
 Delete warehouse item button in the Warehouse toolbar in the Data control area.
 -
A security prompt (Delete data set?) is displayed before the item is deleted. To delete the warehouse item, click on the Yes button.
-
The warehouse item is deleted and removed from the warehouse items list.
Additional warehouse item functions
Additional functions for creating warehouse items or for copying warehouses with warehouse items are provided under Items | Items / Services and Items | Warehouse.
Import item list by warehouse items
The Import item list by warehouse items function in the Items / Services toolbar under Items | Items / Services can be used to create a larger number of warehouse items from the item master data.
Create warehouse items from displayed items
-
Open the Items | Items / Services menu command.
-
Use a filter to restrict the list of warehouse items to be created.
If you do not use a filter, warehouse items will be created from all the items displayed in the list.
-
Click on the
 Import item list to warehouse items button in the Items / Services toolbar.
 -
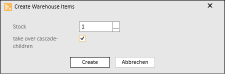
The Create warehouse items window opens.
Warehouse
Select a Warehouse where the items are to be created.
Include cascade children
Activate the Include cascade children option if the associated items for cascaded items are also to be included. If this option is activated, warehouse items will be created from these dependent items even if they are not shown in the list.
If only the cascade parents are to be included, do not activate the Include cascade children option.
-
Click on the Create button to create the warehouse items in the selected warehouse.

Copy warehouse item
The Copy warehouse items function allows you to stock a warehouse with warehouse items to match the pattern of another warehouse by copying the contents of the warehouse.
This is useful when, for example, vehicle stores are all to be equipped following a specific pattern.
All vehicles are recorded as warehouses (stores). A vehicle (store) is now equipped, i.e. all the items required in the vehicle store are transferred into the Vehicle warehouse. It is now possible to copy the contents of this vehicle store into another vehicle store.
At the same time, another warehouse can be selected from which stock is to be removed and transferred to the vehicle (items are delivered from this warehouse to the vehicle).
What happens internally when warehouse items are copied?
If warehouse items are copied, the number of the articles recorded is negated in the stock movement overview and a corresponding offset entry is made to the counterpart warehouse.
Three warehouses are needed in order to effectively use this function.
-
One warehouse into which the item list and stock levels are to be copied (for example, a new vehicle).
-
One warehouse from which the item list is to be copied (old vehicle, or standard warehouse).
-
One warehouse from which the stock is to be transferred or drawn (for example: main warehouse).
-
Select a warehouse on the Items | Warehouses tab that is to be stocked with warehouse items.
This warehouse must not contain any items yet.
-
Click on the Copy warehouse items button in the toolbar.
The Set up warehouse window opens for copying the warehouse items.
There are two selection fields available here:
Transfer warehouse items from:
Select the warehouse that you want to copy here. This does not transfer any stock. The items are copied into the new warehouse regardless of whether there is stock and the level of the stock in the warehouse from which the items are to be taken (Book in goods from:).
Book in goods from:
Enter the warehouse here from which you want to book out stock. If there is not enough stock in the relevant warehouse, the maximum possible stock level will be transferred. If the items have not been created in the warehouse, the items will be created with a stock level of 0 and the settings from the maximum and minimum stocks of the copied warehouse.
No warehouse can be specified twice.
-
To start the copy process, click on the Set up warehouse button.
'Actions' area
You can assign a warehouse item to a warehouse location without opening the data set for editing.
Assign warehouse space for warehouse items
-
Open the Items | Warehouse items menu command.
-
Select a warehouse item from the desired warehouse from the list.
An item may be present several times in the list as a data set exists for each warehouse in which the warehouse item has been recorded.
-
Click on the Assign warehouse location button in the Warehouse toolbar in the Actions area.
The Assign warehouse location window opens. The warehouse for the selected warehouse item is also displayed.
-
Select a Warehouse location for the item.
If the Existing warehouse locations only option under Settings | Items | Warehouse items | Settings - 'General' area is activated, only warehouse locations that have already been created can be selected.
Warehouse locations are created in a warehouse on the Items | Warehouse | Details - 'Warehouse locations' area tab.
A check will not be made to see if the warehouse location has been created in the warehouse If this option is deactivated.
-
Click on Assign.
-
A notification message is displayed when the assignment of a warehouse location has been successful.
'Export' area
![]() Excel
Excel
You can save the displayed data as a list in MS Excel format (*.xlsx or *.xls) using this button. The current column, filter, and search settings are considered when the data is exported.
![]() Report
Report
Reports can be used to print out or send the displayed information for an address or process. The reports that are registered for the current program point are displayed when you click on the Report button.
Also see Registration