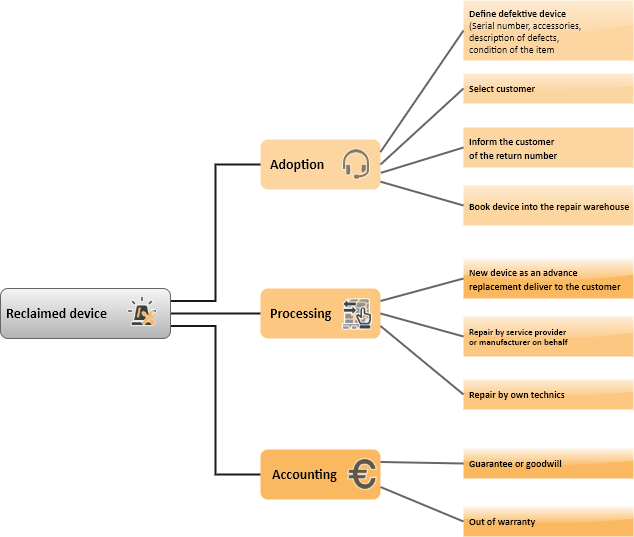
Returns management (RMA)
There is an increasing demand for a documented RMA process to provide a record of claims.
Clients are returning devices to the service provider more frequently for claims under guarantee or for repairs. There is a danger of slipping into negative cover if your profit margins are low.
The optional Returns management (RMA) module enables this returns process to be structured and easily handled using eserp.
Among other things, the serial number can be considered when accepting defective devices for repair. It is also easy to print out receipts for clients and, if needed, for vendors from eserp.
The diagram shows other possible applications.
THE BENEFITS:
- documented returns process directly in the system
- all necessary forms are recorded in eserp by default
- the order status and associated deadlines can be monitored via the serial number, client, service order, or vendor.
Return process overview
You can find further detailed information about the returns process under Repairs (Service | Service orders | Repairs).
Two warehouses are needed to process repairs.
-
Repair warehouse
Goods received from the client are booked to this warehouse.
-
Repair warehouse manufacturer
Warehouse for items to be repaired by the manufacturer.
Both these warehouses must be booked exclusively using the functions in the Service order in connection with returns management.
1. Repair warehouse / warehouse for accepting the client's items
Create a new warehouse for accepting the client's items under Items | Warehouse.
The following settings are needed on the Items | Warehouse | Details tab:
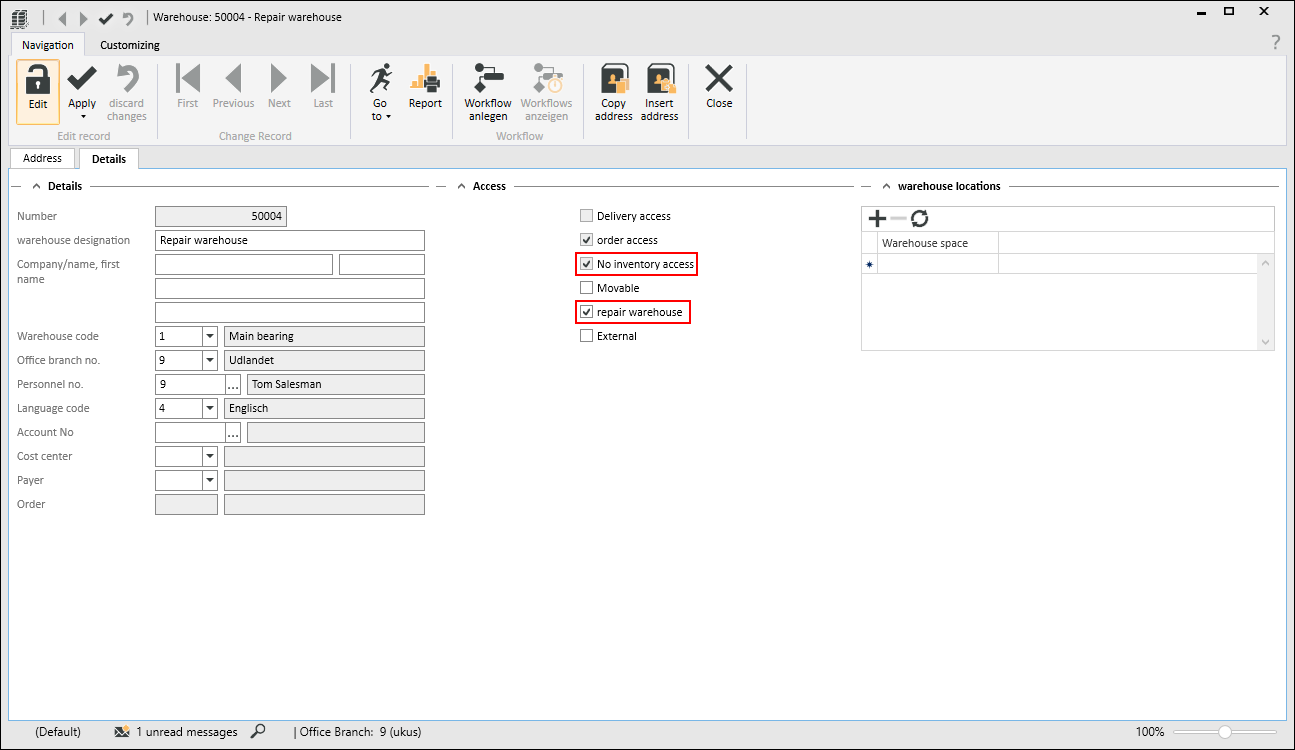
In the Access area, activate the Repair warehouse option. This automatically activates the No inventory access option.
The Order access, Stock access, and Delivery access options will be deactivated if they were activated, and they cannot be reactivated.
2. Repair warehouse manufacturer / Warehouse for repairs by the manufacturer
Create a new warehouse for repairs by the manufacturer under Items | Warehouse.
The following settings are needed on the Items | Warehouse | Details tab:
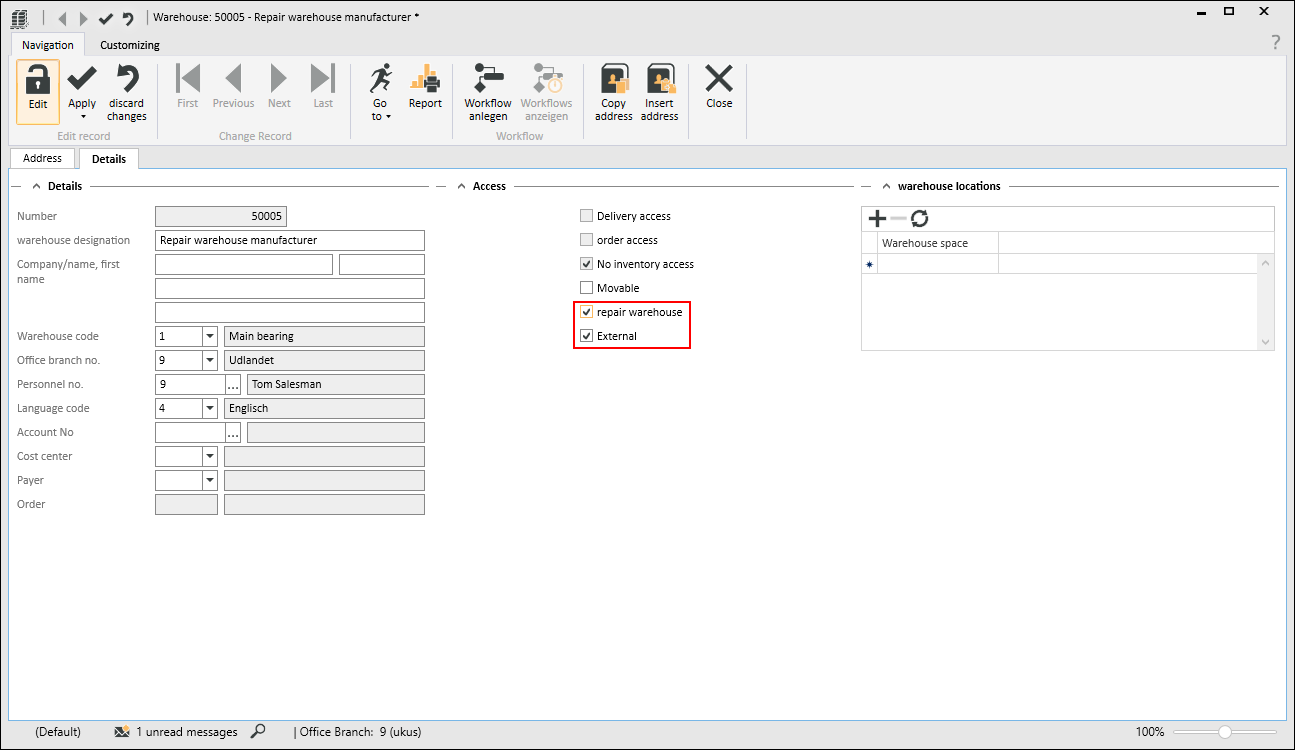
In the Access area, activate the Repair warehouse option. This automatically activates the No inventory access option.
The Order access, Stock access, and Delivery access options will be deactivated if they were activated, and they cannot be reactivated.
You must also activate the External warehouse option for the manufacturer's repair warehouse.
The process for approving (accepting) a defective / rejected component starts with a service order under Service | Service orders.
When a new service order has been created (also see Service orders) you can accept the item for repair on the Service orders | Repairs tab. The entire process is handled on this tab.
To record a new repair, click on the ![]() button in the navigator under Service orders | Repairs | Approval.
button in the navigator under Service orders | Repairs | Approval.
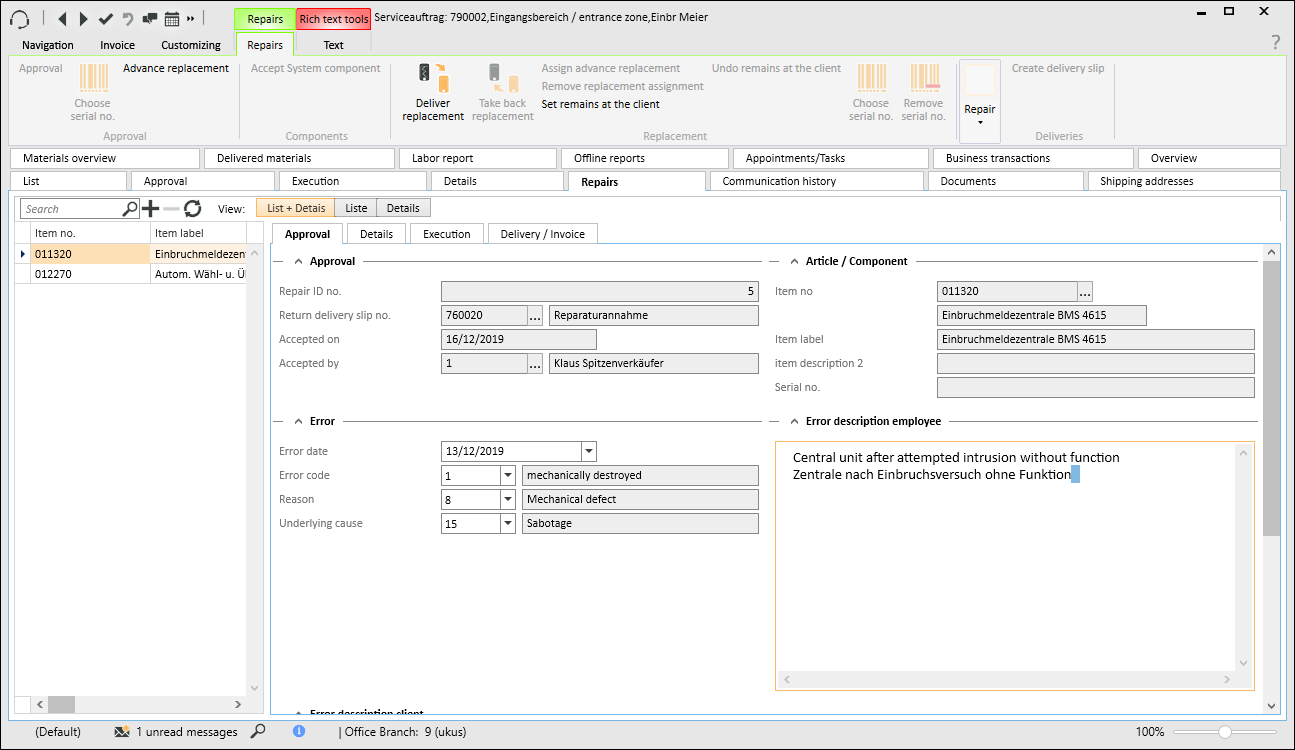
A new repair with a repair ID (number group code RPI) is created, after which the items for repair can be recorded.
You can find a detailed description under the heading Returns management (RMA).
Repair ID no.
A new repair with a repair ID (number range code RPI) is created, and the Service orders | Repairs | Approval sub tab opens where you can record the items for repair.
Return delivery slip no.
The number of the delivery slip under which the item to be repaired was booked into the internal repairs warehouse.
Accepted on
The date when the repair was received. Time stamp when Approval done.
Accepted by
Employee who performed the accept repair function.
You can use the following methods to record an item for repair:
Accept System component
You can use the Accept system component button to select an item directly from the components recorded for the system. The information about a system component is displayed accordingly when you select it (system room, system line item, guarantee / warranty until, item, serial number).
Item master data
In the Item no. field, click on the ![]() button. The item search assistant opens to enable selection of an item from the item master.
button. The item search assistant opens to enable selection of an item from the item master.
Item / device selection by serial number
You can select a serial number from within a system using the Select serial number button providing that the item was supplied with a serial number.
Alternatively, the serial number can be specified manually in the Approval return slip.
Error date
Enter the date when the error was notified here or select it from the calendar.
Error code
Select an error code here to classify the fault.
The available Error codes are managed under Settings | Service | Service management | References | Error codes.
The error codes for repairs can be evaluated using a client specific report.
Reason / Underlying cause
To classify the cause of the error, select a Reason code here. The Reason can be further specified by an Underlying cause. Only the reasons linked to the error code will be shown for selection.
The Reason codes and Underlying cause codes available for selection are managed under Settings | Service | Service management | References | Reasons, and Settings | Service | Service management | References | Sub causes.
The error reasons can be evaluated using a client specific report (also see Client specific reports).
Error description client
If the device fault / error is reported directly by the client, you can enter the client's description of the fault in this memo field.
Error description employee
If the device fault / error is reported by an employee (e.g. when performing servicing), you can enter the employee's description of the fault in this memo field.
Approval
A return slip for the selected item is created using the Approval button in the Repairs toolbar.
As soon as you click on the Approval button, Items | Delivery slips | Details opens for you to create the return slip.
The Repair warehouse is already entered and the Return slip option is activated.
You can book the return slip using the Book / Print button. A printout is not required.
The selected item is accepted into the repair warehouse when you book this return slip.
Functions
There are a number of functions for returns management in the Repairs toolbar on the Service orders | Repairs | Approval tab.
Advance replacement
The Advance replacement function in the Repairs toolbar allows you to supply the client with a replacement item before the repair is approved.
The Advance replacement button is used to create a delivery slip in order to supply the client before the actual repair is created.
Assign advance replacement
If an advance replacement has been delivered, this replacement can be assigned during the subsequent repair under Service | Service orders | Repairs | Details:
If you click on the Assign advance replacement button, the program uses the item number to check if the advance replacement can be uniquely assigned.
If assignment using the item number is not possible, a selection window opens so that you can assign it manually.
Deleting repairs
You can only delete a repair if no delivery slips have been booked from the warehouse.
Reject repair approval
If you clicked on the Approval button by mistake and the return slip that was then created has not been booked yet, you can set the return slip to Completed and then delete it.
If the return slip was booked, however, you will first have to cancel the return slip and then delete it.
This procedure applies to all other return / delivery slips described below (Advance replacement, Deliver replacement, Send repair to manufacturer, Deliver repair).
The Advance replacement function on the Service order | Repairs | Approval tab allows you to supply the client with a replacement item before the repair is approved.
Before the actual repair is recorded, you can use the Advance replacement button in the Repairs toolbar to create a delivery slip in order to supply the client before the actual repair is created.
Assign advance replacement
If a replacement has been delivered in advance, this replacement can be assigned during the following repair process under Service orders | Repairs - Details.
If you click on the Assign advance replacement button in the Repairs toolbar, the program uses the item number to check if the advance replacement can be uniquely assigned.
If assignment using the item number is not possible, a selection window opens so that you can assign it manually.
If the repair is approved, you can supply an exchange instrument as a replacement under Service orders | Repairs - Details.
First select the type of replacement from the Client has replacement selection. The Deliver replacement button will then be enabled.
Click on the Deliver replacement button to automatically create a delivery slip that can be booked.
If the defective item is to be repaired, you can select between third party and own repair on the Service orders | Repairs - Execution tab.
If you do not activate the third party repair option, the repair is an own repair.
Third party repair
With a third party repair, the material is first sent to the manufacturer with a delivery slip. To create the delivery slip, select the manufacturer that is to perform the repair in the Vendor field. You can then click the Create delivery slip button to open Delivery slip management and print and book the delivery slip.
For this, in esoffice there is a transfer booking of the accepted material from the Repair warehouse to the Manufacturer repair warehouse.
The third party repair process differs in function from an own repair in that the goods are initially sent to the vendor / manufacturer with a delivery slip and at some time are then received back with a return slip.
Own repair
As soon as you have selected an employee to perform the repair in the by field, the Dispose of or Repaired buttons will be enabled.
Dispose button
The Dispose of button removes the corresponding item from the system, and activates the Disposed of option in the repair order.
Dispose button
The Dispose of button removes the corresponding item from the system, and activates the Disposed of and Completed options in the repair order. This can only be performed if the status is at least Under repair and not yet Repair completed, and Own repair was selected.
You cannot undo this function.
The serial number history is, of course, retained. This includes the information that this item was included in the repair and was disposed of. Only the stock in the repair warehouse will be reduced accordingly.
If the item was disposed of, you can send an exchange item to the client (see next screenshot) if you have not already supplied a replacement.
Repaired button
When you click on the Repaired button, the Place items in stock button is enabled and the Repaired option in the repair order is activated.
If the client retains the replacement item or is sent an exchange item and repair of the original item accomplished, it can be booked into a used goods warehouse.
Control repair button
The Control repair function sets a timestamp and the personnel number of the person performing the function.
When a repair is completed, either the repaired item or an exchange item is delivered, or there is a direct accounting because the client has already received a replacement and the repaired item has been disposed of or put into storage.
A decision is made on the Service orders | Repairs - Delivery / Invoice tab whether the item to be delivered is to be charged for or not.
The Create delivery slip button allows the system to recognize that either the repaired item or the exchange item selected under Execution is to be delivered.
Take back replacement
If a replacement has already been supplied this is taken back if necessary. You can either use the function in the context menu under List or the corresponding Take back replacement function under Details.
Costing
The returns and deliveries are recorded on the Service order | Material supplied tab of the service order. Invoice and Recalculation options are available here for each line item.
Invoice option
If you activate the Invoice option, this item will be included in the calculation for costing when you create a calculation.
Recalculation option
If you activate the Recalculation option, this means that a positive quantity of this item will add cost to the order and a negative quantity will reduce the cost to the order.
The options are set automatically as follows and can be adjusted manually at any time:
|
Function |
Invoice |
Recalculate |
|---|---|---|
|
Accept repair |
Not set |
Not set |
|
Deliver replacement item (Replacement does not stay with client) |
Not set |
Set |
|
Deliver replacement (Replacement stays with client) |
Set |
Set |
|
Take back replacement |
Not set |
Set |
|
Ship third party repair |
Stock transfer |
|
|
Third party repair returned |
Stock transfer |
|
|
Dispose of own repair items |
|
|
|
Deliver repaired item |
Controlled by the corresponding option under Service order | Repairs - Delivery / Invoice. |
Not set |
|
Deliver exchange item |
Set |
|