Communication history
Service | Inspection orders | Communication history
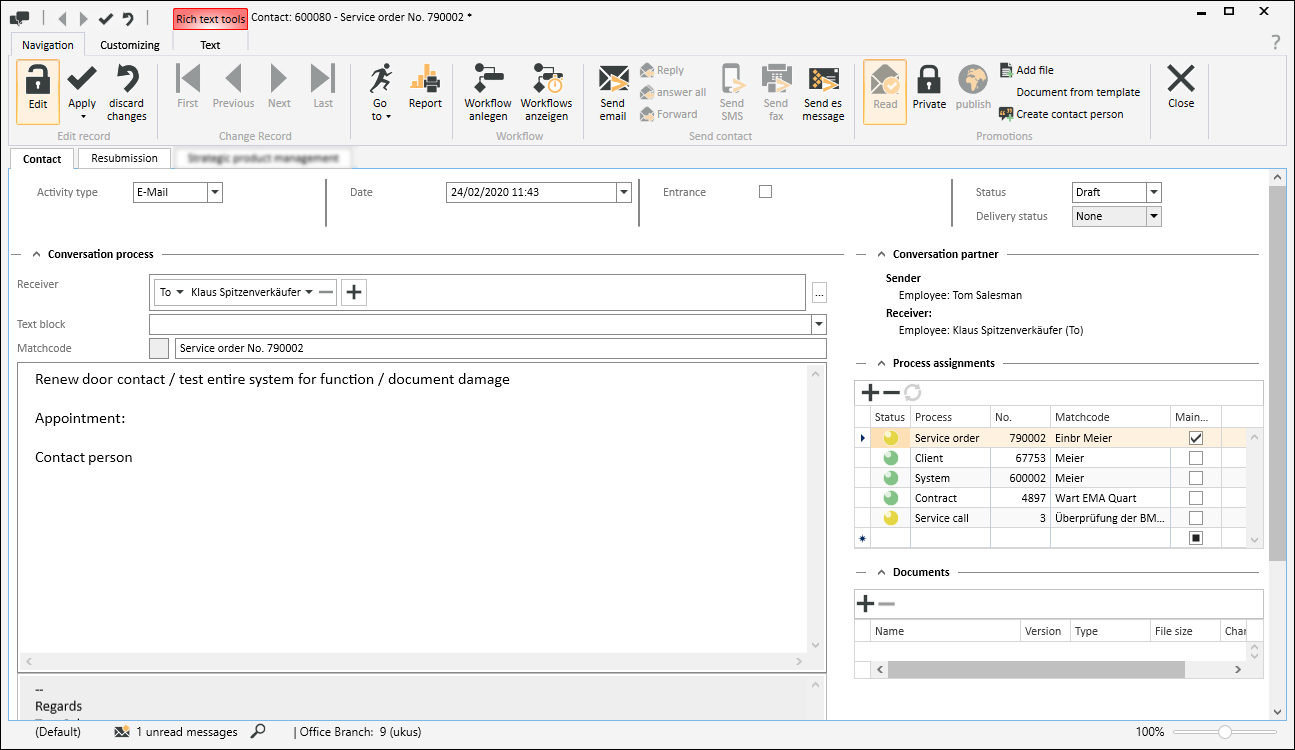
The Communication history tab is provided in several modules and is used to document contact entries, agreements, and information pertinent to any number of business transactions.
Contact entries can also be used to send Emails, SMS messages, fax messages and esMessages, and to store these with the process at the same time.
Incoming messages (for example: emails) can be imported into the Communication history of a process via the es Business server or using the es Outlook add-in application.
Office | CRM | Contact management authorization is required for you to use Contact management.
To create and edit Contacts, the user requires Office | CRM | Edit contacts (incl. others) authorization.
New contact entries are created on the Communication history tab using the ![]() Create contact button.
Create contact button.
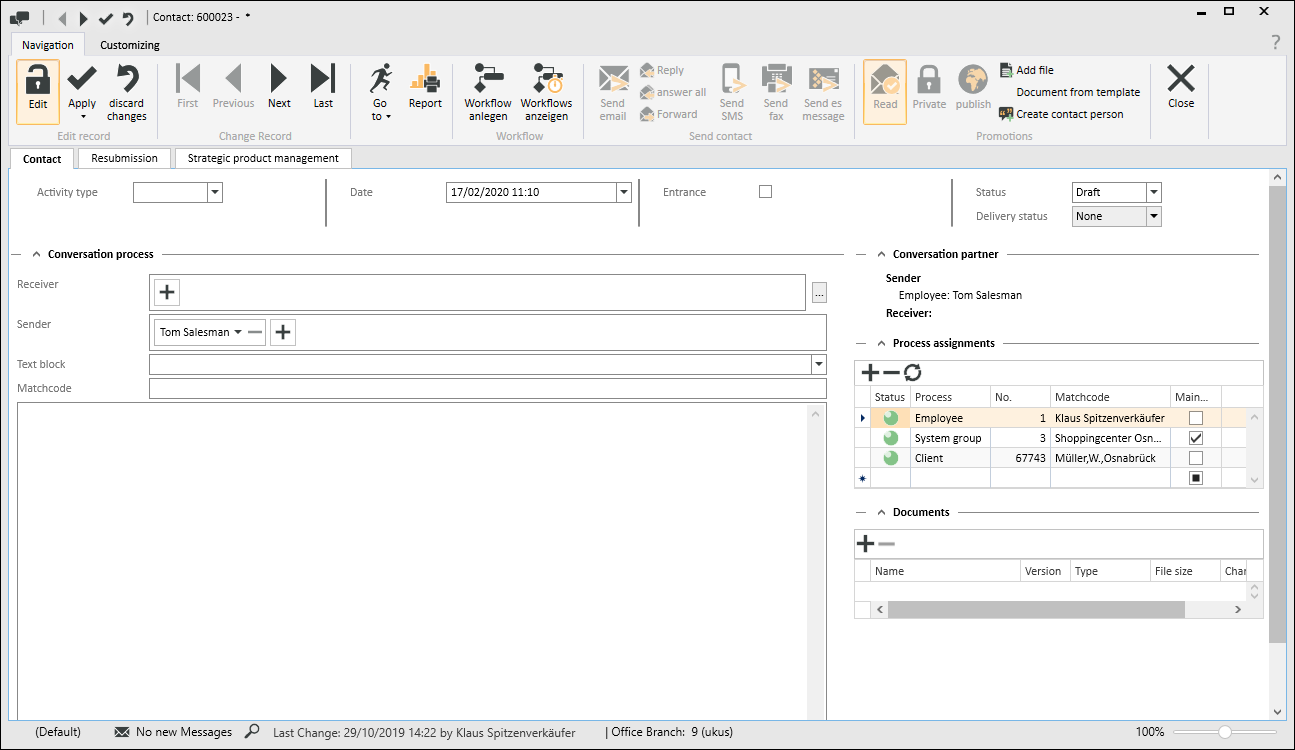
A contact window opens when you create a contact entry.
All contacts can be viewed and new contacts created on the Communication history tab.

Open the contact details by double clicking on the desired contact.
Contact details
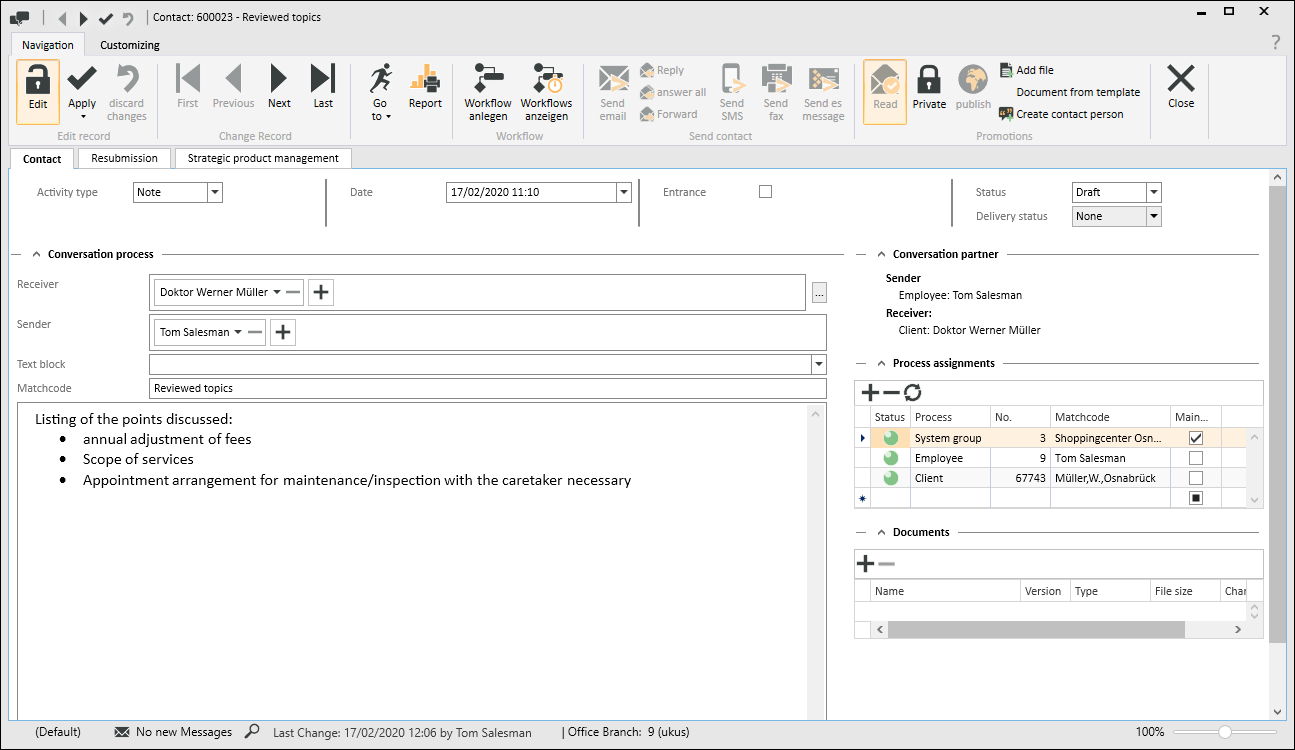
Matchcode
We recommend that you always enter a matchcode, at least for important contacts. This makes it easier to quickly identify a contact in the communication history.
Contact parameters
Activity type
You can specify the activity type for the contact here. Various possibilities for transmitting the contact are available depending on the activity type.
Additionally, for an activity type with the Email option, the signature of the sender that is attached to the Email according to the current settings is displayed.
Please also note the setting for the signature position in the personal settings.
Also see Settings | Personal
Date
You can type in the date and time of the contact in the Date field or set it from the date selector.
Received
The Incoming option specifies whether the contact is incoming or outgoing.
Publish
If the contact is assigned to a service call process, it will be visible to clients in esweb Helpdesk if the Publish option is activated.
If the service call is assigned as the main process and is not yet published, the service call will also be published automatically.
Status
A contact can have one of three statuses:
Draft
A contact entry that is created is assigned the status Draft.
Created
This status is used for contacts that have been imported, fror example: from an Email.
Completed
This status is used when editing of the contact is completed or the contact has been sent.
Delivery status
There are five possible delivery statuses:
None
The contact has not been sent yet.
In process
The contact is being sent now.
Sent
The contact has been sent successfully.
Send error
An error occurred during sending and the contact was not sent.
Cannot be determined
The status cannot be determined because there is no connection to the Business server.
The display updates every 5 seconds after the contact is sent.
Conversation history area
Receiver
A Receiver can be added by clicking on the ![]() button in the Receiver selection. To remove a receiver, click on the
button in the Receiver selection. To remove a receiver, click on the ![]() button.
button.
The entry field for the receiver has an auto complete function, so that if you enter part of the receiver's name, the selection will be filtered by this entry.
The receiver can be selected from:
- All employees in the Personnel master data
- All contact persons for the assigned processes
- All assigned processes if these are addresses (System, Client, etc.)
If an activity type with the Email option was selected, you can also select how the receiver is to receive the Email.
To do this, click on the ![]() icon on the left in the Receiver field.
icon on the left in the Receiver field.
To
The receiver receives the message directly (default).
CC
CC stands for carbon copy. The persons in CC receive a copy of the mail. Every receiver of the mail can see the other people in CC.
BCC
BCC stands for blind carbon copy. All the persons in BCC receive a 'blind' copy of the mail. None of the people in BCC know who else has been sent the mail.
No
The selected receiver does not receive the Email.
If you click on the ![]() icon in Receiver, a list of possible receivers based on the process is displayed.
icon in Receiver, a list of possible receivers based on the process is displayed.
If an activity type with the Email option was selected, you can open a window with extended facilities for selecting the receiver by clicking the ![]() button.
button.
Sender
You can add a sender from the Sender selection by clicking on the ![]() button. To remove a sender, click on the
button. To remove a sender, click on the ![]() button.
button.
The entry field for the sender has an auto-fill function, so that if you enter part of the sender's name, the selection will be filtered by this entry.
The sender can be selected from:
- All employees in the Personnel master data
- All contact persons for the assigned processes
- All assigned processes if these are addresses (System, Client, etc.)
Click on the ![]() icon in Sender to display a list of possible senders based on the process.
icon in Sender to display a list of possible senders based on the process.
If an activity type with the Email option was selected, the Sender selection is hidden because only one sender is possible and this is always the currently logged in user.
The signature and sender address for the Email are not necessarily the same as the Email address of the logged in user.
This depends on the setting for department emails.
Signature
Your signature that is appended to the message text when you send an Email is displayed in this window.
Please also note the setting for the signature position in the personal settings.
Also see Personal settings
Text module
Here you can select one or more text modules that have already been recorded. The selected text module will be inserted at the actual cursor position in the contact text.
Only the text modules that correspond to those under Settings | Office | CRM | Settings - 'Contacts' area Text category Text modules will be shown here.
Matchcode
The Matchcode field contains a very brief summary of the contact and is used as the subject line when sending an Email.
The prefix for the Email subject line will be displayed in front of the actual entry field if a service call is assigned as the main process.
The matchcode is shown in the list of contact entries in the contact history.
'Conversation partner' area
All the conversation partners recorded in the contact are displayed in the overview of conversation partners.
The conversation partners are grouped into receivers and senders.
In addition, the ![]() icon indicates for an incoming contact that the contact has been read by the receiver.
icon indicates for an incoming contact that the contact has been read by the receiver.
'Process assignments' area
Processes can be assigned to the contact in the process assignments list. Assigning the processes causes the contacts on the Contacts tab to be shown with their assigned process.
Right click on a process to open a context menu. You can mark a process as the main process here.
'Documents' area
You can assign any documents to a contact entry.
Save contact
Click on the ![]() Apply button to apply the changes to the contact data set. The contact must be assigned to at least one process for the changes to be applied.
Apply button to apply the changes to the contact data set. The contact must be assigned to at least one process for the changes to be applied.
Contact text
The actual content of the contact entry is entered in this rich text box.
This gives further information about the processing of the contact text.
The buttons for Save and Undo changes are not activated until the focus is moved to another element after the changes are made in the contact text.
The contact text can be directly recorded in the Conversation history.
As soon as you click in the Text field, the Text toolbar is displayed.
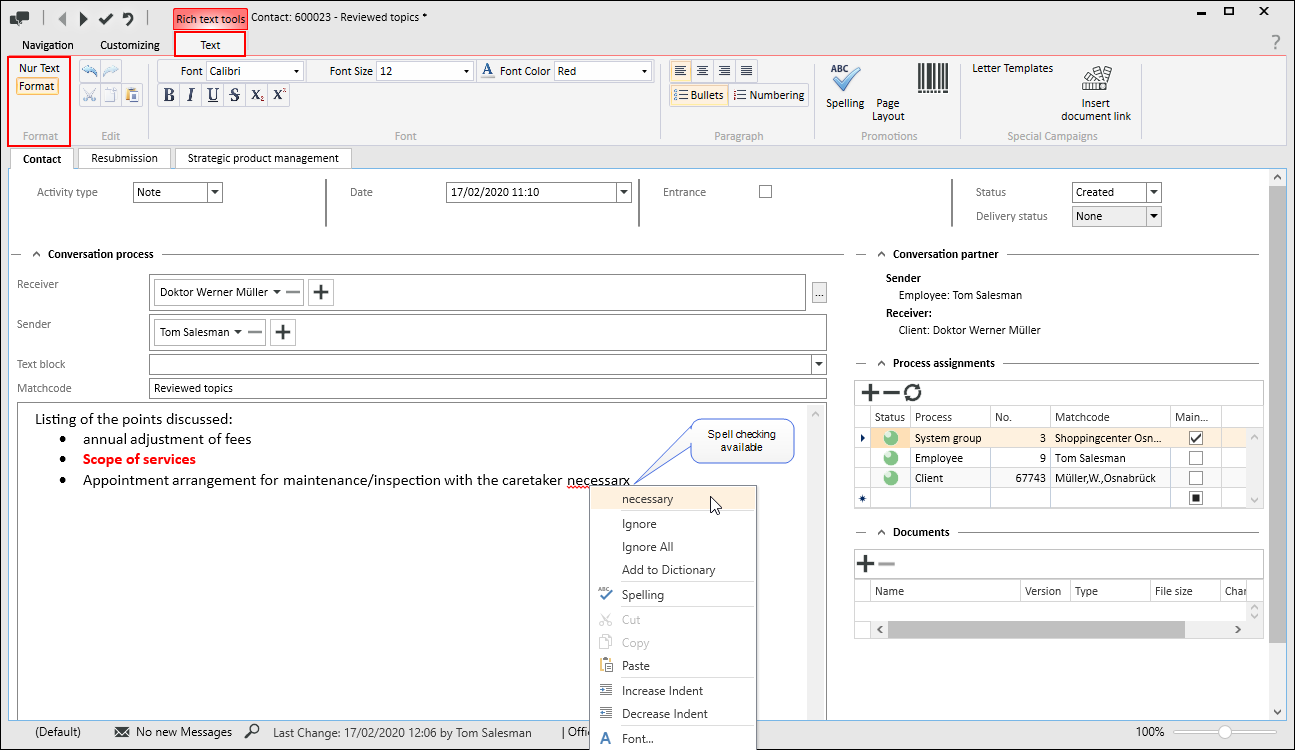
You can switch between Text only and Format (= rich text) in the Format selection box.
In both cases the spellchecker is available.
Functions for text editing are provided in the Text toolbar (ribbon) The toolbar is shownwhen the cursor is placed in a text field that supports the corresponding text functions.
Also see esRichTextBox
There are some combined key functions available for the text in an esRichText box, also see Keyboard operation.
'Format' area
The settings in the Format area determine whether the text can be edited with or without formatting. Depending on the selection, various functions will be shown in the toolbar.
Text only
Use the Text only format if you only want to edit the text without any formatting in the text field.

'Text' toolbar - 'Text only' format
Format
Use the Format format if you only want to edit the text with formatting and text mark ups in the text field.

'Text' toolbar - 'Format only' format
Context menu
Additional functions are provided in the context menu within the text field as well as the functions in the toolbar when you select Format. The context menu is opened with a right click.
Changing the format
You can readily switch from Text only to Format .
If you switch from Format to Text only, the formatting and inserted elements will be lost and a corresponding message will be displayed.
'Edit' area
Undo
Undo the last action.
Redo
Repeat the last action or restore the last undo.
Cut
Cut out the highlighted text and place it on the clipboard.
Copy
Copy highlighted text to clipboard.
Insert / Paste
Paste the text from the clipboard into the text field at the position of the cursor.
'Font' area
You can change the size, color, and many other attributes of the text in the Font area.
This area is only available if Format has been selected in the Format area.
Font
Select one of the fonts (typefaces) installed on your system.
When you select a font, make sure that it is one that is available on all the PCs that are used to run eserp.
Size
Specifies the font size in points. Select a font size from the list. To preserve legibility for most documents and users, use a font size of eight points or above.
Font color
Specifies the color of the marked text. Select a color from the field.
Text markup
Specifies the markup for the marked text (for example bold or italic).
Bold
B -> Bold
Italic
I -> Italic
Underline
Indicates if the marked text is underlined The underline is in the same color as the font.
Crossed through
Draws a line through the marked text.
Subscript
Sets the marked text below the baseline and reduces the font size if a smaller size is available.
Superscript
Elevates the marked text above the baseline and reduces the font size if a smaller size is available.
'Paragraph' area
The text justification and list formats are set in the Paragraph area.
This area is only available if Format has been selected in the Format area.
Justification
Left
Select Left to align the text against the left margin with a ragged right edge (or press the key combination Ctrl + L).
Centered
Select Centered to align the text to the center line with a ragged left and right edge (Ctrl + E).
Right
Select Right to align the text against the right margin with a ragged left edge (Ctrl + R).
Justified
Select Justified to align the text against the left and right margins and insert additional space between words so that each line is the same length (Ctrl + J).
Bullets
You can convert text to a list by marking the text and selecting Bullet list or Number. Every line or paragraph is converted into a bullet point.
If you select Number, the lines / paragraphs will be numbered consecutively. If you select Bullet list, a bullet is placed in front of each line / paragraph.
'Actions' area
Check spelling
Checks the spelling of the text.
Spellcheck for eserp
The Hunspell open source dictionaries are used in eserp for spellchecking.
You can find more information at https://github.com/hunspell/hunspell.
Hunspell is an open source spellchecker that is used in LibreOffice, OpenOffice, Firefox, Thunderbird, and Google Chrome as well as in such products as OS X, Adobe InDesign, or Opera.
Dictionaries are available for spellchecking in many languages.
When eserp is installed, the dictionaries for some languages such as English and German (including some variants) are saved in the dictionaries directory of the installation folder.
When you add terms / words during spellchecking, these will be saved to the user defined dictionaries.
The user defined dictionaries are found in: C:\Users\<username>\AppData\Local\es2000 Errichter Software GmbH\".
Dictionaries for language variants, such as Canadian English, or other languages such as Italian or French can be downloaded from the OpenOffice website, for example. Supplementary dictionaries are also available for some industries.
For these, select the following link: https://extensions.openoffice.org/ (Dictionaries)
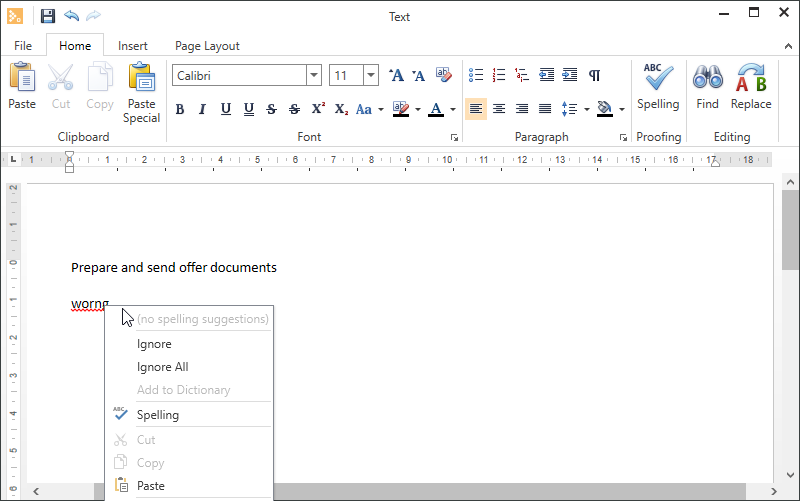
Permanent spellcheck
Spellchecking is performed as you type the text. Words that are not found in the dictionary are underlined with a red wavy line.
Right click on the word to see suggestions from the dictionary, add the word to the dictionary, or ignore the word.
Check spelling
The Check spelling function is available in text fields, the extended text editor, and the text field context menu.
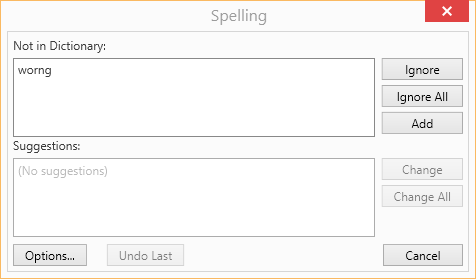
You can check the spelling of a text using this function.
Page view
Opens the text in an extended editor. Here you can print out the text, save it, and insert additional elements (images, tables, icons, etc.)
The expanded text editor allows you to print out the text, save it, and insert additional elements (images, tables, icons, etc.)
The range of functions corresponds to that of common text editor programs such as OpenOffice, LibreOffice or Microsoft Word.
File menu

Start menu

Insert menu

Page layout menu

'Special actions' area
Insert document link
You can insert a link to a file in the document management system (DMS) using this function. The DMS file search function opens for you to select the file.
Select the desiredfile and then click on the ![]() Apply button.
Apply button.
For the format setting Text only, the link is inserted in the format eso://Document?id=29. If the Format setting is used, a clickable link is inserted (underlined colored text).
'Conversation partner' area
All the conversation partners recorded in the contact are displayed in the overview of conversation partners.
The conversation partners are grouped into receivers and senders.
For a contact sent by Email or es Message, the ![]() (Email) or
(Email) or ![]() (esMessage) icons additionally indicate that the contact has been read by the receiver.
(esMessage) icons additionally indicate that the contact has been read by the receiver.
'Process assignments' area
Processes can be assigned to the contact in the process assignments area. Assigning the processes causes the contacts on the Contacts tab to be shown with their assigned process.
Right click on a process to open a context menu. You can mark a process as the main process here.
'Documents' area
You can assign documents / files to a contact entry.
Save contact
Click on Apply to save the changes to the contact data set.
At least one process must have been assigned before a contact entry can be saved.
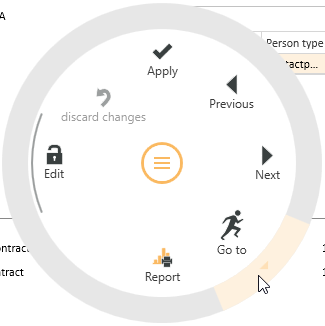
Functions / Toolbars
Various functions are provided in the toolbars (ribbons / ribbon bars) above the tabs.
The toolbar structure depends on the current module / tab.
Some toolbars are only shown when you edit certain fields, such as the Text toolbar when you edit rich text fields.
'General' area
![]() Create contact
Create contact
New contact entries are created on the Communication history tab using the ![]() Create contact button.
Create contact button.
To create and edit Contacts, the user requires Office | CRM | Edit contacts (incl. others) authorization.
A contact window opens when you create a contact entry.
![]() Reply
Reply
If the marked contact entry is an incoming email or esMessage, you can use the ![]() Reply button to create a new contact entry to the sender.
Reply button to create a new contact entry to the sender.
The original message from the sender is quoted in the contact text with certain information (From, Date / time sent, To, Subject).
The contact entry matchcode (= Subject) is preceded by Re: (abbreviated from the Latin in re, meaning concerning, or about).
![]() Reply all
Reply all
If the marked contact entry is an incoming email or esMessage with several recipients, you can use the ![]() Reply all button to create a new contact entry to the sender and all the other recipients.
Reply all button to create a new contact entry to the sender and all the other recipients.
The original message from the sender is quoted in the contact text with certain information (From, Date / time sent, To, Subject).
The contact entry matchcode (= Subject) is preceded by Re: (abbreviated from the Latin in re, meaning concerning, or about).
![]() Forward
Forward
You can forward incoming emails or esMessages using this function
The original message from the sender is quoted in the contact text with certain information (From, Date / time sent, To, Subject).
The contact entry matchcode (= Subject) is preceded by Fwd:.
![]() Delete contact
Delete contact
To delete a contact entry, click on the ![]() Delete contact button. A confirmation dialog (Delete data set?) is displayed before actual deletion. When you click Yes to confirm, the contact entry will be deleted.
Delete contact button. A confirmation dialog (Delete data set?) is displayed before actual deletion. When you click Yes to confirm, the contact entry will be deleted.
To delete Contacts, the user requires Office | CRM | Edit contacts (incl. others) authorization.
'Incoming document' area
![]() Add document
Add document
You can attach documents / files to a contact entry using this button.
-
Select a contact entry.
-
Click on the Add document button.
-
A file selection window opens. Select the file (document) you want and click on the Open button.
-
The contact entry is opened for editing and the file is added to the Documents area.
![]() Scan document
Scan document
You can attach a document that has been scanned in to a contact entry.
-
Select a contact entry.
-
Click on the
 Scan document button.
 -
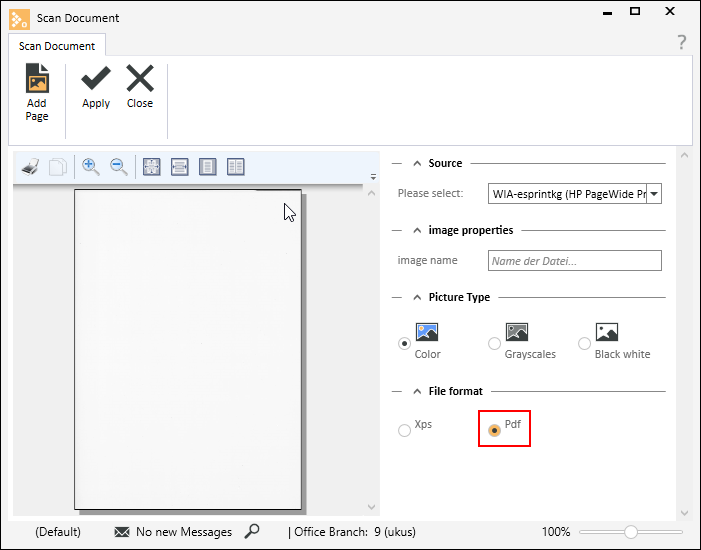
The Scan document window opens.

You can select an available scanner / multifunction printer (local or network) under Source.
You may need to install the device manufacturer's drivers / software for the scanner to be shown in the selection.
Under Image properties, enter an Image name and select an Image type (color, grayscale, or black and white). You can choose to save the scanned image in XPS or PDF format under File format.
You can set PDF format as the default in the Scan dialog.
Activate the Always use PDF option in the Scan dialog under Settings | External programs | Other | Document management | Settings - 'Scan' area.
-
Click on the
 Scan document button. The document will be scanned in and shown in the preview. You can add further scans to the document using the Add page button.
A file selection window opens. Select the file (document) you want and click on the Open button.
-
When all the pages of the document have been scanned in, click on the
 Apply button to save the complete document.
 -
The contact entry is opened for editing and the file is added to the Documents area.
'Assignment' area
Assign process
You can assign further processes to a contact entry.
-
Select a contact entry.
-
Click on the Assign process button.
-
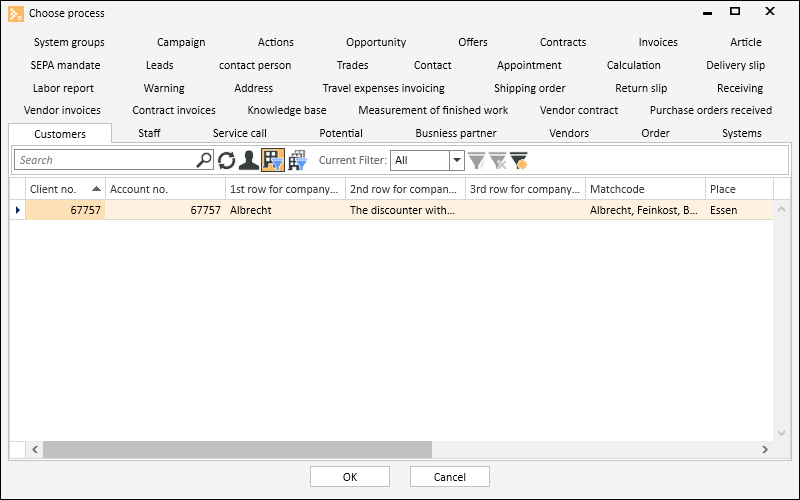
The Select process window opens.
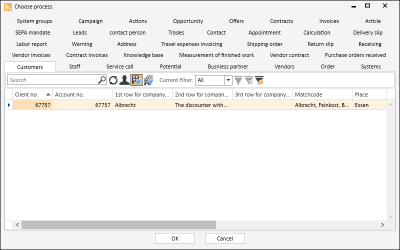
-
Select a process from the ones shown and click on the OK button.
'Actions' area
![]() Create service call
Create service call
You can create a service call for the main process of the selected contact entry using this function.
-
Select a contact entry.
-
Click on the
 Create service call button.
 -
A new service call is created and the Service | Help desk | Approval tab opens with the Address preset to the main process of the contact entry. The contact entry matchcode is set as the Description for the service call.
-
Record the further details for the service call and save your entries using the
button.
'Edit data set' area
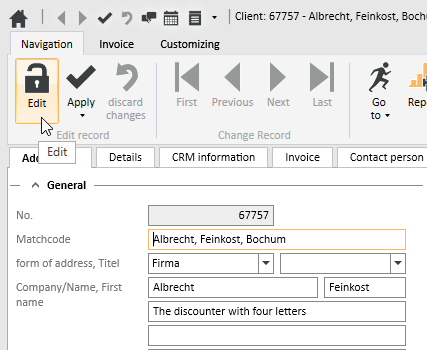
![]() Edit
Edit
Click on the ![]() Edit button to switch the Form to Edit mode.
Edit button to switch the Form to Edit mode.
The usual Input elements are available in Edit mode.
If data has been changed and you close the form or change to another data set, a message will be displayed asking you if you want to save the changes or not.
Changes can be undone by clicking the ![]() Reject changes button as long as input has not been actively saved or the form has not been closed or the data set changed.
Reject changes button as long as input has not been actively saved or the form has not been closed or the data set changed.
Detail data sets can also be opened directly in Edit mode. To do this, deactivate the Do not automatically edit detail data option under Settings | General | General | Settings | System settings - 'Program behavior' area.
Also see Edit Data Set
![]() Apply
Apply
You can always actively save changes in the data by clicking the ![]() Apply button.
Apply button.
![]() Apply and close
Apply and close
You can save the changed data and close the entry form / module in one go with the ![]() Apply and close function.
Apply and close function.
![]() Reject changes
Reject changes
Changes can be undone by clicking the ![]() Reject changes button as long as input has not been actively saved or the form has not been closed or the data set changed.
Reject changes button as long as input has not been actively saved or the form has not been closed or the data set changed.
'Change data set' area
Each detail view contains a copy of the current list view for the module. This can be viewed on the List tab in the Detail view. This enables you to also navigate through the original list in the Detail View using the navigation buttons.
If a filter or search is active when you open the detail view, this will also be applied to the display on the List tab.
![]() First
First
Jumps to the first data set in the list. The sort order on the List tab is used.
![]() Previous
Previous
Pages back to the previous data set in the list. The sort order on the List tab is used.
![]() Next
Next
Pages forward to the next data set in the list. The sort order on the List tab is used.
![]() Last
Last
Jumps to the last data set in the list. The sort order on the List tab is used.
![]() Go to
Go to
There is a general Go to function in eserp that allows you to jump to the associated modules.
You can use the Go to function to jump to other modules that are connected to the current process.
You can jump directly from a Client data set to the Systems or Contracts for the Client.
The ![]() Go to button in the Navigation toolbar is used to execute the Go to function.
Go to button in the Navigation toolbar is used to execute the Go to function.
Click on the ![]() icon in the button to display the available Go to targets.
icon in the button to display the available Go to targets.
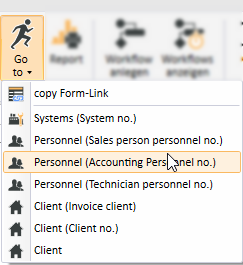
When you click on an item in the list, the corresponding module opens with the linked data set.
Go to in the Context menu
The Go to function is also available at many points in the program in the Context menu that is opened with a right mouse click.
![]() View change history
View change history
Program areas for which a detailed change history is to be recorded can be activated from Tools | Database logging. A report stating when data sets were deleted can be produced for each area. When the detail log function is activated, the report also states what kind of data sets were deleted.
This report is recorded in the report entry point Data set change history (Groups).
A report can be displayed from the Data set change history report entry point using the ![]() Show change history button. This function is also available in lists / tables via the context menu so that you can display the changes in the detail data sets.
Show change history button. This function is also available in lists / tables via the context menu so that you can display the changes in the detail data sets.
The Data set change history and Data set change history (Groups) report entry points are only shown when the license for esLog is present and the table RevGrup exists.
![]() Report
Report
Reports can be used to print out or send the displayed information for an address or process. The reports that are registered for the current program point are displayed when you click on the Report button.
Also see Registration
'Technicians' area
![]() Find technician
Find technician
This button opens the Dispatching function, which includes the locations of technicians. You can use this button if you have the appropriate licenses.
You can find a detailed description under Dispatching.
![]() Send order to technician
Send order to technician
As well as entering the appointment in the calendar, you can send it as a notification to the technician using the Send email button in the Appointment window or the Send order to technician button in the Service order. A contact is created from the information in the service order and the appointment. This contact is saved in the communication history and can then be sent to the technician as an email, SMS, or esMessage.
![]() Enter in calendar
Enter in calendar
To enter appointments in the calendar (using the toolbar Navigation -> Enter in calendar), you will need to enter a Technician and the Appointment / Start date.
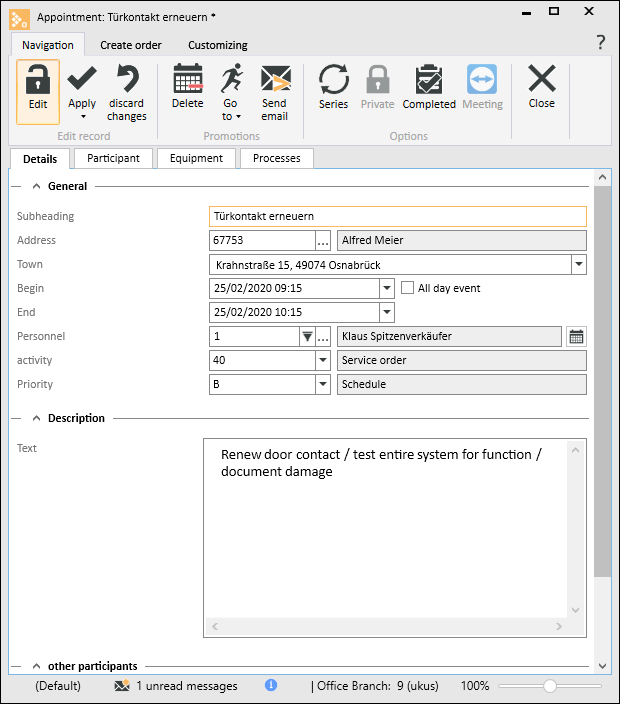
You can enter the task to be performed and notes for the technician in the Description area.
'Information' area
![]() History
History
Use this command to display all the inspection and maintenance orders that are assigned to the Contract, System, or Client. You can set the reference (client, system, contract) using the selection in the window header.
The display of data sets shown can be restricted using search and filter functions.
Right click on a data set to open the context menu and use the Go to command to open the corresponding order.
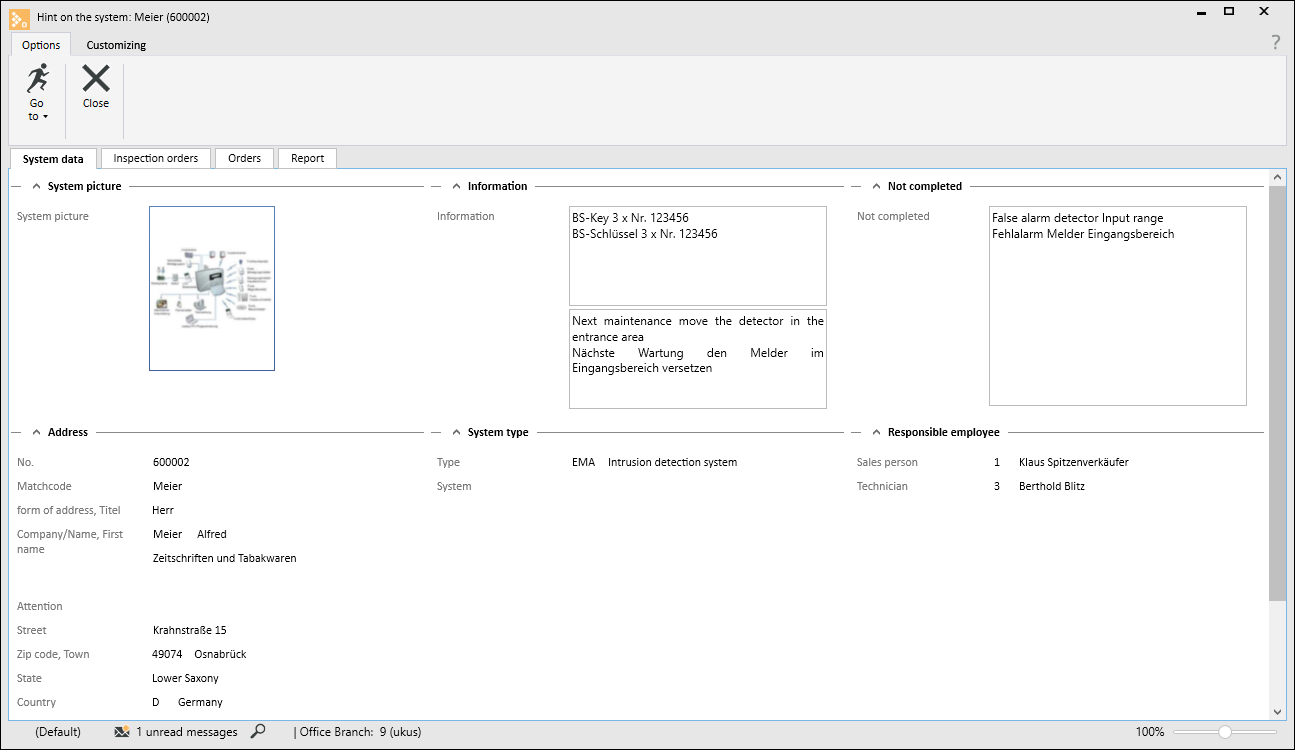
![]() System
System
Use this button to open a separate window that displays the most important system data (system data, contract, inspection orders, orders and reports).
'Complete' area
Set to completed / uncompleted / technically completed
You can set an order to completed using the Complete button.
Please note that you cannot create or edit labor reports for orders that have already been set to completed. You cannot book materials to these orders / receipts either.
Set to uncompleted
You can use the Set to not completed button to reopen an order for editing that has been set to completed.
Technically completed
You can select this button if there is a status value for Technically completed recorded for the particular order type.
The recorded order status will be entered when you click on the button. If there is nothing entered in the Technically completed on date field (Execution tab), the current date will be entered. If a date has already been entered, no changes will be made.
![]() Close
Close
Closes the current form / module.
A message will indicate if there are any unsaved changes.
You can then decide whether to save the changes (Yes), reject the changes (No) or cancel the Close command (Cancel).
The Customize (0110250) license is required for customizing.
The optional esCustomize allows the following control element properties to be adjusted:
- The order and visibility of input and control elements
- The labeling of control elements
- The layout of control elements (color, text width)
- The brief hint text for control elements
- The data linking of control elements
It is also possible to create new fields and add them to the Form.
![]() Start customizing
Start customizing
Click on the ![]() Start customizing button to switch the current form to Customizing mode.
Start customizing button to switch the current form to Customizing mode.
The Form is always customized in the context of the current role that is being used (see Role assignment).
To find out how to change the role, please see: Role assignment.
General | Administration | General references - Customize forms authorization is required to customize forms.
Also see Customizing forms
Apply customizing from role
Click on the Apply customizing from role button to apply the customizing settings already defined for another role to the current form. A selection of the customizing properties defined in other roles is shown.
![]() Edit fields
Edit fields
You can edit certain properties (required field, font color, background color, default values) of the input fields in a form / module using the Edit fields function. Also see Required fields and Default values.
You can also create your own fields and user defined data packs, also see Create individual fields.
![]() Role management
Role management
This button opens management of customizing roles.
Customizing roles can be created and managed under Settings | General | Customizing | References | Customizing - Roles.
Functions when the Customizing process is running
Three additional buttons are shown after you start Customizing:
![]() Apply
Apply
This function saves the temporary customization and closes Customizing mode.
You must close and restart the program for the changes to be visible to the user.
![]() Cancel
Cancel
Use this button to Cancel the Customizing process. Customizing mode closes without saving the changes you made to the forms.
![]() Reset
Reset
This function resets Customizing and loads the default settings for the form. The reset is performed only after you have confirmed the query dialog that is displayed.
The current Customizing settings are deleted by the reset and cannot be retrieved.
General | Administration | Reset form customizing authorization is required to reset Customizing.