Approval
Service | Help desk | Approval
Basic information about a service call can be recorded on the Service | Helpdesk | Approval tab.
The user requires Service | Help desk | Create new service calls authorization for this tab.
The references displayed on this tab can be created under Settings | Service | Service management | References and elsewhere.
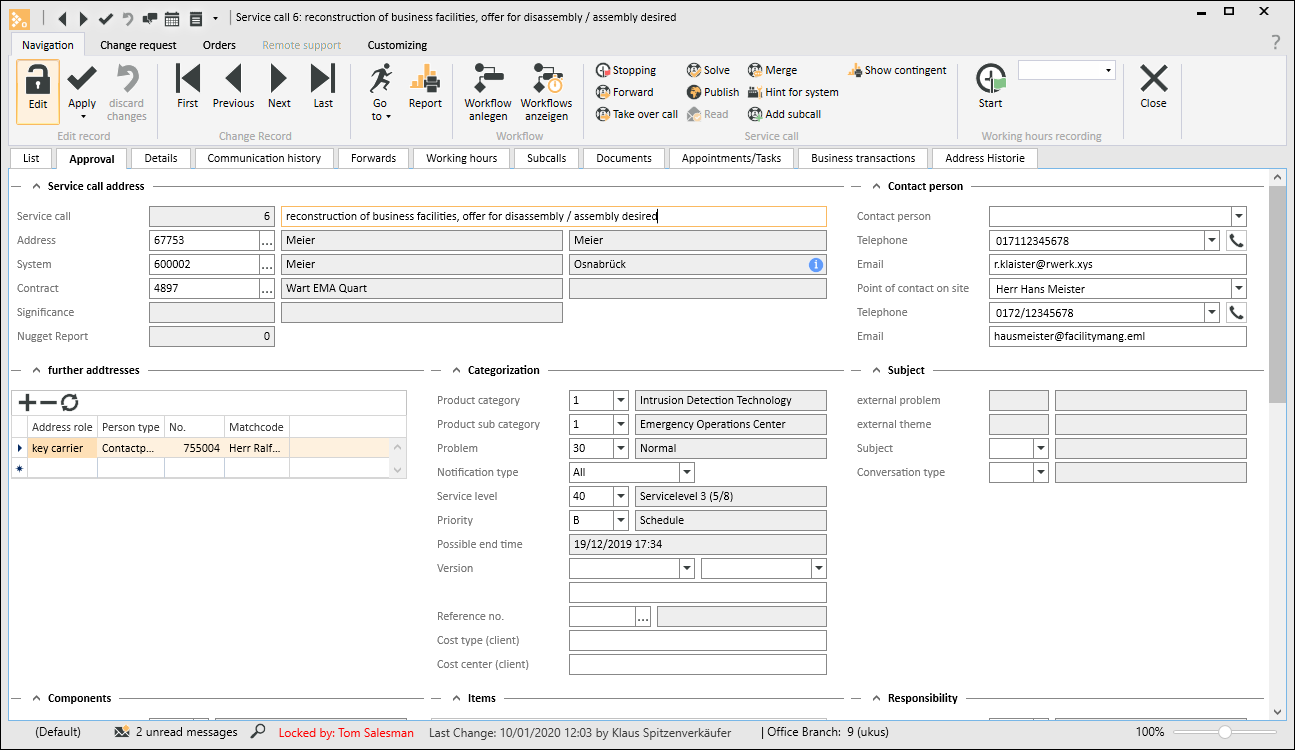
'Service call address' area
Service call (Call number / Matchcode)
When a new Service call is created, the number is automatically drawn from the Service call number range. The matchcode (title) can be entered manually or automatically.
You can preset the Matchcode (Title) to the Matchcode of the Address using the Preset call title to matchcode of the client option under Settings | Service | Service management | Settings | Help desk - Approval.
The Title / Matchcode is a short description of the Service call. This short description is shown in all lists and reports so that the Service call is not identified by just the Service call number. You should choose a meaningful description for the Title so that it can be used to identify the Service call. The input field for the Title is at the head of the tab and can take up to 80 characters.
Address
The Address can be specified using the ![]() button, or you can enter the Address number directly. The addresses that are available for service calls are specified under Settings |Service | Service management | Settings | Help desk - 'Address types' area. Potential clients, Clients, Business partners, Vendors, and Personnel can be selected.
button, or you can enter the Address number directly. The addresses that are available for service calls are specified under Settings |Service | Service management | Settings | Help desk - 'Address types' area. Potential clients, Clients, Business partners, Vendors, and Personnel can be selected.
System
If, for example, you select the Client first, then the selection available in Systems will be restricted to those of the selected Client.
Contract
Only the contracts for the selected system are shown for the contract selection.
However, it does not generally matter which field (address, system, or contract) is filled out first.
For example, if you enter a Contract first, the Address and System fields will be filled out automatically as this information results from the Contract.
The Address can be selected without any restrictions. If you change the Client, all the related data will be deleted.
System
The System can be selected by using the ![]() button.
button.
The available systems are shown in the selection window (![]() Only show active systems filter is active). If an address has already been selected, the display is restricted to the systems for this address (
Only show active systems filter is active). If an address has already been selected, the display is restricted to the systems for this address (![]() Filter by [AddressNo] filter is active).
Filter by [AddressNo] filter is active).
You can deactivate both filters so that all the systems are displayed for selection.
After the selection is made, the System match code and System location will also be displayed.
If the System is selected before an Address is selected, the corresponding Address data will be entered in the relevant fields automatically. Once the System has been selected, the Contract and System line item selections will also be enabled. The available Contract and System line item selections will be limited to the selected System.
The System selection depends on the Address selection and will therefore be deleted if you change the Address.
If you create a Service call and there is only one System assigned to the selected Address, this system will be entered automatically. If there is also only one Contract for the selected System, this will also be entered automatically.
Contract
The Contract can be selected by using the ![]() button. After the Contract is selected, the Contract match code will also be displayed.
button. After the Contract is selected, the Contract match code will also be displayed.
The Contract selection depends on the System and on the selected Address. If you change the System or the Address, the Contract selection will be deleted.
You can edit the Address, System, and Contract as long as the associated Service call has not been started.
If the service call has already been started, you can only edit this data if you have Service | Help desk | Edit service call address data authorization.
![]() Additional hints for system
Additional hints for system
If specific information hints about the system are available, this will be indicated by the ![]() icon in the System field.
icon in the System field.
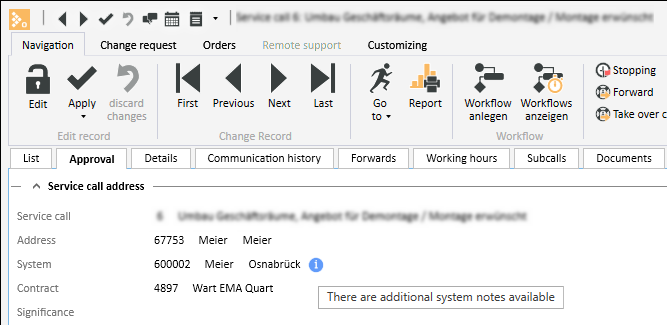
You can open an overview of the system using the ![]() Hints on system button in the Navigation toolbar.
Hints on system button in the Navigation toolbar.
You can use the Go to function to open the System and view the hints on the Systems | Details - Information / Uncompleted tab.
Significance
The Significance field is set automatically by the service call address. If an address significance has been recorded for the service call address on the Service | Help desk | Details tab, this will be included in the service call and shown here for information.
'Contact person' area
Contact person / Telephone / Email
Select the contact person (for example: the caller) from the list of Contact persons for the particular client. When you select a contact person, the corresponding Telephone number and Email address are also entered.
You can also enter the information in these fields manually.
You can use the ![]() button to enter a contact person directly from the service contract. This contact person is assigned to the Client when the data is saved.
button to enter a contact person directly from the service contract. This contact person is assigned to the Client when the data is saved.
Contact on site / Telephone / Email
Select the contact person who is responsible on site (for example: caretaker) from the list of Contact persons for the particular client. When you select a contact person, the corresponding Telephone number and Email address are also entered.
You can also enter the information in these fields manually.
You can use the ![]() button to enter a contact person directly from the service contract. This contact person is assigned to the Client when the data is saved.
button to enter a contact person directly from the service contract. This contact person is assigned to the Client when the data is saved.
'Further addresses' area
In this area, you can assign further addresses / address roles to the service call. If an address role has already been assigned in the selected system, this will also be linked to the service call.
Address role
Select an Address role. Only the address roles linked to the corresponding Process type will be displayed.
The address roles are recorded under Settings | Office | Addresses | References | Address roles. The assignment to the process types is made from this point.
Person type
After you select an address or a contact person, the assigned Person type is shown here.
No.
Select an address or a contact person here. The address selection is initially filtered for the particular process, i.e. only the data sets directly assigned to the process are shown. The filter can be deactivated.
Matchcode
After you select an address or a contact person, the data set matchcode is shown here.
'Categorization' area
A Service call is defined more precisely in this area. Various selection fields are provided here for this purpose. These fields are created in the corresponding references.
Line
Lines of products can be assigned to a system, for example Security equipment, Building technology. You can assign product categories and therefore product subcategories to a product line. If a service call is created for a system in the Help desk, the product line is included in the service call. You can also select a product category and a product subcategory there.
Lines are recorded under Settings | General | General | References | Lines.
Product category
You can select a product category dependent on the selected product line here.
This assignment enables subsequent evaluation of the accumulated Service calls according to Product categories by means of client specific reports.
You can control the visibility of the Product categories and Product subcategories fields in the Help desk using the Customizing settings (Settings | General | Customizing | Settings | Display - 'Helpdesk' area).
Product categories are recorded under Settings | General | General | References | Product categories.
Product subcategory
You can select a product subcategory dependent on the selected product category here.
This assignment enables subsequent evaluation of the accumulated Service calls according to Product categories / Product subcategories by means of client specific reports.
You can control the visibility of the Product categories and Product subcategories fields in the Help desk using the Customizing settings (Settings | General | Customizing | Settings | Display - 'Helpdesk' area -> with product categories / with product subcategories).
Product subcategories are recorded under Settings | General | General | References | Product sub categories.
Problem
Select a problem category here. Problem categories are used to classify a service call according to the severity of the notified fault. The significances and the corresponding service levels are assigned through the problem category.
The problem category can also be edited subsequently. The changes are saved and shown in the History.
A Service level can also be set automatically from the Problem specification if the corresponding details have been recorded for the Problem categories in the references.
Problem categories are recorded under Settings | Service | Service management | References | Problem categories.
Notification type
This selection specifies the type of automatic notification. If you have assigned a problem category, the associated Notification type will also be assigned. This can be edited later.
Unallocated
The type of notification is not changed when the problem category of a service call is changed.
No one
The notification type is set to No one when the problem category of a service call is changed. No automatic notification takes place.
Only internally
Only internal automatic notifications are made.
All
Internal and external notifications are sent automatically.
Service level
The Service level describes the stages in a service call up to an Escalation. This display should not usually be edited, as the Service level can and should be set automatically and it is automatically adjusted when a change event occurs.
The service level of a service call can be changed under the following conditions:
- The Manually edit service level option is activated under Settings | Service | Service management | Settings | Help desk - 'General' area.
- The user has Service | Help desk | Service calls - Change service level authorization.
The Service level is determined from the previously selected data according to the following plan.
- The Service level is taken from the selected System line item if a Service level has been recorded for it and the selection of System line items is available on the Components tab.
- If this is not the case, the Service level is taken from the selected Contract.
- If a Contract has not been selected, or the Contract has not been given a Service level, the Service level will be determined from the Client / Problem category relationship.
- If none of the above applies, a Service level will not be determined and the Service call cannot be created.
If there are several service levels, the service level priority is determined as follows:
Please note that a higher priority Service level will overwrite Service levels with lower priority.
- The service level for a system line item has the highest priority.
- The service level for a contract has medium priority.
- The service level recorded for the Client / Problem category assignment has the lowest priority.
Priority
Select a priority that you can use to set the urgency of the service call.
The Priority defines the importance of a particular process.
Priorities are recorded under Settings | General | General | References | Priorities. You can also record a reaction time in minutes for a priority.
Possible end time
The possible end time is determined on the basis of the assigned service level and is shown here for information.
Reference no.
You can manually enter a reference number (for example the Client's) in this field or select a main service call as the reference using the ![]() button. This allows you to create a relationship between various service calls e.g. to avoid entering detailed descriptions more than once.
button. This allows you to create a relationship between various service calls e.g. to avoid entering detailed descriptions more than once.
The current service call is automatically entered as a Sub call of the specified Reference call on the corresponding tab. You can use the Go to button to jump to this Main call.
Cost type (client)
If the client expects a particular cost type to be specified on the printed materials, this cost type can be entered as text here. If the client specific cost type is already recorded for the system, this will also be included in the service call and can be printed out on the corresponding forms.
Cost center (client)
If the client expects a particular cost center to be specified on the printed materials, this cost center can be entered as text here. If the client specific cost center is already recorded for the system, this will be included in the service call and can be output on the corresponding forms.
'Subject' area
Ext. Problem / Ext. Subject
The Ext. Problem / Ext. Subject fields here are only filled out by a service call that is created through esweb. In this case, the Client has access to the same problem categories / subjects as the user.
Subject
Select a conversation topic here. A service call can be classified more precisely by means of the conversation topic, which can also be used for evaluation by means of a client specific report.
You can show or hide the Subject field in the help desk using the customizing settings (Settings | General | Customizing | Settings | Display - 'Helpdesk' area -> With conversation topics).
Topics are recorded under Settings | Service | Service management | References | Conversation topics.
Conversation type
Select a conversation type here. A service call can be classified more precisely by means of the conversation type, which can also be used for evaluation by means of a client specific report.
You can show or hide the Conversation type field in the help desk using the customizing settings (Settings | General | Customizing | Settings | Display - 'Helpdesk' areaHelp desk -> With conversation types).
The conversation types are recorded under Settings | Service | Service management | References | Conversation types.
'Components' area
This area is used to assign an error description to a specific system component.
Room / Room matchcode
To select a System line item, you can first select the Room where the particular Component is located. The Room also depends on the System and therefore also on the selected Client. If you change the System or the Client, the Room selection and therefore the Line item selection will be deleted.
Components / item description
After selecting the Room, the System line item can be specified using a System line item selection dialog. This dialog is opened using the ![]() button.
button.
The System line item selection dialog is also available even if you have not selected a Room yet. In this case, all the Components for the System will be shown in the selection list. When a Component has been selected, the associated Room will also be automatically assigned to the Call.
The System line item selection depends on the Room selection and will therefore be deleted if you change the Room.
Defective item
Activate this option if the selected component is a defective item.
Contract type and contract service type
If the selected component is assigned to a contract type / contract service type, the corresponding data including the fees are shown in this table.
'Items' area
You can enter items from the item master in this table as an alternative to the system components. This selection dialog is also opened using the ![]() button in the Item field.
button in the Item field.
'Responsibility' area
In this area, a Call can be assigned to an Employee who will be responsible for the service call. The Person responsible is the person who will undertake the necessary steps to solve the service call.
Office branch no.
Select the office branch to which the service call is to be assigned. When you create a service call, the office branch for the selected address is entered by default.
Department
You can select a department responsible for the service call here. The Department filter on the Service call overview page can be used to restrict the data sets displayed for this.
Responsible
In this area, a Call can be assigned to an Employee who will be responsible for the service call. The Person responsible is the person who will undertake the necessary steps to solve the service call.
In this area, you can also pass on the Call to a person other than the one entered or to another team.
Responsible employee
The personnel no. and name of the employee assigned to the service call, such as through forwarding, are displayed in this field.
Responsible team
The team assigned to the service call, such as through forwarding, is displayed here.
Action
You can link a previously recorded marketing action (for example client satisfaction survey) to the service call using the ![]() button.
button.
Opportunity
You can link a previously recorded opportunity to the service call using the ![]() button.
button.
'Message' area
Client message
The description of the Client's problem can be entered in this field.
The message can be edited by an Employee who has Service | Helpdesk | Edit service call authorization.
'Result' area
The result or solution to a solved Call should be entered in this field, for example.
If you want to alter the result, you will need Edit service call authorization.
The Assignment area here has the same function as the same area on the Service | Approval tab.
Functions / Toolbars
Various functions are provided in the toolbars (ribbons / ribbon bars) above the tabs.
The toolbar structure depends on the current module / tab.
Some toolbars are only shown when you edit certain fields, such as the Text toolbar when you edit rich text fields.
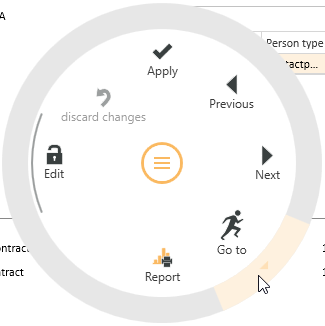
'Edit data set' area
![]() Edit
Edit
Click on the ![]() Edit button to switch the Form to Edit mode.
Edit button to switch the Form to Edit mode.
The usual Input elements are available in Edit mode.
If data has been changed and you close the form or change to another data set, a message will be displayed asking you if you want to save the changes or not.
Changes can be undone by clicking the ![]() Reject changes button as long as input has not been actively saved or the form has not been closed or the data set changed.
Reject changes button as long as input has not been actively saved or the form has not been closed or the data set changed.
Detail data sets can also be opened directly in Edit mode. To do this, deactivate the Do not automatically edit detail data option under Settings | General | General | Settings | System settings - 'Program behavior' area.
Also see Edit Data Set
![]() Apply
Apply
You can always actively save changes in the data by clicking the ![]() Apply button.
Apply button.
![]() Apply and close
Apply and close
You can save the changed data and close the entry form / module in one go with the ![]() Apply and close function.
Apply and close function.
![]() Reject changes
Reject changes
Changes can be undone by clicking the ![]() Reject changes button as long as input has not been actively saved or the form has not been closed or the data set changed.
Reject changes button as long as input has not been actively saved or the form has not been closed or the data set changed.
'Change data set' area
Each detail view contains a copy of the current list view for the module. This can be viewed on the List tab in the Detail view. This enables you to also navigate through the original list in the Detail View using the navigation buttons.
If a filter or search is active when you open the detail view, this will also be applied to the display on the List tab.
![]() First
First
Jumps to the first data set in the list. The sort order on the List tab is used.
![]() Previous
Previous
Pages back to the previous data set in the list. The sort order on the List tab is used.
![]() Next
Next
Pages forward to the next data set in the list. The sort order on the List tab is used.
![]() Last
Last
Jumps to the last data set in the list. The sort order on the List tab is used.
![]() Go to
Go to
There is a general Go to function in eserp that allows you to jump to the associated modules.
You can use the Go to function to jump to other modules that are connected to the current process.
You can jump directly from a Client data set to the Systems or Contracts for the Client.
The ![]() Go to button in the Navigation toolbar is used to execute the Go to function.
Go to button in the Navigation toolbar is used to execute the Go to function.
Click on the ![]() icon in the button to display the available Go to targets.
icon in the button to display the available Go to targets.
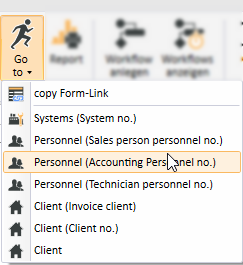
When you click on an item in the list, the corresponding module opens with the linked data set.
Go to in the Context menu
The Go to function is also available at many points in the program in the Context menu that is opened with a right mouse click.
![]() View change history
View change history
Program areas for which a detailed change history is to be recorded can be activated from Tools | Database logging. A report stating when data sets were deleted can be produced for each area. When the detail log function is activated, the report also states what kind of data sets were deleted.
This report is recorded in the report entry point Data set change history (Groups).
A report can be displayed from the Data set change history report entry point using the ![]() Show change history button. This function is also available in lists / tables via the context menu so that you can display the changes in the detail data sets.
Show change history button. This function is also available in lists / tables via the context menu so that you can display the changes in the detail data sets.
The Data set change history and Data set change history (Groups) report entry points are only shown when the license for esLog is present and the table RevGrup exists.
![]() Report
Report
Reports can be used to print out or send the displayed information for an address or process. The reports that are registered for the current program point are displayed when you click on the Report button.
Also see Registration
'Workflow' area
![]() Create workflow
Create workflow
Previously defined workflow processes can be selected and started using this button. Only the workflow processes that are assigned to the current process type or to no process type will be displayed.
![]() Show workflow
Show workflow
This button displays the workflows that have already been started.
'Service call' area
![]() Pause
Pause
You need Service | Help desk | Service calls - Pause clocks authorization to use the Pause function.
If a service call has been started (clocks are running) you can use the Pause button to temporarily stop (pause) the service call clocks. Escalation of the service call does not occur if the clocks have been paused.
![]() Continue
Continue
To restart a paused service call, click on the Continue button.
![]() Resume
Resume
You need Service | Help desk | Service calls - Resume solved calls or Service | Help desk | Service calls - Resume completed calls authorization to use the Resume function.
You can reopen a service call for processing that has been solved or completed using this function.
![]() Forward
Forward
You can use this function to forward a service call to a user and / or a team for processing.
You need Service | Help desk | Forward service calls authorization to use the Forward function.
If you click on the Forward button, the eserp Message dialog opens.
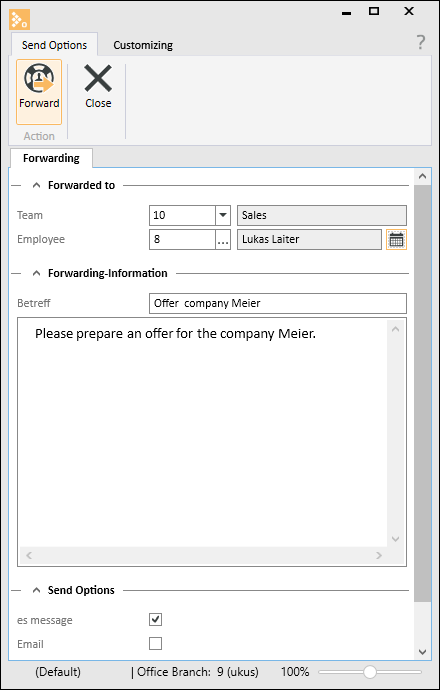
If the service call is forwarded or a Person responsible has been entered, the fields will be filled out with the corresponding names.
If the service call is forwarded to a team and an employee is selected from the team, for example, then an email will only be sent to this particular employee. If only the team is selected, for example, then the email will be sent to all members of the team. The assignment in the Personnel table is also considered.
Team
You can select the team here to which the service call is to be forwarded. You can select the team using the number or description.
Employee
You can select the employee here to whom the service call is to be forwarded. If you have previously selected a team, you can only select an employee who is a member of that team here. If you want to assign this service call to another employee, you will have to delete the team selection first. You can then select the employee using the personnel number or name.
Subject
You can enter a subject line here. The subject is used as the matchcode for the contact entry for forwarding.
You can preset the subject to a text module, and variables that access the service call information can also be inserted.
You can select the subject line for the Default subject line forwarding under Settings | Service management | Settings | Help desk - 'General' area.
Text
You can enter the forwarding message text here. You can preset the forwarding text message to a text module, and variables that access the service call information can also be inserted.
You can select the subject line for the Default subject line forwarding under Settings | Service management | Settings | Help desk - 'General' area.
Send options
The forwarding is sent as an email.
SMS
The forwarding is sent as an SMS message.
esMessage
The forwarding is sent as an esMessage.
Additional email
The forwarding is also sent as an email to the recorded additional email address.
![]() Take over call
Take over call
You need Service | Help desk | Service calls Process all or Service | Help desk | Service calls Process only own teams / Office branches authorization to use the Take over call function.
You can use this function to take over a service call for processing for which you as the user are not entered as the person responsible.
![]() Solve
Solve
You need Service | Help desk | Solve service calls authorization to use the Solve function.
You can set a service call to solved using the Solve button, which therefore stops both the clocks. You can use this function if you have Solve service call authorization and the service call has a status that is less than solved.
You can reopen solved service calls for processing again using the Resume button.
![]() Close
Close
You need Service | Help desk | Close service calls authorization to use the Close function.
If a service call has been solved, you can use this button to close the service call.
![]() Publish
Publish
You can use this button to make a service call visible to the specified address through the esweb.
If a service call is entered through esweb, the Publish option is set immediately.
If a contact entry has been saved with the Publish option, the Publish option will also be set in the associated service call if the service call has not already been published.
If a default reply has been entered in the contact, the Publish option will be set automatically in the contact.
If an Email (contact) is sent to a Client about a Call that is already published, this Contact will also be set to Published automatically to provide the Client with a continuous history.
The same applies to an Email received that directly applies to the client's Call.
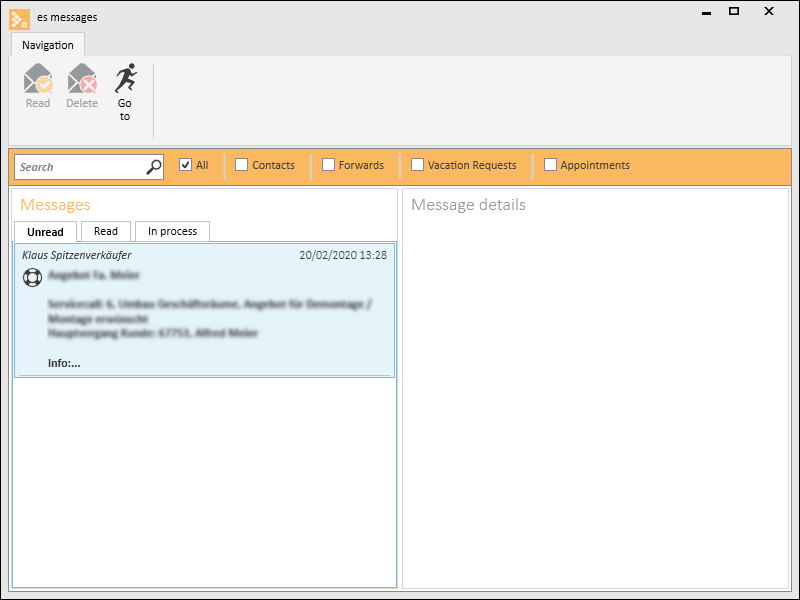
![]() Read
Read
If there have been changes made to a service call, e.g. a new contact entry has been created or an email has been imported, the service call is shown in the list in bold type. You can mark the service call as read to indicate that you are aware of the changes that were made.
The Read button cannot be selected (grayed out) if no new information / entries exist for the service call.
![]() Merge
Merge
The Merge button allows you to merge service calls together. The service call selection window opens where you can specify a further service call to be merged. Mark a service call and click on the OK button to merge the two calls together.
When you merge the calls, the data of the previous call are assigned to the new call. The previous service call number will be overwritten by the new service call number in all parts of the database. An exception to this is the call history (Progress area on the Service | Help desk | Details tab).
When you merge calls, a new entry that records the previous service call number is created. The history entries pertaining to the previous service call also remain unchanged.
The previous service call is removed from the service calls table when the calls are merged.
If the old service call is assigned to a Main service call, only the service calls that have the same Main call will be available for selection here. A new note entry with the Service call no. as heading will be created for both the Message and the Result memo fields.
![]() Hint for system
Hint for system
To get a quick overview of the system linked to the service call, you can display important information about the system from the System data, Contract, Inspection orders, Orders and Service level areas using the Hints for system button.
Client specific reports for the system data can also be included.
![]() Add sub service call
Add sub service call
When you click on this button, a new service call is created which is assigned as a sub call to the active service call when it is saved.
If you want to add an already created service call as a sub call, click on the ![]() icon next to the button and select the Add sub call command. You can select the sub call from a list of active service calls.
icon next to the button and select the Add sub call command. You can select the sub call from a list of active service calls.
You can display the sub calls for a main call under Service | Help desk | Subcalls.
![]() Show contingent
Show contingent
If you are using the optional Contingent management module, you can use this button to open / print a report with the contingent information (nugget extract).
'Work time recording' area
![]() Work time recording - Start
Work time recording - Start
You can use the Start button to start a stopwatch that records the time for the active process.
You can select the wage type for the recorded time form the selection field to the right of the button.
When the active process is closed or the work time recording is stopped using the ![]() Stop button, a Labor report containing the recorded work times is created.
Stop button, a Labor report containing the recorded work times is created.
![]() Work time recording - Stop
Work time recording - Stop
Stops the stopwatch recording the work time and creates a Labor report containing the recorded work times.
![]() Close
Close
Closes the current form / module.
A message will indicate if there are any unsaved changes.
You can then decide whether to save the changes (Yes), reject the changes (No) or cancel the Close command (Cancel).
The Customize (0110250) license is required for customizing.
The optional esCustomize allows the following control element properties to be adjusted:
- The order and visibility of input and control elements
- The labeling of control elements
- The layout of control elements (color, text width)
- The brief hint text for control elements
- The data linking of control elements
It is also possible to create new fields and add them to the Form.
![]() Start customizing
Start customizing
Click on the ![]() Start customizing button to switch the current form to Customizing mode.
Start customizing button to switch the current form to Customizing mode.
The Form is always customized in the context of the current role that is being used (see Role assignment).
To find out how to change the role, please see: Role assignment.
General | Administration | General references - Customize forms authorization is required to customize forms.
Also see Customizing forms
Apply customizing from role
Click on the Apply customizing from role button to apply the customizing settings already defined for another role to the current form. A selection of the customizing properties defined in other roles is shown.
![]() Edit fields
Edit fields
You can edit certain properties (required field, font color, background color, default values) of the input fields in a form / module using the Edit fields function. Also see Required fields and Default values.
You can also create your own fields and user defined data packs, also see Create individual fields.
![]() Role management
Role management
This button opens management of customizing roles.
Customizing roles can be created and managed under Settings | General | Customizing | References | Customizing - Roles.
Functions when the Customizing process is running
Three additional buttons are shown after you start Customizing:
![]() Apply
Apply
This function saves the temporary customization and closes Customizing mode.
You must close and restart the program for the changes to be visible to the user.
![]() Cancel
Cancel
Use this button to Cancel the Customizing process. Customizing mode closes without saving the changes you made to the forms.
![]() Reset
Reset
This function resets Customizing and loads the default settings for the form. The reset is performed only after you have confirmed the query dialog that is displayed.
The current Customizing settings are deleted by the reset and cannot be retrieved.
General | Administration | Reset form customizing authorization is required to reset Customizing.