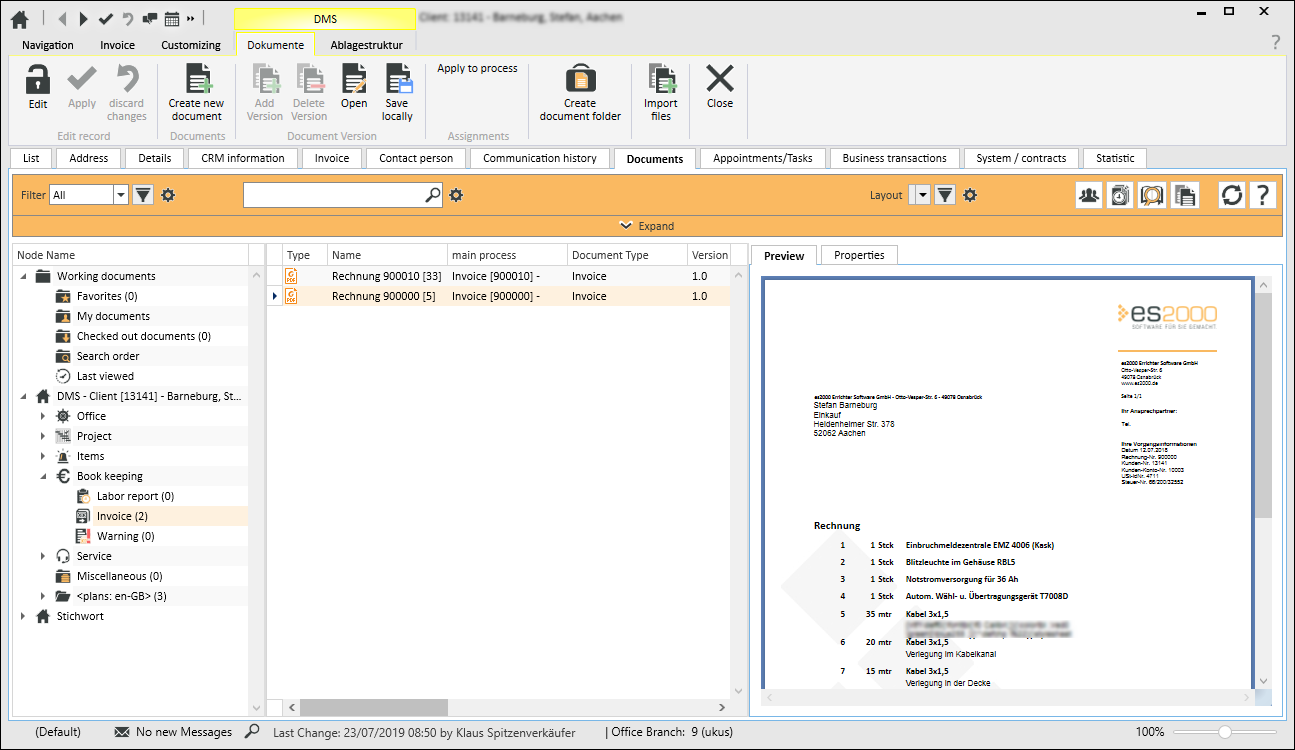
Documents
Office | Opportunity | Documents
You can manage files with any content in the Documents tab in the separate modules for the individual processes in eserp (for example: Service orders, Client files, etc.).
If the process involves an address (Client, Potential client, Vendor, etc.), all the document versions where the process can be assigned to this address (for example: all the documents for a service order that belongs to a particular client) will be displayed on the Documents tab sorted according to process type and time.
If the process does not involve an address (for example: a service order), only those documents that are directly assigned to this process type (example process type: Service order) and this particular process (example: Service order no. 23461) will be displayed on the Documents tab.
Process type Address
The Documents tab for file management is displayed within the detail forms for the individual address types (Clients, Potential clients, Vendors, etc.) in eserp.
On the tab, the separate document versions are shown in a file tree structure. The file tree is made up from the separate possible process types for this address type in eserp.
You can display, for example, all the offer documents for a Client by clicking on the Offer folder in the directory tree. Only the document versions that are assigned to a process for the address will be displayed.
An example to explain the background: Different versions of a document containing procedural instructions for restarting an alarm system or a telephone system can have been sent to different clients from different service calls made to the Help desk. However, the user is only interested in seeing the specific version that was sent to a client at a particular time, X.
The Miscellaneous folder is a special case, however. You can save documents to this folder that do not have an explicit process assignment. Only the address as such is assigned as a process to the document. Additional sub folders can be added to the Miscellaneous folder using the Document management settings.
Other processes with DMS filing
If the process in which the document management is displayed does not involve an address, only the files that are directly assigned to this process will be displayed in the directory tree on the Documents tab.
Areas
The Documents tab is divided into different areas.
The focus is on the grouped display of documents versus time for each process type.
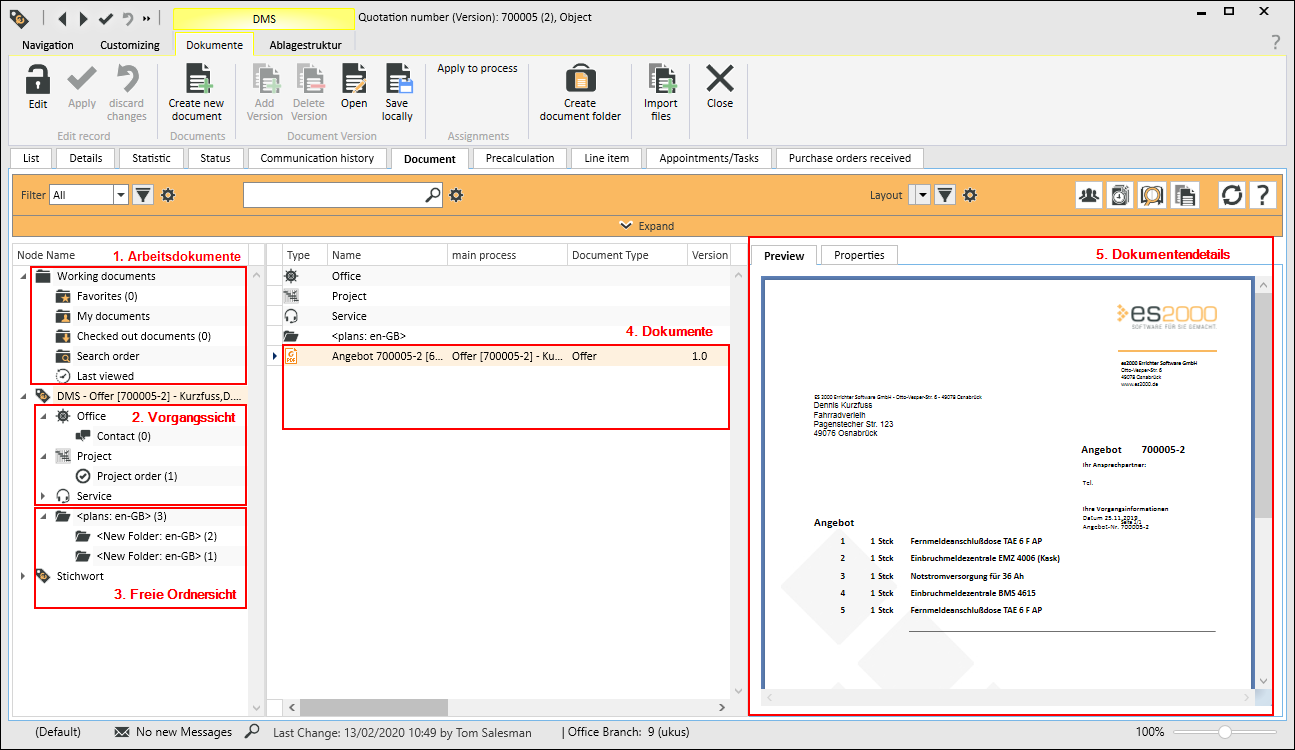
1. Working documents
The following areas are part of the working documents:
Favorites
Shows all documents that have been saved as Favorites. You can add documents as Favorites or remove them from the Favorites using the context menu (right click on the document or document version).
My documents
All the documents or versions of a document created by the current user.
Checked out documents
All the documents that were checked out for editing by the current user are shown in this folder.
Search folder
Displays all the document versions that were opened, saved locally, or checked out in the Search dialog.
Last viewed
Displays all the document versions that were last opened from the document management system.
2. Process view
All the documents for the particular process type are grouped according to the relative process number at the separate nodes of the process view. If a process type has a sub folder, the directory tree is kept and the documents in it are shown grouped on the time axis.
3. Free folder view
The free folder view is a general document filing view that is not related to any process. The directory / folder structure can be set individually. The documents are grouped according to time in the particular folders.
4. Document
A document possesses the following properties: Document name, author, creation date, file size, etc. There can be different versions of each document. Each version can be assigned to different processes.
Sub folders that are on the same level as the document versions can also be shown in this area.
5. Document details
The document details are divided into three main areas: As well as a document preview, the document properties, properties of a document version, and the document history can be viewed.
Preview
The document preview cannot be edited.
The software registered for the file type in the Windows registry is used for the preview (for example: Adobe Acrobat Reader for PDF files).
If a preview is unavailable, there is no assignment of the particular file name extension to a corresponding application in the Windows registry.
Properties
The document properties and the properties of a document version are displayed.
Search bar
The search bar allows document versions to be found more quickly.
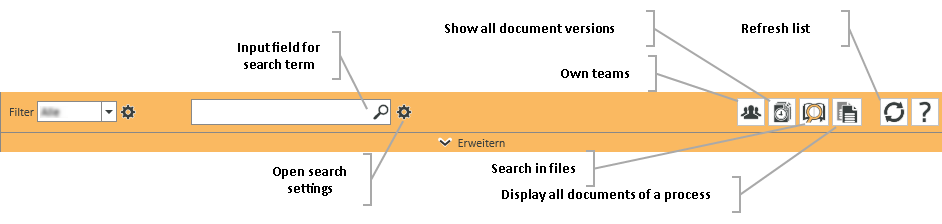
Full text search
As well as the full text search, user defined filters can be used to find document versions.
A preview of the document and a summary of the properties of the document and of the specific version are displayed for the selection.
The selected document version can be opened, saved locally, or checked out. Document versions that were opened or saved locally during the search process are saved and displayed under Working documents in the Search folder area.
Also see Search, Filter, and Sort
Functions / Toolbars
Various functions are provided in the toolbars (ribbons / ribbon bars) above the tabs.
The toolbar structure depends on the current module / tab.
Some toolbars are only shown when you edit certain fields, such as the Text toolbar when you edit rich text fields.
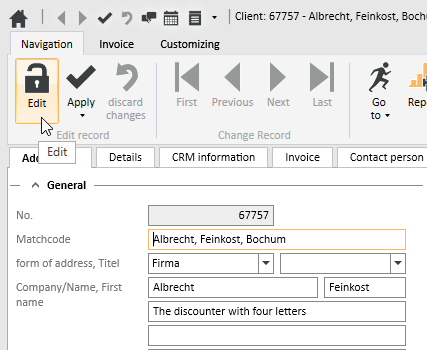
'Edit data set' area
![]() Edit
Edit
Click on the ![]() Edit button to switch the Form to Edit mode.
Edit button to switch the Form to Edit mode.
The usual Input elements are available in Edit mode.
If data has been changed and you close the form or change to another data set, a message will be displayed asking you if you want to save the changes or not.
Changes can be undone by clicking the ![]() Reject changes button as long as input has not been actively saved or the form has not been closed or the data set changed.
Reject changes button as long as input has not been actively saved or the form has not been closed or the data set changed.
Detail data sets can also be opened directly in Edit mode. To do this, deactivate the Do not automatically edit detail data option under Settings | General | General | Settings | System settings - 'Program behavior' area.
Also see Edit Data Set
![]() Apply
Apply
You can always actively save changes in the data by clicking the ![]() Apply button.
Apply button.
![]() Apply and close
Apply and close
You can save the changed data and close the entry form / module in one go with the ![]() Apply and close function.
Apply and close function.
![]() Reject changes
Reject changes
Changes can be undone by clicking the ![]() Reject changes button as long as input has not been actively saved or the form has not been closed or the data set changed.
Reject changes button as long as input has not been actively saved or the form has not been closed or the data set changed.
'Documents' area
![]() Create new document
Create new document
DMS | Add new document authorization is required to create a new document.
-
To create a new document, select either a (sub) folder within a process or a directory in the free folders area.
-
Click on the
 Create new document button. The Create new document input window opens.
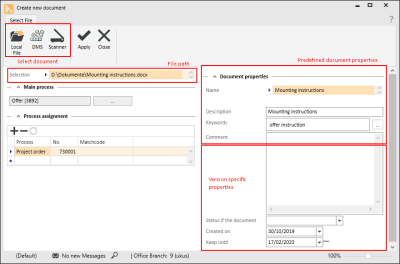
Instead of selecting a file using the Create new document input form, you can copy and insert document versions from within the DMS.
This means that you can also insert local files that have been copied to the clip board into the DMS.
-
Select a document.
There are three ways to select a document.
 Local file
A file selection window opens. You can select a file from the local file system.
 DMS
DMSA search dialog opens, which you can use to select a file from the DMS
 Scanner
You can use this function to scan a document and select the temporary file that is created.
-
Specify the Document properties.
-
The Process assignment has a direct relationship to the document version. The main process is added automatically from the context in which the document was created.
-
To insert the selected document click on the
 Apply button.

'Document versions' area
![]() Add version
Add version
DMS | Add new version authorization is required to add a new version of a new document.
-
To add a document version, select the particular document.
-
Click on the
 Add version button. The Add version window opens. The document properties are taken from the original docuent. A new version number is already entered.
 -
Select a document.
There are three ways to select a document.
Local fileA file selection window opens. You can select a file from the local file system.
DMSA search dialog opens, which you can use to select a file from the DMS
ScannerYou can use this function to scan a document and select the temporary file that is created.
-
The document properties are already predefined when a version is added and cannot be edited here. However, version properties and their process assignments can be specified.
-
To insert the document version click on the Apply button.
![]() Delete version
Delete version
When a document version is deleted, a summary of all the associated process assignments is displayed.
Requirements for deleting a version:
- The document version is checked in.
Only the user who created the document or the document version can delete the version.
DMS | Delete document user authorization is required .
![]() Open
Open
When you open a document version, the application registered for the file type in the Windows registry is used to open the document version directly from the DMS.
For example, PDF files open in Adobe Acrobat, and DOCX / DOC files in Microsoft Word.
![]() Save locally
Save locally
A document version can be saved locally by downloading it from the DMS and saving it.
-
Select the document.
-
Click on the
 Save locally button.
 -
A file selection dialog opens for you to specify the local storage path. You can edit the file name before saving the file.
'Assignments' area
Apply to process
A window opens for you to select a process for the current document version. Select a process to apply the document to it.
![]() Create document folder
Create document folder
When you create a document folder, all the document versions can be exported as a ZIP file to a Process or to a Folder in the free folders area. The DMS directory structure is retained on export.
DMS | Create document folder authorization is required to create a document folder.
The dialog shows a preview of the number of files that will be exported and the memory space required.
![]() Select process
Select process
You can select processes using the Select process button. The processes that are available will depend on the active process. The list of processes is opened with the 'Filter by process' filter active by default.
Subprocesses
Activate this option to export all the Subprocesses for a process. All the documents that contain the process as a further assignment will be exported.
Assigned operations
When this option is activated, the documents for assigned processes will also be exported.
![]() Deselect
Deselect
To remove a process from the list, mark the process and then click on the Deselect button.
The documents for the selected processes are exported by clicking on the ![]() Create document folder button. A file selection window opens for you to save the ZIP file.
Create document folder button. A file selection window opens for you to save the ZIP file.
![]() Import files
Import files
The Import files function allows you to automatically import a large number of files into the DMS for each process type.
DMS | Documents - Batch file import authorization is required for the Import files function.
For each client, you have a PDF file with the signed GDPR declaration of consent in a directory which is to be assigned to each particular client in the DMS. The PDF file name includes the client number, for example: GDPR_4711.pdf.
-
Select the folder you want in the DMS where the document is to be imported for the particular process type.
-
Then click on the
Import files button.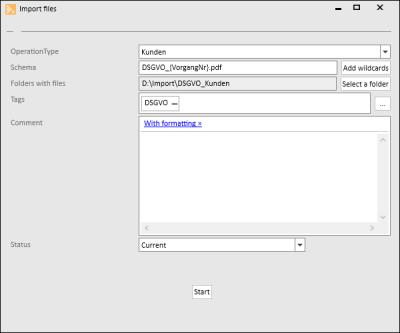
-
Select the desired Process type, for example: Clients
-
Create the Plan for the assignment. The assignment to an individual process is ensured by a placeholder.
The Add placeholder button is used to insert a placeholder for the process number of the selected process. This would be the Client number in the case of Clients.
-
Under Folder with files, select the folder that contains the files to be imported.
-
Under Keywords, you can assign predefined keywords to the files to be imported. Also see Keyword.
-
You can record a Comment with the imported files when they are imported. This comment is displayed by the DMS when the file is selected later.
-
Under Status, select a document status that is to be assigned to the files to be imported. Also see Document status
-
Click the Start button to start the import.
The documents are imported, marked with a version, and checked in. A check is made for possible duplicates.

![]() Close
Close
Closes the current form / module.
A message will indicate if there are any unsaved changes.
You can then decide whether to save the changes (Yes), reject the changes (No) or cancel the Close command (Cancel).
You can adjust the process specific folder structure for documents using the Filing structure toolbar.
DMS | Edit structure authoization is required in order to make changes to the document management system (DMS) filing structure.
The functions can also be accessed from the context menu (right click) in the folder structure.
![]() Add folder
Add folder
You can use this button to add a general directory to the process specific folder structure. The directory is available for all data sets of the process.
A message that once more displays the process for which the folder is being created must be confirmed before the directory is created.
The folder is created following confirmation. The folder will be named with a general name (New Folder) with the ISO language code of the logged in user (for example en-US for US English or en-GB for UK English). You can use the ![]() Rename button to rename the folder as required, depending on language.
Rename button to rename the folder as required, depending on language.
![]() Delete folder
Delete folder
You can delete a directory marked in the process specific folder structure using this button.
You can only delete folders that do not contain any files or sub folders.
A message that once more displays the process for which the folder is being deleted must be confirmed before the directory is deleted. The folder is deleted for all data sets of the process.
![]() Rename
Rename
You can rename a directory in the DMS folder structure depending on the language.
Confirmation is required before the directory is renamed, as this will affect all the data sets of the process.
In the Rename window, you can give the folder a new name for each language defined. The ISO language code is also entered by default.
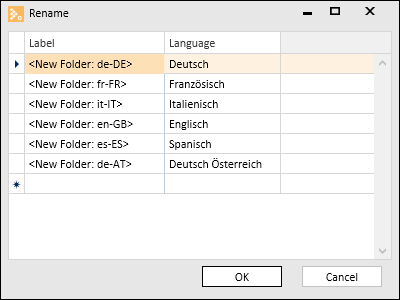
The languagesincluding the ISO language codes are recorded under Settings | General | General | References | Languages.
Description
Enter a Description according to the set Language code.
![]() Close
Close
Closes the current form / module.
A message will indicate if there are any unsaved changes.
You can then decide whether to save the changes (Yes), reject the changes (No) or cancel the Close command (Cancel).
Functions / Toolbars
Various functions are provided in the toolbars (ribbons / ribbon bars) above the tabs.
The toolbar structure depends on the current module / tab.
Some toolbars are only shown when you edit certain fields, such as the Text toolbar when you edit rich text fields.
'Edit data set' area
![]() Edit
Edit
Click on the ![]() Edit button to switch the Form to Edit mode.
Edit button to switch the Form to Edit mode.
The usual Input elements are available in Edit mode.
If data has been changed and you close the form or change to another data set, a message will be displayed asking you if you want to save the changes or not.
Changes can be undone by clicking the ![]() Reject changes button as long as input has not been actively saved or the form has not been closed or the data set changed.
Reject changes button as long as input has not been actively saved or the form has not been closed or the data set changed.
Detail data sets can also be opened directly in Edit mode. To do this, deactivate the Do not automatically edit detail data option under Settings | General | General | Settings | System settings - 'Program behavior' area.
Also see Edit Data Set
![]() Apply
Apply
You can always actively save changes in the data by clicking the ![]() Apply button.
Apply button.
![]() Apply and close
Apply and close
You can save the changed data and close the entry form / module in one go with the ![]() Apply and close function.
Apply and close function.
![]() Reject changes
Reject changes
Changes can be undone by clicking the ![]() Reject changes button as long as input has not been actively saved or the form has not been closed or the data set changed.
Reject changes button as long as input has not been actively saved or the form has not been closed or the data set changed.
'Change data set' area
Each detail view contains a copy of the current list view for the module. This can be viewed on the List tab in the Detail view. This enables you to also navigate through the original list in the Detail View using the navigation buttons.
If a filter or search is active when you open the detail view, this will also be applied to the display on the List tab.
![]() First
First
Jumps to the first data set in the list. The sort order on the List tab is used.
![]() Previous
Previous
Pages back to the previous data set in the list. The sort order on the List tab is used.
![]() Next
Next
Pages forward to the next data set in the list. The sort order on the List tab is used.
![]() Last
Last
Jumps to the last data set in the list. The sort order on the List tab is used.
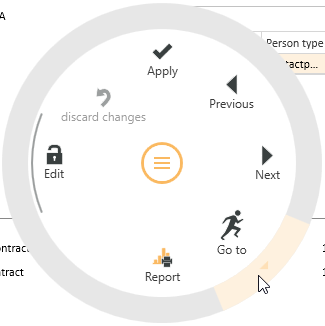
![]() Go to
Go to
There is a general Go to function in eserp that allows you to jump to the associated modules.
You can use the Go to function to jump to other modules that are connected to the current process.
You can jump directly from a Client data set to the Systems or Contracts for the Client.
The ![]() Go to button in the Navigation toolbar is used to execute the Go to function.
Go to button in the Navigation toolbar is used to execute the Go to function.
Click on the ![]() icon in the button to display the available Go to targets.
icon in the button to display the available Go to targets.
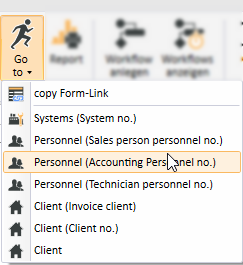
When you click on an item in the list, the corresponding module opens with the linked data set.
Go to in the Context menu
The Go to function is also available at many points in the program in the Context menu that is opened with a right mouse click.
![]() View change history
View change history
Program areas for which a detailed change history is to be recorded can be activated from Tools | Database logging. A report stating when data sets were deleted can be produced for each area. When the detail log function is activated, the report also states what kind of data sets were deleted.
This report is recorded in the report entry point Data set change history (Groups).
A report can be displayed from the Data set change history report entry point using the ![]() Show change history button. This function is also available in lists / tables via the context menu so that you can display the changes in the detail data sets.
Show change history button. This function is also available in lists / tables via the context menu so that you can display the changes in the detail data sets.
The Data set change history and Data set change history (Groups) report entry points are only shown when the license for esLog is present and the table RevGrup exists.
![]() Report
Report
Reports can be used to print out or send the displayed information for an address or process. The reports that are registered for the current program point are displayed when you click on the Report button.
Also see Registration
'Workflow' area
![]() Create workflow
Create workflow
Previously defined workflow processes can be selected and started using this button. Only the workflow processes that are assigned to the current process type or to no process type will be displayed.
![]() Show workflow
Show workflow
This button displays the workflows that have already been started.
'Address' area
Edit address
You can edit the address for the opportunity using this function. You can select a client or potential client address.
'Actions' area
![]() New offer calculation
New offer calculation
You can create a new offer calculation for the current address using this button. You can either create a new calculation folder or select an existing calculation folder.
![]() From template /
From template / ![]() From GAEB file
From GAEB file
If you click on the ![]() icon in the button, you can create an offer calculation from a template or from a GAEB file. You can either create a new calculation folder or select an existing calculation folder before you select the offer template or the GAEB file.
icon in the button, you can create an offer calculation from a template or from a GAEB file. You can either create a new calculation folder or select an existing calculation folder before you select the offer template or the GAEB file.
Existing calculation folders are initially filtered according to the current address.
![]() Set to complete
Set to complete
You can set an Opportunity to Completed status using the ![]() Set to complete button.
Set to complete button.
The entry fields are disabled.
![]() Set to uncompleted
Set to uncompleted
You can reopen an opportunity that is marked as Completed for editing using the ![]() Set to uncompleted button.
Set to uncompleted button.
![]() Close
Close
Closes the current form / module.
A message will indicate if there are any unsaved changes.
You can then decide whether to save the changes (Yes), reject the changes (No) or cancel the Close command (Cancel).
The Customize (0110250) license is required for customizing.
The optional esCustomize allows the following control element properties to be adjusted:
- The order and visibility of input and control elements
- The labeling of control elements
- The layout of control elements (color, text width)
- The brief hint text for control elements
- The data linking of control elements
It is also possible to create new fields and add them to the Form.
![]() Start customizing
Start customizing
Click on the ![]() Start customizing button to switch the current form to Customizing mode.
Start customizing button to switch the current form to Customizing mode.
The Form is always customized in the context of the current role that is being used (see Role assignment).
To find out how to change the role, please see: Role assignment.
General | Administration | General references - Customize forms authorization is required to customize forms.
Also see Customizing forms
Apply customizing from role
Click on the Apply customizing from role button to apply the customizing settings already defined for another role to the current form. A selection of the customizing properties defined in other roles is shown.
![]() Edit fields
Edit fields
You can edit certain properties (required field, font color, background color, default values) of the input fields in a form / module using the Edit fields function. Also see Required fields and Default values.
You can also create your own fields and user defined data packs, also see Create individual fields.
![]() Role management
Role management
This button opens management of customizing roles.
Customizing roles can be created and managed under Settings | General | Customizing | References | Customizing - Roles.
Functions when the Customizing process is running
Three additional buttons are shown after you start Customizing:
![]() Apply
Apply
This function saves the temporary customization and closes Customizing mode.
You must close and restart the program for the changes to be visible to the user.
![]() Cancel
Cancel
Use this button to Cancel the Customizing process. Customizing mode closes without saving the changes you made to the forms.
![]() Reset
Reset
This function resets Customizing and loads the default settings for the form. The reset is performed only after you have confirmed the query dialog that is displayed.
The current Customizing settings are deleted by the reset and cannot be retrieved.
General | Administration | Reset form customizing authorization is required to reset Customizing.