Line items
Items | Purchase orders | Line items
The line items in the selected purchase order are shown on the Items | Purchase orders | Line items tab.
Any new line items to be inserted are also generated on this tab.
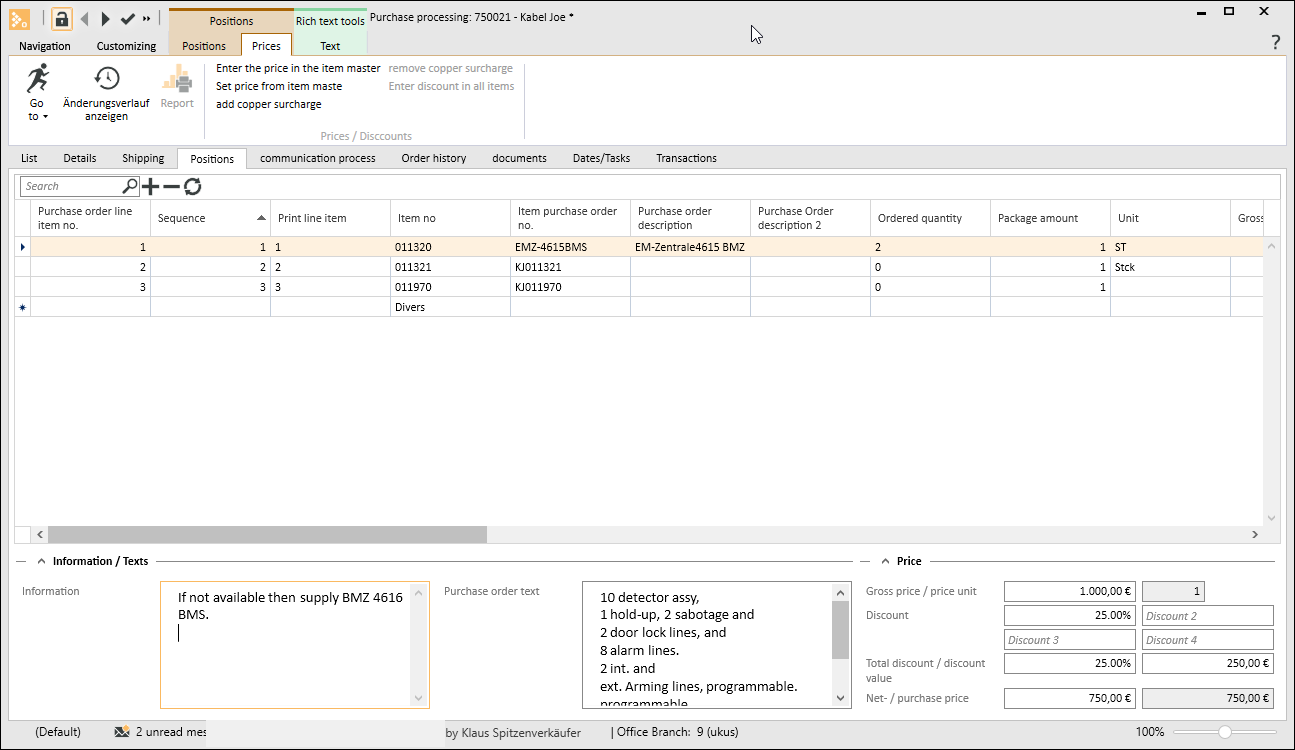
'Purchase order line items' list
Color meanings
Font color
Blue
No stock entry is envisaged for the purchase order line item.
Gray
The purchase order line item is completed.
Background colors
Red
The vendor's confirmed price is higher than the net price.
Green
The vendor's confirmed price is lower than the net price.
Orange
The ordered quantity was increased due to the pack quantity.
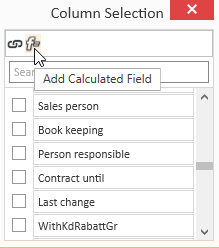
Column selection / Column editor
The columns to be displayed in a Data Grid can be set using the Column Selection dialog. To open Column Selection, right click on the table column header and choose Show Column Editor from the context menu.

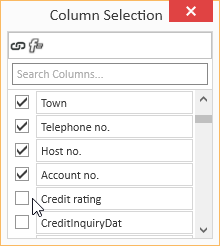
In the Column selection window, you can show the desired columns by activating the option in front of the column name.
Deactivate the check box in front of the column name to remove the column from the list view.
To save the list view layout, right click on the column header and select Save layout from the context menu.
Move columns / Change column order
Each user can set the column order individually. To move a column, click on the column and hold down the left mouse button, drag it to the desired position between two columns and release the mouse button (drag and drop).
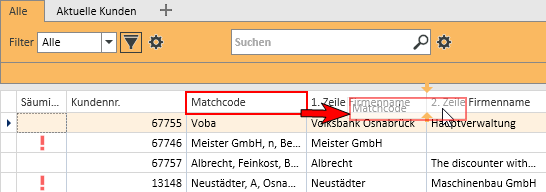
Suitable locations for inserting a column are marked with two colored arrows.
Optimum width
Adjusts the column width to automatically match the contents. Right click on the column header and select Optimum width from the context menu.
Use the Save layout function to permanently store the changed column width.
If you do not save the Layout after changing the column width, the column width will be reset when you restart the module.
Optimum width (all columns)
Adjusts the column width to automatically match the contents for all columns. Right click on the column header and select Optimum width (all columns) from the context menu.
Use the Save layout function to permanently store the changed column width.
If you do not save the Layout after changing the column width, the column width will be reset when you restart the module.
Column filters
You can use column filters to display only certain data sets from extensive lists.
You can use the column filters for example to display all the client data sets for a particular ZIP code. Only the ZIP codes that are already recorded for the client data sets will be displayed.
To filter the data sets, click on the desired column (for example ZIP code) and on the filter icon ![]() there.
there.
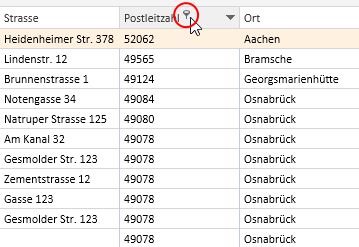
You will now see a list of all the recorded ZIP codes.
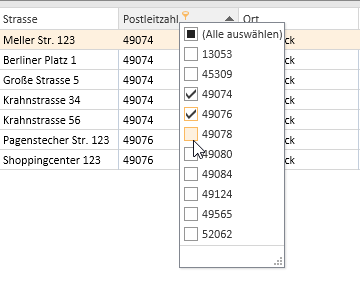
You can now select one or more values for the filter. There are also additional filters available (all, user defined, empty, not emptry).
If a filter is active for a column, this is indicated by the colored filter icon ![]() in the column header. Click on the icon to edit the filter.
in the column header. Click on the icon to edit the filter.
Sort order
The values in a column can be sorted in ascending or descending order by clicking on the table column header.
You can sort rows without changing existing sort conditions as follows:
-
Press and hold down the Shift key and click on the column header until an up or down arrow appears
-
Right click on the column header and select Ascending order or Descending order from the context menu.
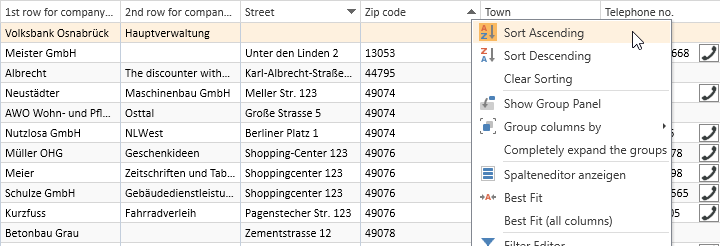
In the above example, the list is sorted by Zip code (ascending order) and additionally by Street (descending order). Thus, if there are several entries with the same Zip code, these entries will be sorted according to the Street field.
To remove a column from the sort criteria, press and hold down the Ctrl key and click on the column.
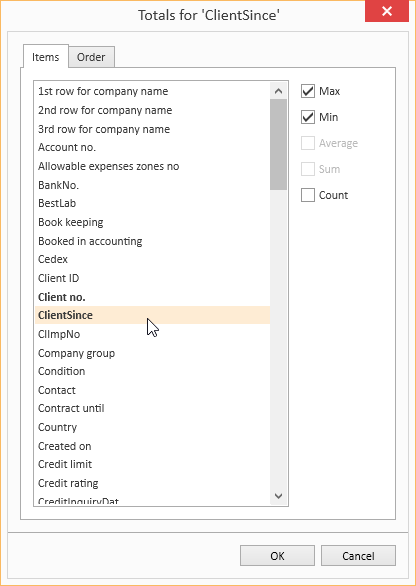
Column summaries
A column summary can be displayed below each column in the list.

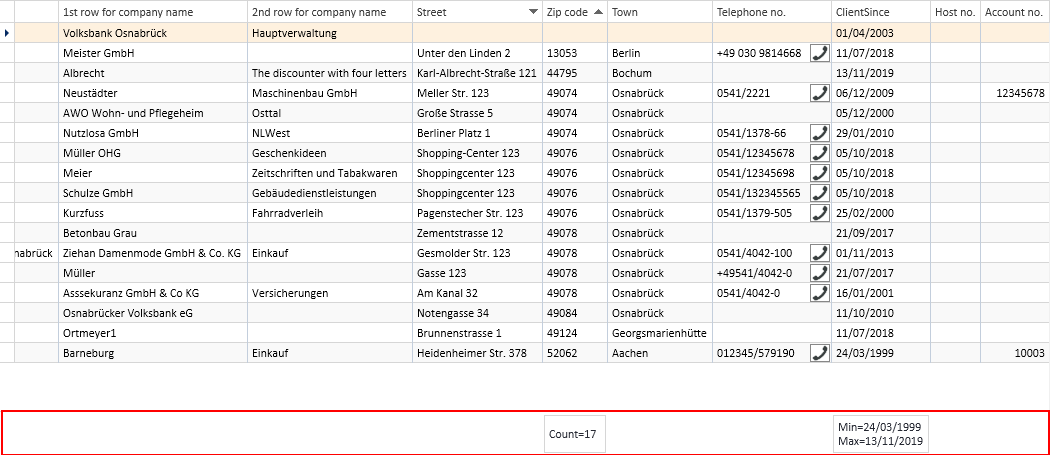
To configure this column summary, right click on the column header and select Show Sums from the context menu.
A Totals field is now shown below the list. Right click in this field to select the value to be displayed for this column.
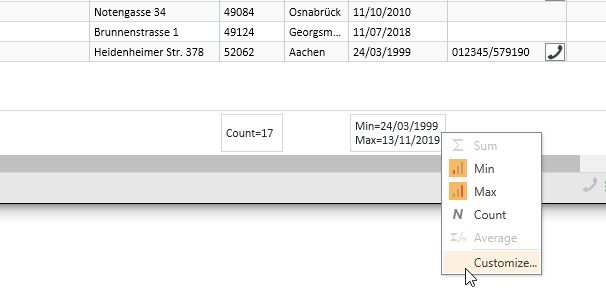
You can use the Customize... context menu command to make more detailed settings for the column summaries, including setting the Sort order and labeling when there are several sums.
Groupings
To group according to one or more columns, proceed as follows:
Method 1
- Right click on the column header and select Show grouping field from the context menu.
- Drag a column header into the Grouping field.
- You can drag additional columns into the grouping field to further subdivide a grouping.
- To remove the grouping, drag the column header from the group selection field and drop it back in the list or select the Remove grouping command in the context menu.
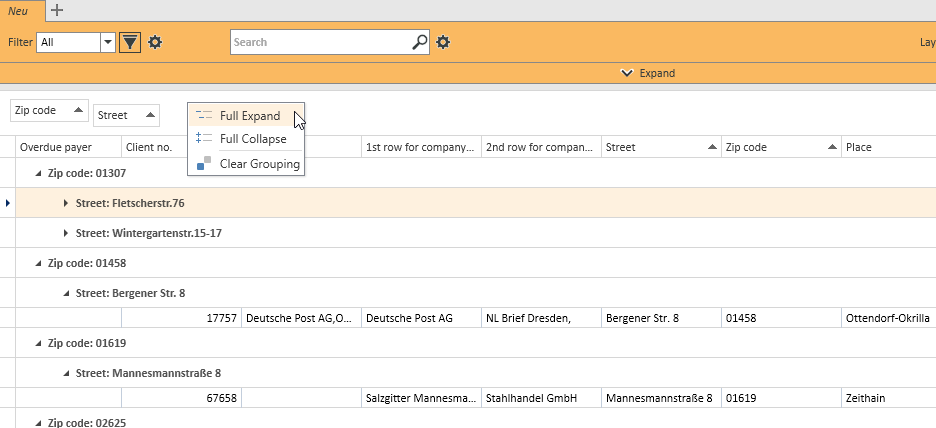
Method 2
Right click on the column header and select Group columns by from the context menu. You can now select whether to use the Standard grouping or grouping according to Initial letters.
To remove the grouping, right click on the column header or the particular column in the Group Selection field and select Remove Grouping from the context menu.
Grouping summaries
Summaries can be displayed for individual groupings.
To do this, right click in the column header in the Group Selection field and select Group Sum Editor from the context menu.
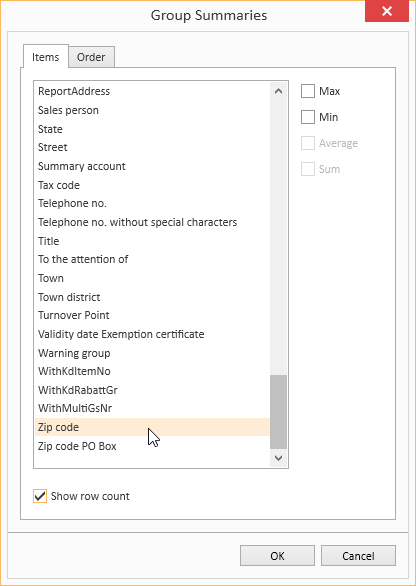
You can now define criteria for a Group Summary in the Group Selection dialog. You can use the Show number of rows option to display the number of data sets in a group.
Sort according to Grouping summaries
When a data grid has been grouped and a Grouping summary has been defined, the grouped data grid can also be sorted according to the values in the Grouping summary. Right click on the column header that is used for the grouping and select Sort by Group sorting from the context menu.
Calculated Fields
You can create Calculated fields in the Column editor. To do this, open the Column editor and click on the Add calculated field button.
First, you will be asked for a field name. Enter the header for the Calculated Field in the box. When you click OK to confirm the dialog, the Expression editor opens.
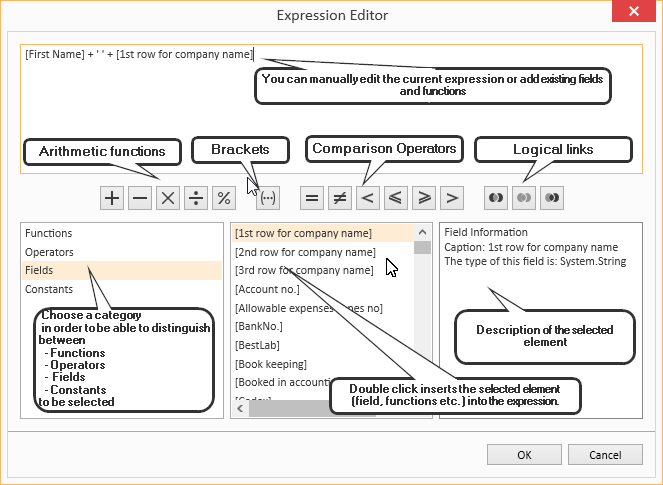
You can find a list of the functions and operators under Functions in Calculated fields.
To later edit the Expression, right click on the table column header of a Calculated Field and select Edit Expression from the context menu.
Iif(IsNullOrEmpty([Vorname]), [1. Zeile Firmenname], [Vorname] + + [1. Zeile Firmenname])In this example, the First name and Company 1 fields are combined into one field with a space between them, but only if the First name field is filled out. Otherwise, only the Company 1 field is output.
Field Background color
Data fields that meet certain conditions can be highlighted with a Background color.
To set Background colors for individual fields, right click on a column and select Background color from the menu.
You can now define a new rule. All the fields that match this rule will then be highlighted in the selected color.
The pencil icon opens the Expression editor. You can create more complex expressions with this editor. Also see Calculated Fields.
When you have successfully created a rule, close the window by clicking the OK button. The rule will be applied when you refresh the View.
Rule: [NoEmployees] < 30
Color: #FF009DFF
This rule colors all fields in the Client no. column blue if the number of employees entered in the corresponding data set is less than 30.
Using and Managing layouts
Right click on a column to open a context menu where you can access the Layout settings.
Load Layout
The Load layout command displays all the layouts that you have already created.
You can easily switch to another Layout here.
Save Layout / Save Layout As
When you Save Layout, the current View will be saved in the currently open Layout. All Expressions, Calculated Fields and Sort Groups will be included in this Layout and can be applied as required.
You can use the Save Layout As command to save the current View as a new separate Layout.
Specify the Layout properties for this.
Edit Layout
If you want to change the properties of the current Layout, select Edit Layout Properties from the menu. The Layout properties window opens. You can make the changes that you want here.
Reset Layout / Delete Layout
If the edited Layout is not what you want, you can undo the changes you made and revert to the original Layout by selecting Reset Layout from the menu. You can also use the Delete Layout command in the menu to delete a Layout entirely if you no longer want it.
Purchase order line item fields
The following fields are displayed in the list. The displayed columns and their order can be customized.
Purchase order line item no.
This field contains the internal line item number. The field content is an integer value. The spacing between individual values is chosen to be high enough for new line items to be inserted. A new line item will contain the value halfway between the line item number of the previous line item and that of the next line item.
Print line item
The Print line item field is filled out when a purchase order is printed and contains the print line item that also appears on the document. This is important to be able to answer questions about the purchase order without a copy of the printed document by using the screen display.
Item no.
Item number from the Item master data for the item in the purchase order line item.
Item purchase order no.
Vendor's item order number.
The purchase order number is taken from the Items | Vendors - 'Purchase order data' sub tab tab in the item master data.
Purchase order description 1 / Purchase order description 2
Vendor's item order description.
The entered data are taken from the Items | Vendors - 'Purchase order data' sub tab tab in the item master data.
Quantity ordered
Displays the quantity of a line item ordered.
Pack quantity
The pack quantity refers to the corresponding data in the item master data. The pack quantity of an item is recorded there in the corresponding field on the Items | Vendors - 'Purchase order data' sub tab tab.
This pack quantity Indicates the number of items in one pack when this is ordered from the vendor. Example: 10-bottle crate of mineral water
Certain settings must be made in the item master data if the pack quantity of an item is to be considered when printing a purchase order. If this information about the pack quantity for the item / vendor has been recorded, the vendor's pack quantity will always be checked and shown on the printout accordingly when the item is ordered.
The quantity is rounded up to a multiple of the vendor's pack quantity when the purchase order is generated.
The pack quantity for item X is 10 12 pieces of item X are required for an order. The pack quantity is taken into account when the purchase order is made, so two packs of item X will be ordered from the supplier on the printed order, making a total of 20 items in all.
You can view this information on the Items | Purchase orders | Line items tab. The Pack quantity and Actual quantity ordered (pieces) fields can be seen in the list.
However the ordered quantity shown on the printed purchase order is 2 (2 * pack quantity of 10 items) with the corresponding price of 20 * unit price of the item.
Unit of quantities
Shows the Quantity unit (QU) of the purchase order line item taken from the item master data.
Deliver from
Displays the earliest date from which the individual line item is to be delivered.
Deliver by
Displays the latest date from which the individual line item is to be delivered.
You can assign your own delivery date for an individual line item using the To deliver field.
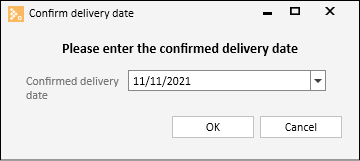
Confirmed delivery date
A confirmed delivery date from the vendor gives better control of stock entries and tracking of delays in deadlines.
The Set confirmed delivery date function in the Line items toolbar allows you to set a confirmed delivery date for all the line items marked in the list.
Net price
The net price calculation is rounded off according to the currency setting. This ensures that there are no inaccuracies in the determination of the total price (quantity * net price) for a line item.
Currency (used for pricing a line item)
You cannot subsequently change the currency. The vendor's currency is always used here, as it makes no sense to include different currencies in a purchase order.
Purchase price
The purchase price (PP) of the purchase order line item. This is: Purchase price = Net price in local currency.
Received quantity
The quantity of a purchase order line item already received.
Completed
If the line item has been completed, an entry is made under Completed.
You can flag individual line items in the list as completed, or use the Completed on / off function in the Line items toolbar to do this for the marked line items.
'Information / Texts' area
Information
You can enter additional information for the vendor in the Information field, which will be printed out in the purchase order (depending on the settings). For example, you could include an alternative item to be delivered if the booked item cannot be supplied.
The Text toolbar (rich text tools) provides additional functions for formatting the text.
Purchase order long text
The corresponding long text for purchase orders from the item master data (Items | Vendors - 'Purchase order data' sub tab tab) is displayed in the Purchase order long text text field.
The Texttoolbar (rich text tools) provides additional functions for formatting the text.
Functions for text editing are provided in the Text toolbar (ribbon) The toolbar is shownwhen the cursor is placed in a text field that supports the corresponding text functions.
Also see esRichTextBox
There are some combined key functions available for the text in an esRichText box, also see Keyboard operation.
'Format' area
The settings in the Format area determine whether the text can be edited with or without formatting. Depending on the selection, various functions will be shown in the toolbar.
Text only
Use the Text only format if you only want to edit the text without any formatting in the text field.

'Text' toolbar - 'Text only' format
Format
Use the Format format if you only want to edit the text with formatting and text mark ups in the text field.

'Text' toolbar - 'Format only' format
Context menu
Additional functions are provided in the context menu within the text field as well as the functions in the toolbar when you select Format. The context menu is opened with a right click.
Changing the format
You can readily switch from Text only to Format .
If you switch from Format to Text only, the formatting and inserted elements will be lost and a corresponding message will be displayed.
'Edit' area
Undo
Undo the last action.
Redo
Repeat the last action or restore the last undo.
Cut
Cut out the highlighted text and place it on the clipboard.
Copy
Copy highlighted text to clipboard.
Insert / Paste
Paste the text from the clipboard into the text field at the position of the cursor.
'Font' area
You can change the size, color, and many other attributes of the text in the Font area.
This area is only available if Format has been selected in the Format area.
Font
Select one of the fonts (typefaces) installed on your system.
When you select a font, make sure that it is one that is available on all the PCs that are used to run eserp.
Size
Specifies the font size in points. Select a font size from the list. To preserve legibility for most documents and users, use a font size of eight points or above.
Font color
Specifies the color of the marked text. Select a color from the field.
Text markup
Specifies the markup for the marked text (for example bold or italic).
Bold
B -> Bold
Italic
I -> Italic
Underline
Indicates if the marked text is underlined The underline is in the same color as the font.
Crossed through
Draws a line through the marked text.
Subscript
Sets the marked text below the baseline and reduces the font size if a smaller size is available.
Superscript
Elevates the marked text above the baseline and reduces the font size if a smaller size is available.
'Paragraph' area
The text justification and list formats are set in the Paragraph area.
This area is only available if Format has been selected in the Format area.
Justification
Left
Select Left to align the text against the left margin with a ragged right edge (or press the key combination Ctrl + L).
Centered
Select Centered to align the text to the center line with a ragged left and right edge (Ctrl + E).
Right
Select Right to align the text against the right margin with a ragged left edge (Ctrl + R).
Justified
Select Justified to align the text against the left and right margins and insert additional space between words so that each line is the same length (Ctrl + J).
Bullets
You can convert text to a list by marking the text and selecting Bullet list or Number. Every line or paragraph is converted into a bullet point.
If you select Number, the lines / paragraphs will be numbered consecutively. If you select Bullet list, a bullet is placed in front of each line / paragraph.
'Actions' area
Check spelling
Checks the spelling of the text.
Spellcheck for eserp
The Hunspell open source dictionaries are used in eserp for spellchecking.
You can find more information at https://github.com/hunspell/hunspell.
Hunspell is an open source spellchecker that is used in LibreOffice, OpenOffice, Firefox, Thunderbird, and Google Chrome as well as in such products as OS X, Adobe InDesign, or Opera.
Dictionaries are available for spellchecking in many languages.
When eserp is installed, the dictionaries for some languages such as English and German (including some variants) are saved in the dictionaries directory of the installation folder.
When you add terms / words during spellchecking, these will be saved to the user defined dictionaries.
The user defined dictionaries are found in: C:\Users\<username>\AppData\Local\es2000 Errichter Software GmbH\".
Dictionaries for language variants, such as Canadian English, or other languages such as Italian or French can be downloaded from the OpenOffice website, for example. Supplementary dictionaries are also available for some industries.
For these, select the following link: https://extensions.openoffice.org/ (Dictionaries)
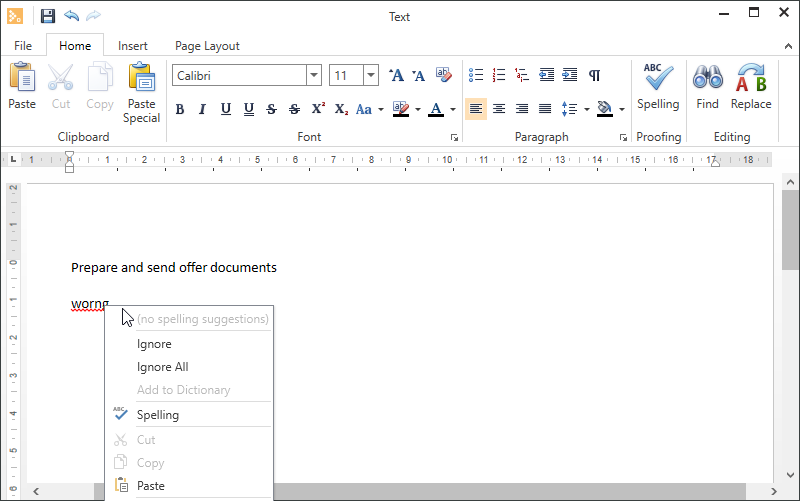
Permanent spellcheck
Spellchecking is performed as you type the text. Words that are not found in the dictionary are underlined with a red wavy line.
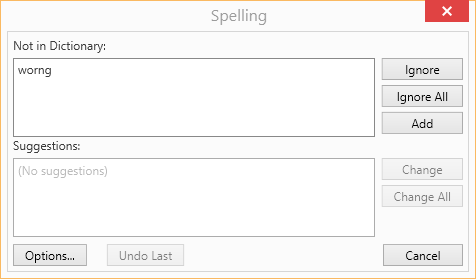
Right click on the word to see suggestions from the dictionary, add the word to the dictionary, or ignore the word.
Check spelling
The Check spelling function is available in text fields, the extended text editor, and the text field context menu.
You can check the spelling of a text using this function.
Page view
Opens the text in an extended editor. Here you can print out the text, save it, and insert additional elements (images, tables, icons, etc.)
The expanded text editor allows you to print out the text, save it, and insert additional elements (images, tables, icons, etc.)
The range of functions corresponds to that of common text editor programs such as OpenOffice, LibreOffice or Microsoft Word.
File menu

Start menu

Insert menu

Page layout menu

'Special actions' area
Insert document link
You can insert a link to a file in the document management system (DMS) using this function. The DMS file search function opens for you to select the file.
Select the desiredfile and then click on the ![]() Apply button.
Apply button.
For the format setting Text only, the link is inserted in the format eso://Document?id=29. If the Format setting is used, a clickable link is inserted (underlined colored text).
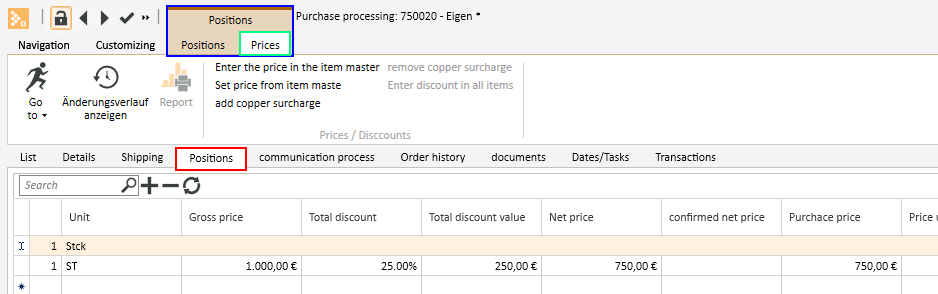
'Price' area
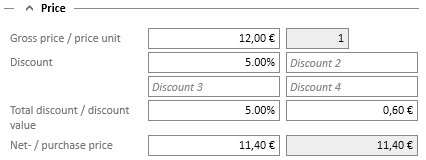
Gross price / Price unit
The gross price of a purchase order line item referred to the price unit can be entered here. When an item is included from the item master data, the corresponding information from there is entered here.
Enter a percentage discount here. The net price is then calculated automatically based on the gross price minus the entered discount. This makes it possible to process a special discount for each line item in the purchase order separately. The first time that an item is added into a purchase order, the delivery discount is taken 1:1 from the item master data and not recalculated automatically.
In addition to calculaing the net price, it is also possible to calculate the discount or the gross price. This of course requires that the other fields have been completed in each case.
It is also possible to record multiple discounts for the purchase order line items here. There are three additional discount fields provided for this purpose (Discount 1, Discount 2, Discount 3, and Discount 4).
Calculation of multiple discounts is done using the formula:
Net price = Gross price*(100-Discount1)*(100-Discount2)*(100-Discount3)*(100-Discount4)
Net / purchase price
If the net price (see Discount) is calculated, it is entered automatically in the P price (purchase price) field.
Functions / Toolbars
Various functions are provided in the toolbars (ribbons / ribbon bars) above the tabs.
The toolbar structure depends on the current module / tab.
Some toolbars are only shown when you edit certain fields, such as the Text toolbar when you edit rich text fields.
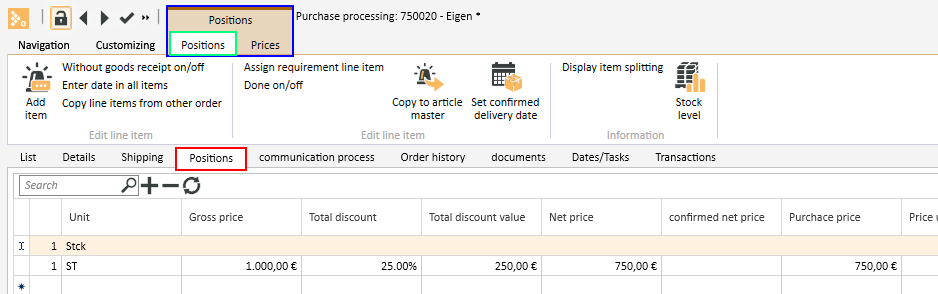
'Line items' toolbar
There are two different toolbars (Line items and Prices) with corresponding functions on the Items | Purchase orders | Line items tab. Switching between them is done via the upper tab.
'Line items' function tab
'Edit line items' area
![]() Add items
Add items
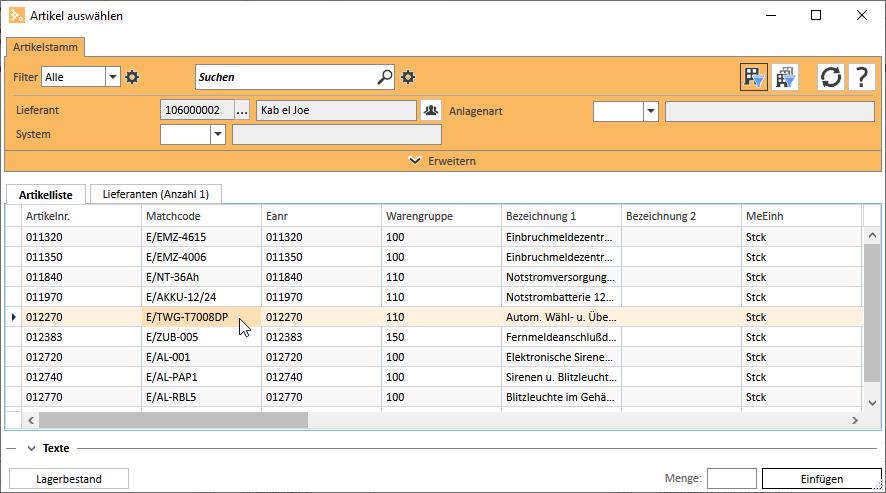
You can add a further purchase order line item from the item master data to the purchase order using the ![]() Add items button. The item search assistant is opened for selecting an item. The filter is already set to the vendor entered for the purchase order.
Add items button. The item search assistant is opened for selecting an item. The filter is already set to the vendor entered for the purchase order.
Without stock entry on / off
The Without stock entry on / off button enables a line item to be marked as a line item without stock entry. As far as the stock entry is concerned, this line item is considered as completed right from the start (for example items that are not managed in the warehouse, but are nevertheless ordered from the vendor). These line items are shown in blue.
Enter date in all line items
If you have selected / entered a date in the Deliver from or Deliver by column, you can use this function to enter the date for all the other purchase order line items.
The cursor must be positioned in the field with the newly entered date, otherwise the function cannot be selected.
Copy line items from another purchase order
You can copy purchase order line items from other purchase orders using this function.
After clicking the button, first select a purchase order on the Purchase orders tab in the Copy purchase order line items window.
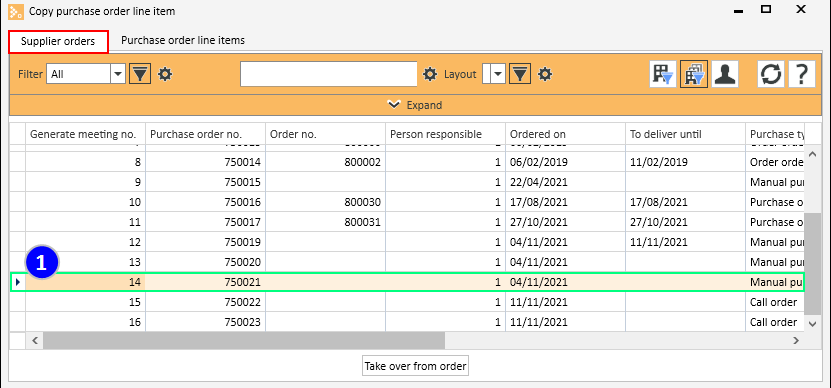
Switch to the Purchase order line items tab.
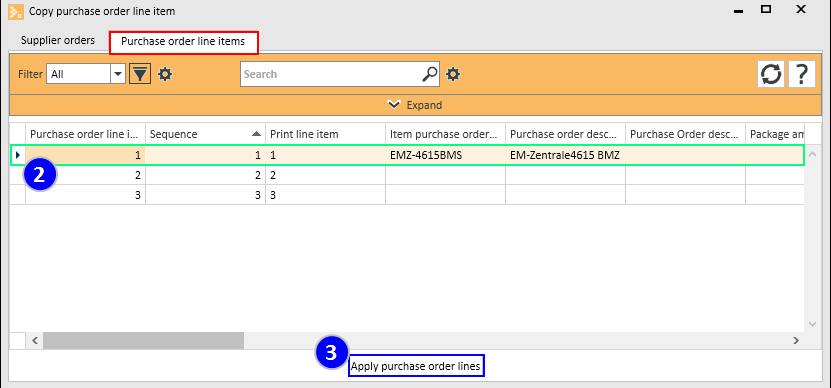
You can mark the desired purchase order line items here and copy them into the current purchase order using the Apply from this order button.
'Edit line item' area
Assign requirement line items
This function enables assignment of a purchase order line item to an order requirement line item. The orders are searched for a requirement line item corresponding to the marked line item and this will be suggested for assignment. The selection can be further restricted using filters.
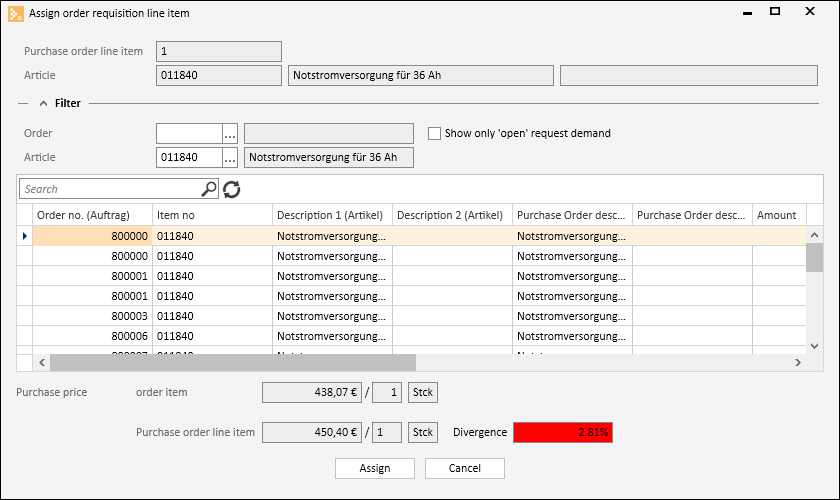
All the requirement line items are shown in this dialog. A requirement line item can then be assigned using the Assign button.
For each Requirement line item, the
- Item no.
- Item description 1 and Item description 2 from the item master data,
- Purchase order description 1 and Purchase order description 2 for the particular vendor from the Items | Vendors - 'Purchase order data' sub tab tab,
- data for the associated order line item (Line item ID, Print line item, Item no., and Description 1 and 2),
when it is opened.
Additionally, the requested quantity, open quantity, ordered quantity, and the Deliver by date from the requirement line item are shown.
The purchase price check is made through the purchase price from the order line item. The percentage difference is displayed in color.
Functionality
The items marked in the list are shown in the header of the Assign order requirement line items window. A requirement line item is assigned to this item.
All the order line items are shown in the list. The list can be restricted using the Order, Item, and Open order requirements only filters
Position on the item line item in the table that you want to assign to the line item in the header of the window. The particular purchase price (PP) of the line items is shown at the bottom of the window.
Click on the Assign button to assign the ItemIDno to the order line item of the miscellaneous line item.
Completed on / off
You can set an individual line item from the entire purchase order to completed using this Completed on / off button. A security prompt asking if you really want to set this line item to completed will be displayed. If line items have already been set to completed and you click this button, a security prompt is again displayed. This time, the promt asks you if you really want to set the line item to uncompleted.
![]() Include in item master data
Include in item master data
You can record a purchase order line item recorded manually in the purchase order process as an item in the item master data with this function. This makes sense only if the item is to be used again often in the future.
![]() Set confirmed delivery date
Set confirmed delivery date
If you have received a confirmed delivery date from the vendor, you can enter this in the Confirmed delivery date field for all the marked line items.
'Information' area
Show line item breakdown
The Order assignment window is opened using the Show line item breakdown button. Here you can display the order numbers belonging to each particular purchase order line item. As well as the order number, the warehouse, commissioned quantity, and any reservations, etc. are also displayed.
The requested quantity can be edited if this dialog is opened from the purchase order and there is more than one data set for this item in the BePosAuf table in the database. The new total quantities resulting from this are immediately entered in the purchase order line items.
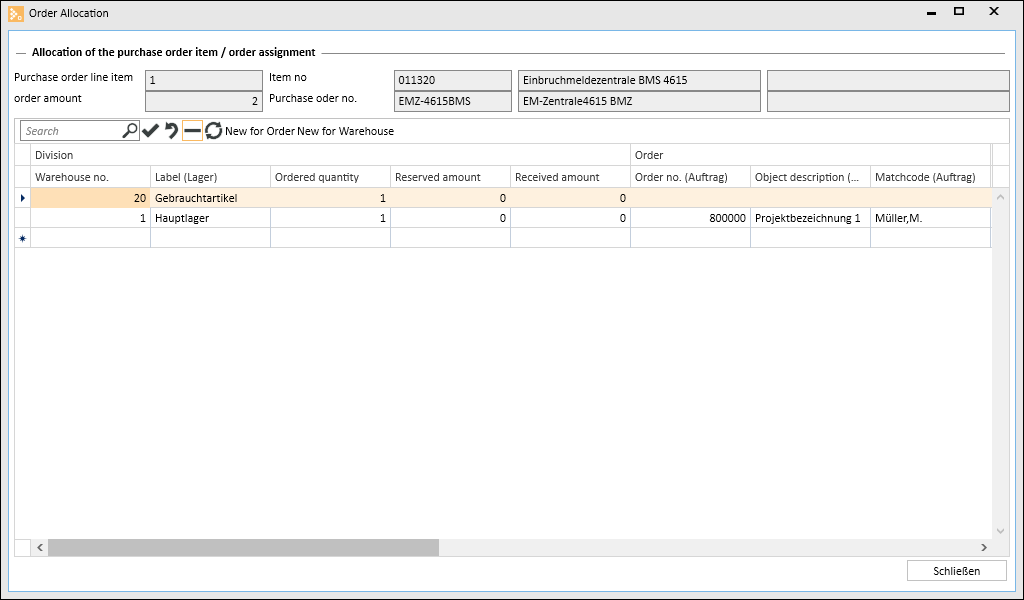
You can change the breakdown of the purchase order line items using the ![]() Remove breakdowns button. You can use the New for order button to allocate an order requirement line item and the New for warehouse button to allocate a line item to a warehouse.
Remove breakdowns button. You can use the New for order button to allocate an order requirement line item and the New for warehouse button to allocate a line item to a warehouse.
The totals of the breakdown quantities must be equal to the quantity of purchase order line items (Ordered quantity) after the changes have been made, otherwise the changed breakdown cannot be saved.
![]() Stock levels
Stock levels
You can display the current warehouse stocks of the selected item in a separate window (warehouse stocks dialog) at any time using the Warehouse stocks button.
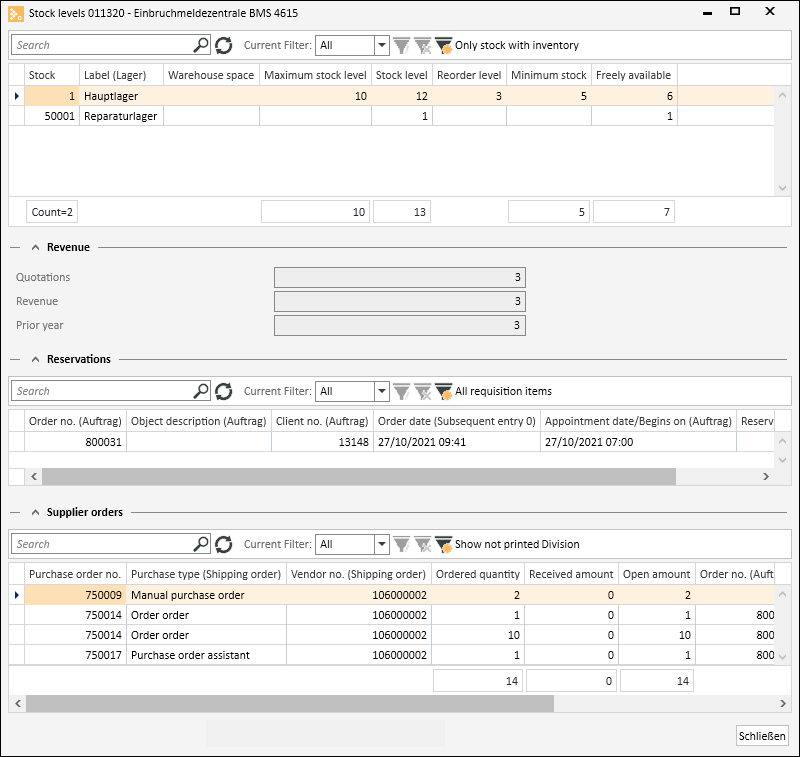
The current item number and item description 1 are shown in the header of the Warehouse stocks window.
You can leave the window open and select a different item in the list. The display of the warehouse stocks will be updated accordingly.
'Stock levels' area
The stock levels of the item in the various warehouses are shown here.
You can customize the layout of the list and save it using the Save layout command in the context menu.
The display can be restricted using the search and filter functions.
Background color meanings
Red: Item stock level is less than or equal to zero.
Yellow: Item stock level is less than the minimum stock level.
Blue: No available stock for the item.
'Turnover' area
The Turnover area is shown if the Warehouse stock dialog with offer and revenue amount option under Settings | Items | Warehouse management | Settings - 'General' area is activated.
Here you can display the quantity of the item in open offers (Offers) as well as the turnover quantities for the current year (Turnover) and the previous year.
'Reservations' area
The Reservations area is only shown if the With item reservation option under Settings | Items | Warehouse management | Settings - 'General' area is activated.
The existing reservations for the selected item are shown in this area. You can use the Go to context menu command to open the associated order.
You can customize the layout of the list and save it using the Save layout command in the context menu.
The display can be restricted using the search and filter functions.
'Purchase orders' area
The open purchase orders for the selected item are shown here. You can use the Go to context menu command to open the associated purchase order.
You can customize the layout of the list and save it using the Save layout command in the context menu.
The display can be restricted using the search and filter functions.
'Prices' function tab
![]() Go to
Go to
There is a general Go to function in eserp that allows you to jump to the associated modules.
You can use the Go to function to jump to other modules that are connected to the current process.
You can jump directly from a Client data set to the Systems or Contracts for the Client.
The ![]() Go to button in the Navigation toolbar is used to execute the Go to function.
Go to button in the Navigation toolbar is used to execute the Go to function.
Click on the ![]() icon in the button to display the available Go to targets.
icon in the button to display the available Go to targets.
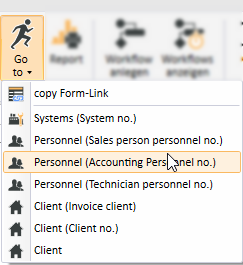
When you click on an item in the list, the corresponding module opens with the linked data set.
Go to in the Context menu
The Go to function is also available at many points in the program in the Context menu that is opened with a right mouse click.
![]() Report
Report
Reports can be used to print out or send the displayed information for an address or process. The reports that are registered for the current program point are displayed when you click on the Report button.
Also see Registration
'Prices / Discounts' area
Enter price in item master data
Select this function if you have adjusted the price of a purchase order line item and want to enter this price in the item master data.
Items | Item management | Edit item PP or Items | Item management | Edit items (own OB only) (incl. PP) authorization is required for the Enter price in item master data function.
A security prompt is displayed before the prices are actually entered.
Set price from item master data
You can use this function to reload the prices and pack quantity for the particular item from the item master data.
This is useful if you have changed the prices after the purchase order was created and you want to use these changed prices in the purchase order.
Add copper surcharge
Adds the copper price to the current purchase order line item.
You can edit the copper price for the purchase order on the Items | Purchase orders | Details - 'General' area tab. The copper price from the basic settings (Settings | Items | Item management | Settings - 'General' area) is entered by default when a purchase order is created.
Remove copper surcharge
You can remove the copper price from all the line items to which it has been added (Add copper surcharge function) using the Remove copper price button.
Enter discount in all line items
You can add a discount to all the line items in a purchase order with this button. This enables you to request and monitor negotiated discounts from the vendor as quickly as possible through the purchase order.
'Edit data set' area
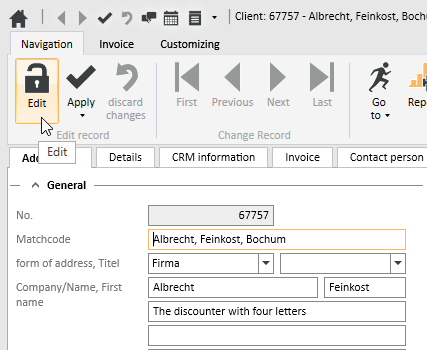
![]() Edit
Edit
Click on the ![]() Edit button to switch the Form to Edit mode.
Edit button to switch the Form to Edit mode.
The usual Input elements are available in Edit mode.
If data has been changed and you close the form or change to another data set, a message will be displayed asking you if you want to save the changes or not.
Changes can be undone by clicking the ![]() Reject changes button as long as input has not been actively saved or the form has not been closed or the data set changed.
Reject changes button as long as input has not been actively saved or the form has not been closed or the data set changed.
Detail data sets can also be opened directly in Edit mode. To do this, deactivate the Do not automatically edit detail data option under Settings | General | General | Settings | System settings - 'Program behavior' area.
Also see Edit Data Set
![]() Apply
Apply
You can always actively save changes in the data by clicking the ![]() Apply button.
Apply button.
![]() Apply and close
Apply and close
You can save the changed data and close the entry form / module in one go with the ![]() Apply and close function.
Apply and close function.
![]() Reject changes
Reject changes
Changes can be undone by clicking the ![]() Reject changes button as long as input has not been actively saved or the form has not been closed or the data set changed.
Reject changes button as long as input has not been actively saved or the form has not been closed or the data set changed.
'Change data set' area
Each detail view contains a copy of the current list view for the module. This can be viewed on the List tab in the Detail view. This enables you to also navigate through the original list in the Detail View using the navigation buttons.
If a filter or search is active when you open the detail view, this will also be applied to the display on the List tab.
![]() First
First
Jumps to the first data set in the list. The sort order on the List tab is used.
![]() Previous
Previous
Pages back to the previous data set in the list. The sort order on the List tab is used.
![]() Next
Next
Pages forward to the next data set in the list. The sort order on the List tab is used.
![]() Last
Last
Jumps to the last data set in the list. The sort order on the List tab is used.
'Purchase order' area
![]() Book
Book
You can book and print out / send the current purchase order with this function.
First specify the report for issuing the purchase order.
When you issue the purchase order, you can decide whether to send it or print it out. Click on the corresponding button (Send or Print).
If you select Send, the purchase order can be sent as an email or as a file in openTRANS format.
Also see
Minimum order value
A check is made before printing, sending, or displaying a purchase order to see if the purchase order is less than the vendor's minimum order value.
The net prices of the individual line items are used to determine the order value of a purchase order.
If the purchase order is less than the minimum order value, you will be prompted to confirm that you want to print (send, display) the purchase order. The purchase order will not be printed (sent, displayed) without confirmation.
Where several purchase orders are printed at the same time, missing confirmation for one order will not affect the other orders.
In the next step, you can select the display options for issuing the purchase order. The booking process is started and the purchase order is issued in the desired manner when you click on the OK button.
This function is used to influence the appearance of the printout / display of a purchase order.
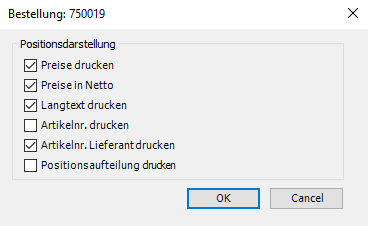
Print prices
If Print prices is activated, prices with a value of $0.00 will also be printed out. This may be necessary for example if the order pertains to a guarantee delivery or free delivery from the vendor where the ordered material does not have a price.
Net price
The net prices of purchase order line items are output if this option is activated.
Print long text
The item purchase order long text for each purchase order line item is output if this option is activated.
You can record the Purchase order long text for an item for each vendor on the Items | Items / Services | Vendors - 'Purchase order data' sub tab tab.
Print item no.
The item number from the item master data is also output for each purchase order line item if this option is activated.
Print vendor's item no.
The vendor's item number (order number) is also output for each purchase order line item if this option is activated.
The vendor's item numbers can be recorded for each vendor on the Items | Items / Services | Vendors - 'Purchase order data' sub tab tab in the Order no. field.
Print line item breakdown
If the quantities for a purchase order line item are assigned to different orders, you can activate this option to print out the quantity for each order with the associated order number in addition to the total quantity ordered.
![]() Preview
Preview
You can display a print preview of the particular purchase order using the ![]() Preview button. You can alter the appearance of the purchase order using the display options.
Preview button. You can alter the appearance of the purchase order using the display options.
This function is used to influence the appearance of the printout / display of a purchase order.
Print prices
If Print prices is activated, prices with a value of $0.00 will also be printed out. This may be necessary for example if the order pertains to a guarantee delivery or free delivery from the vendor where the ordered material does not have a price.
Net price
The net prices of purchase order line items are output if this option is activated.
Print long text
The item purchase order long text for each purchase order line item is output if this option is activated.
You can record the Purchase order long text for an item for each vendor on the Items | Items / Services | Vendors - 'Purchase order data' sub tab tab.
Print item no.
The item number from the item master data is also output for each purchase order line item if this option is activated.
Print vendor's item no.
The vendor's item number (order number) is also output for each purchase order line item if this option is activated.
The vendor's item numbers can be recorded for each vendor on the Items | Items / Services | Vendors - 'Purchase order data' sub tab tab in the Order no. field.
Print line item breakdown
If the quantities for a purchase order line item are assigned to different orders, you can activate this option to print out the quantity for each order with the associated order number in addition to the total quantity ordered.
![]() Online Suppliers Comparison
Online Suppliers Comparison
Confirmed order information such as prices and delivery dates for online orders can be compared with the purchase order reference using the Online Suppliers Comparison function when you use an online interface for suppliers (eswawi, ITscope, etc.).
Completed on / off
You can use the Completed on / off button to set an entire purchase order including the associated line items to Completed.
This function can also be used to set completed purchase orders to uncompleted.
![]() Go to
Go to
There is a general Go to function in eserp that allows you to jump to the associated modules.
You can use the Go to function to jump to other modules that are connected to the current process.
You can jump directly from a Client data set to the Systems or Contracts for the Client.
The ![]() Go to button in the Navigation toolbar is used to execute the Go to function.
Go to button in the Navigation toolbar is used to execute the Go to function.
Click on the ![]() icon in the button to display the available Go to targets.
icon in the button to display the available Go to targets.
When you click on an item in the list, the corresponding module opens with the linked data set.
Go to in the Context menu
The Go to function is also available at many points in the program in the Context menu that is opened with a right mouse click.
![]() View change history
View change history
Program areas for which a detailed change history is to be recorded can be activated from Tools | Database logging. A report stating when data sets were deleted can be produced for each area. When the detail log function is activated, the report also states what kind of data sets were deleted.
This report is recorded in the report entry point Data set change history (Groups).
A report can be displayed from the Data set change history report entry point using the ![]() Show change history button. This function is also available in lists / tables via the context menu so that you can display the changes in the detail data sets.
Show change history button. This function is also available in lists / tables via the context menu so that you can display the changes in the detail data sets.
The Data set change history and Data set change history (Groups) report entry points are only shown when the license for esLog is present and the table RevGrup exists.
![]() Report
Report
Reports can be used to print out or send the displayed information for an address or process. The reports that are registered for the current program point are displayed when you click on the Report button.
Also see Registration
'Workflow' area
![]() Create workflow
Create workflow
Previously defined workflow processes can be selected and started using this button. Only the workflow processes that are assigned to the current process type or to no process type will be displayed.
![]() Show workflow
Show workflow
This button displays the workflows that have already been started.
![]() Close
Close
Closes the current form / module.
A message will indicate if there are any unsaved changes.
You can then decide whether to save the changes (Yes), reject the changes (No) or cancel the Close command (Cancel).
The Customize (0110250) license is required for customizing.
The optional esCustomize allows the following control element properties to be adjusted:
- The order and visibility of input and control elements
- The labeling of control elements
- The layout of control elements (color, text width)
- The brief hint text for control elements
- The data linking of control elements
It is also possible to create new fields and add them to the Form.
![]() Start customizing
Start customizing
Click on the ![]() Start customizing button to switch the current form to Customizing mode.
Start customizing button to switch the current form to Customizing mode.
The Form is always customized in the context of the current role that is being used (see Role assignment).
To find out how to change the role, please see: Role assignment.
General | Administration | General references - Customize forms authorization is required to customize forms.
Also see Customizing forms
Apply customizing from role
Click on the Apply customizing from role button to apply the customizing settings already defined for another role to the current form. A selection of the customizing properties defined in other roles is shown.
![]() Edit fields
Edit fields
You can edit certain properties (required field, font color, background color, default values) of the input fields in a form / module using the Edit fields function. Also see Required fields and Default values.
You can also create your own fields and user defined data packs, also see Create individual fields.
![]() Role management
Role management
This button opens management of customizing roles.
Customizing roles can be created and managed under Settings | General | Customizing | References | Customizing - Roles.
Functions when the Customizing process is running
Three additional buttons are shown after you start Customizing:
![]() Apply
Apply
This function saves the temporary customization and closes Customizing mode.
You must close and restart the program for the changes to be visible to the user.
![]() Cancel
Cancel
Use this button to Cancel the Customizing process. Customizing mode closes without saving the changes you made to the forms.
![]() Reset
Reset
This function resets Customizing and loads the default settings for the form. The reset is performed only after you have confirmed the query dialog that is displayed.
The current Customizing settings are deleted by the reset and cannot be retrieved.
General | Administration | Reset form customizing authorization is required to reset Customizing.